
- Guide – Maintenance
Racking repair after inspection: from findings to return to use
By Tobias Schott · 23-minute read · Updated October 2026
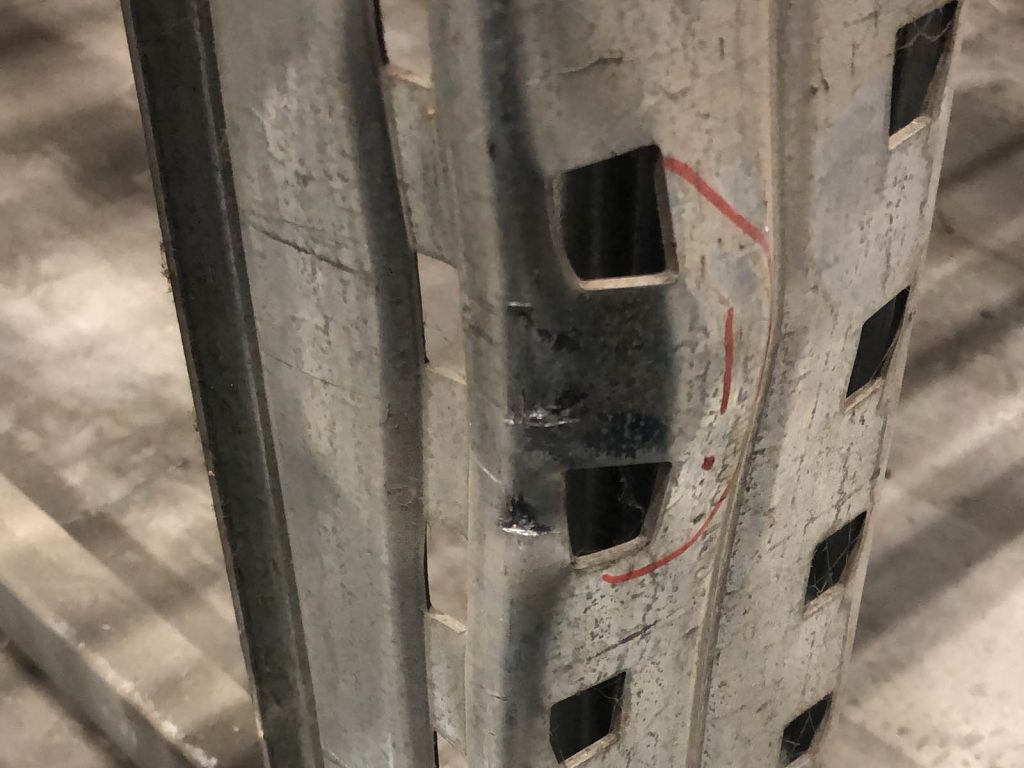
Racking repair starts where the racking inspection ends. The inspector records and classifies the damage, the installation contractor replaces damaged components to the manufacturer’s specification, and the racking only goes back into use after a re-inspection.
The racking inspection is over, and there is a defect list on your desk. Three uprights hit, one beam bent, several beam locks missing, and the impact protection torn off at one end of a run. Two bays are marked red and already isolated. Now the racking repair begins – and with it a number of practical questions.
Who is allowed to replace the parts? Where do the right spare parts come from? Does all the racking have to be empty, or is one aisle enough? And who decides at the end that the pallet positions can be used again? Every day these questions stay open costs pallet positions and throughput.
This guide takes you from the findings to the repair. How racking is inspected, who may inspect it and which limits apply is covered in our overview guide to racking inspection. This guide covers the next step: what is repaired, how, in what order and with which parts.
We write as an installation and maintenance contractor from Rodgau near Frankfurt. We repair based on the findings and the manufacturer’s specification – and because we have our own competent person for racking inspections, we can also carry out the inspection and the re-inspection on request. Sign-off for use stays with the operator.
Key points at a glance
- The racking inspection is carried out by a competent person (befähigte Person), who records the damage, classifies it and decides after the repair whether the racking can be used again.
- The installation contractor carries out the repair: it replaces uprights, beams, beam locks, base plates, floor anchors and impact protection to the manufacturer’s specification.
- The inspector’s risk levels set the order: red is offloaded and isolated at once, amber repaired promptly, green marked and monitored.
- Damaged components are replaced, not straightened; only original parts or parts approved by the manufacturer are fitted.
- Before any work starts, the affected bay is offloaded and isolated; in a live warehouse the work moves aisle by aisle.
- After the repair, the installation contractor records what was replaced and the inspector re-inspects – only then does the operator return the racking to use.
- Where the same spot is hit again and again, floor-anchored impact protection is part of the repair.
What is a racking repair?
A racking repair restores a racking installation after identified damage: damaged components are replaced or added to the manufacturer’s specification so that the racking can again carry the load it was designed for.
Technically, it is corrective maintenance – bringing the installation back to a serviceable condition. Some call it racking reinstatement. It means the same thing: the findings are in, and now it is time to act.
It differs from two neighbouring tasks. The racking inspection establishes what is damaged and assesses it. A racking conversion changes an intact installation – different beam levels, extra bays, new runs. A repair, by contrast, restores the original condition without changing the configuration.
Who inspects, who repairs, who signs off?
Three roles interlock in every repair. If you mix them up, you end up with repaired racking that nobody is prepared to sign off.
| Role | Task | Who typically does it |
|---|---|---|
| Inspect and assess | Record damage, classify by risk level, re-inspect after the repair | Competent person, often called a racking inspector |
| Repair | Arrange offloading, isolate, replace components, align, anchor, document | Installation contractor or racking manufacturer |
| Sign off and operate | Order isolation, commission the inspection, return the racking to use after the inspection | Operator, usually warehouse management or maintenance |
We can take on two rows of this table: the repair and – with our own competent person – the inspection and re-inspection. Whether an operator wants inspection and repair from one contractor or prefers to award them separately is their decision; both are common. Sign-off for use always rests with the operator.
From findings to action: reading the risk levels
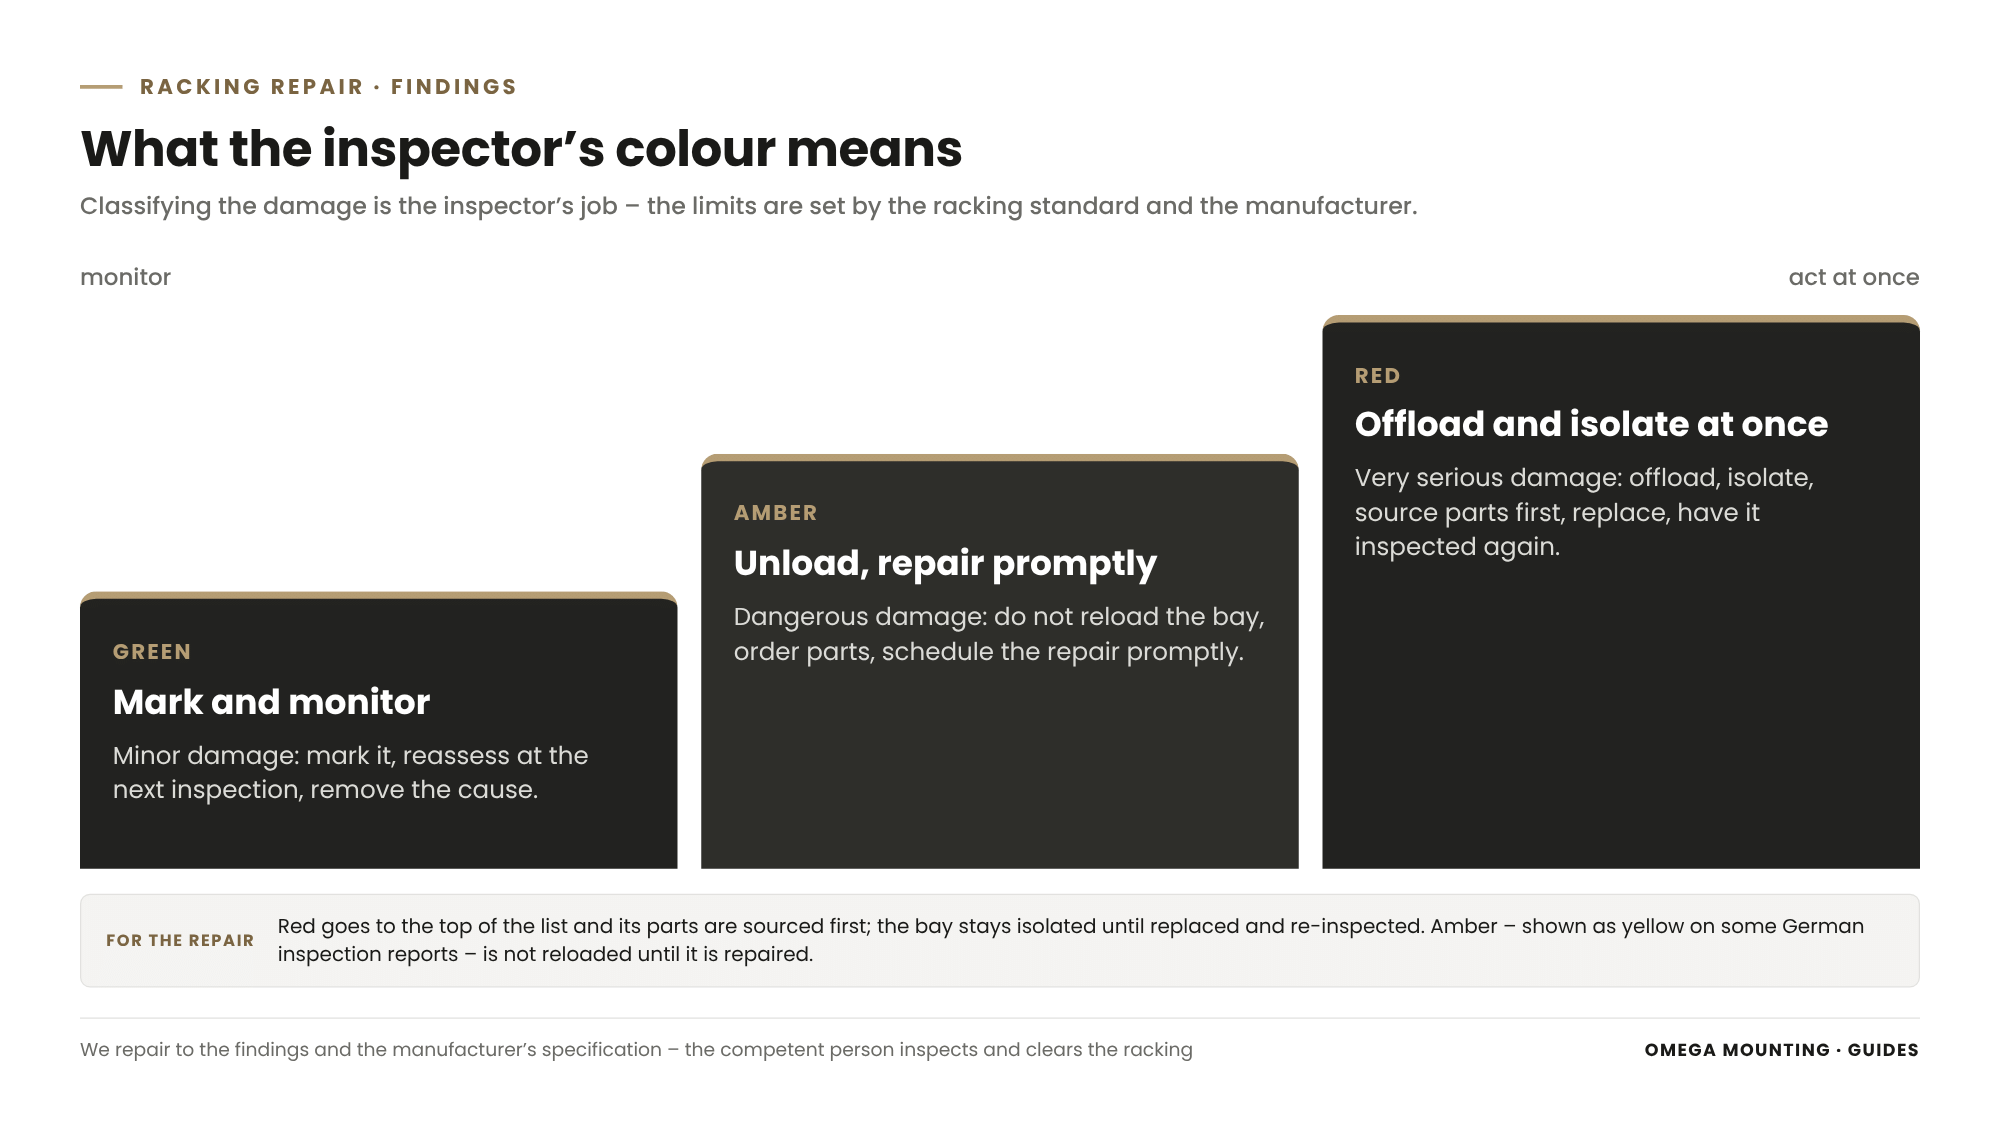
The inspector’s risk levels decide the order and speed of the repair. Red means offload, isolate and replace at once; amber means unload and repair promptly; green means mark and reassess at the next inspection.
The classification itself is the inspector’s job. The inspector measures the deformation and compares it with the limits in the racking standard and the manufacturer’s data. These limits are set out in our guide to racking inspection and the green, amber and red risk levels. For the repair, what matters is what follows from the colour.
Red: offload and isolate at once
A red finding is very serious damage. The affected bay is offloaded and isolated immediately, before anyone talks about dates. It stays isolated until the component has been replaced and the inspector has cleared the bay again. For the repair, red means: this finding goes to the top of the list, and its parts are ordered first.
Amber: unload and repair promptly
Amber – shown as yellow on some German inspection reports – is hazardous damage that must be put right soon. The bay is unloaded and must not be reloaded before the repair. We combine these findings with the red ones in a single visit if the parts arrive in time. That turns the defect list into one work package rather than a series of separate visits.
Green: mark and monitor
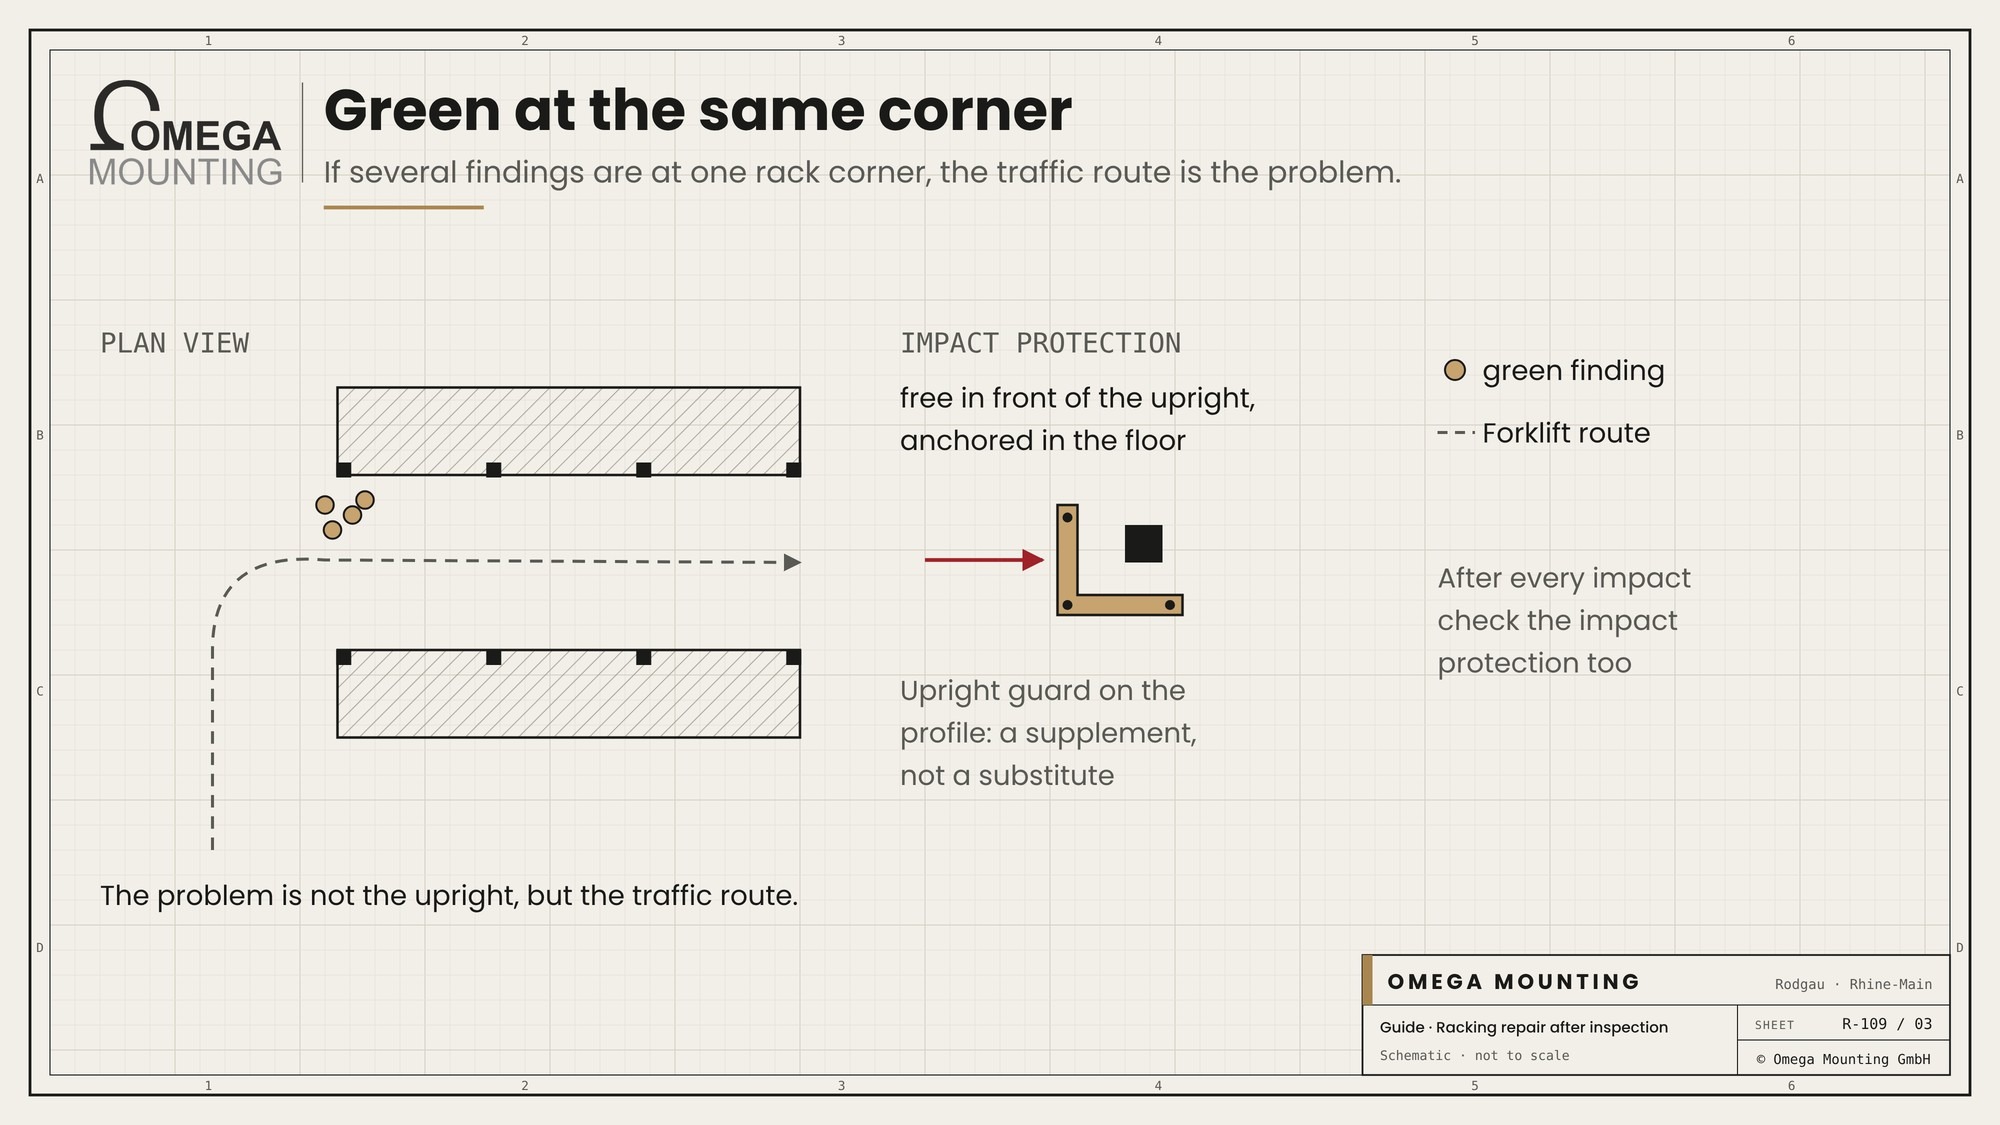
Green means the component is still considered safe. It is marked and recorded but not replaced immediately. Green findings are still worth a look: if several sit at the same end of a run, that spot is being hit regularly. Then the problem is not the upright but the traffic route – and impact protection belongs in the plan.
Making the defect list usable
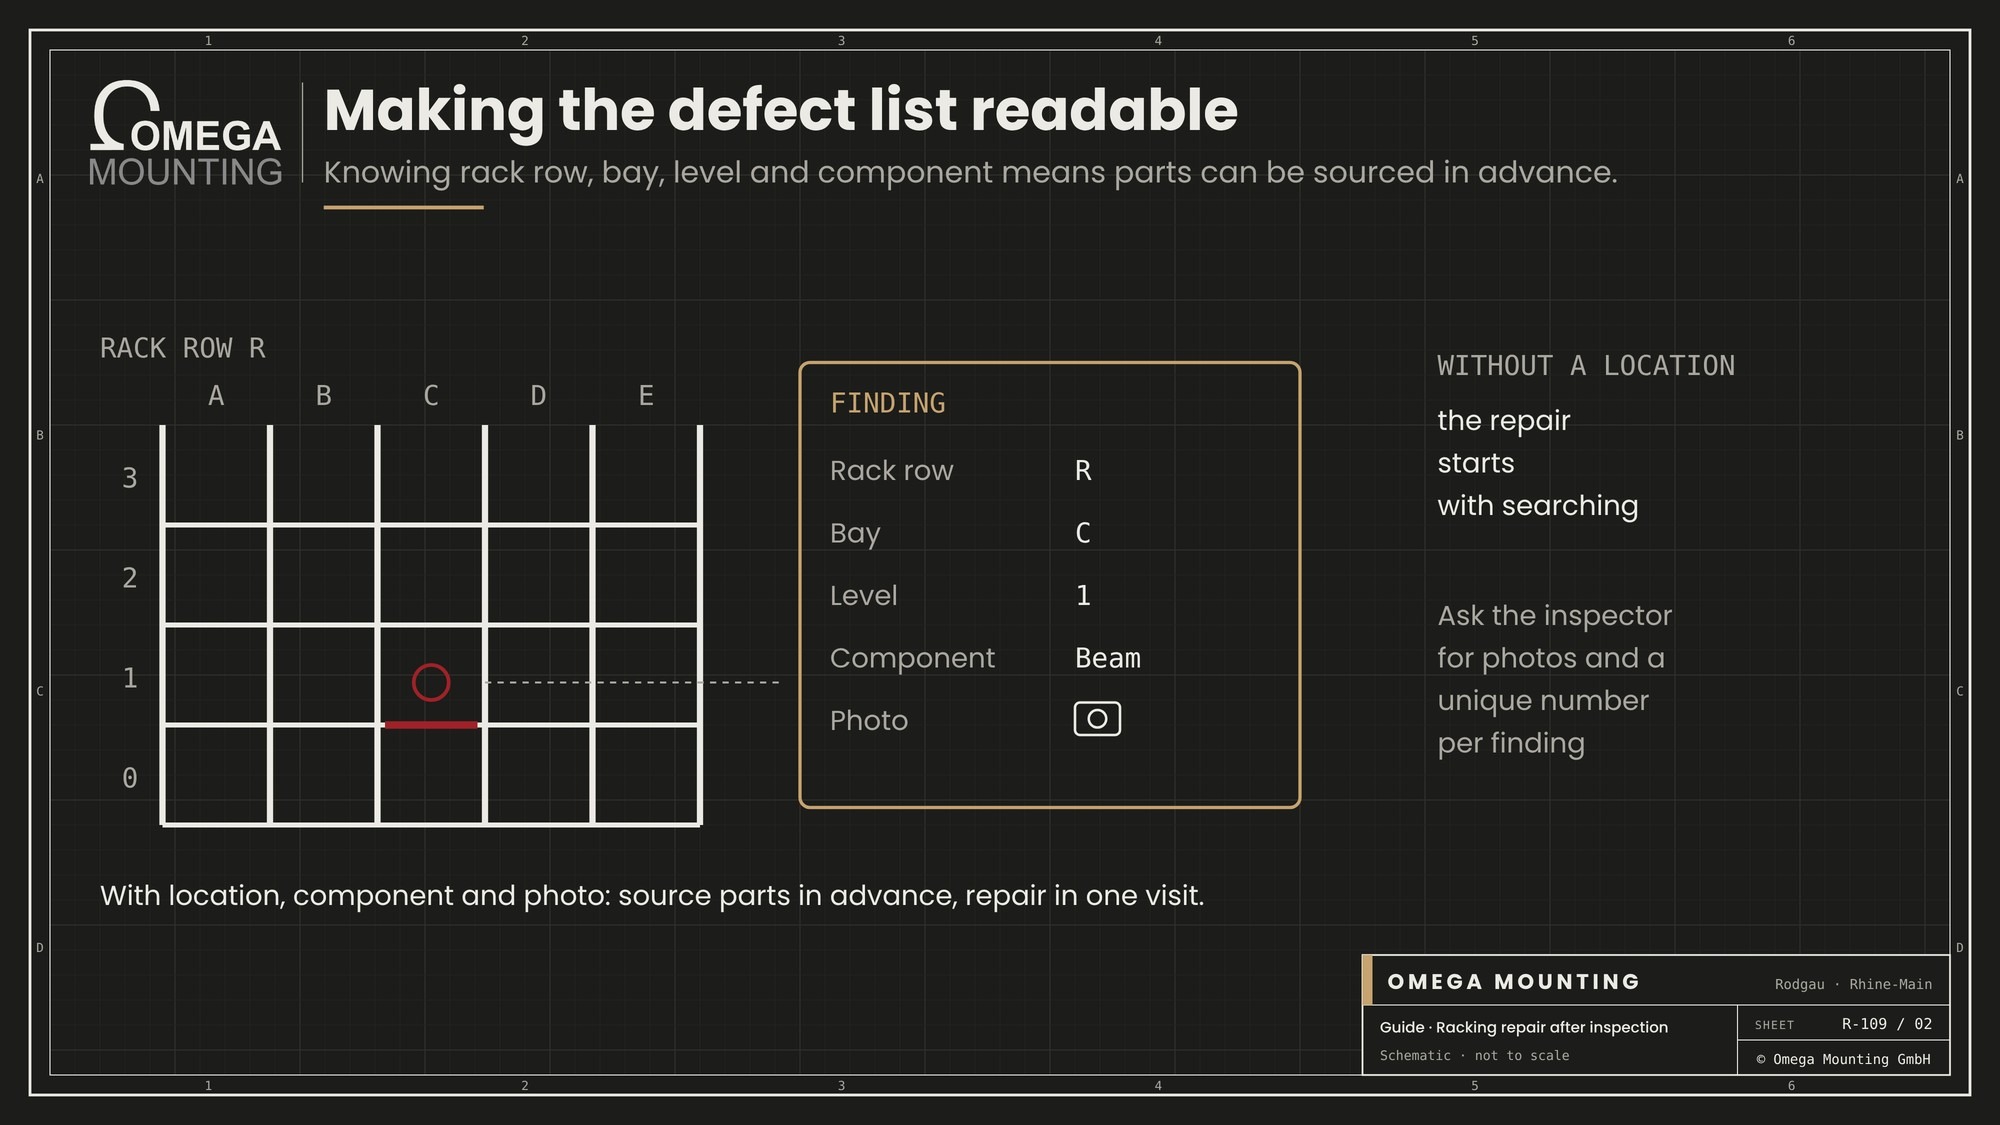
A defect list from a racking inspection is only as good as its location details. If you know the run, bay, level and component, parts can be ordered in advance and the repair finished in a single visit. Without these details, the repair starts with a search. So ask the inspector for photos and a unique number for each finding.
What gets replaced in a racking repair
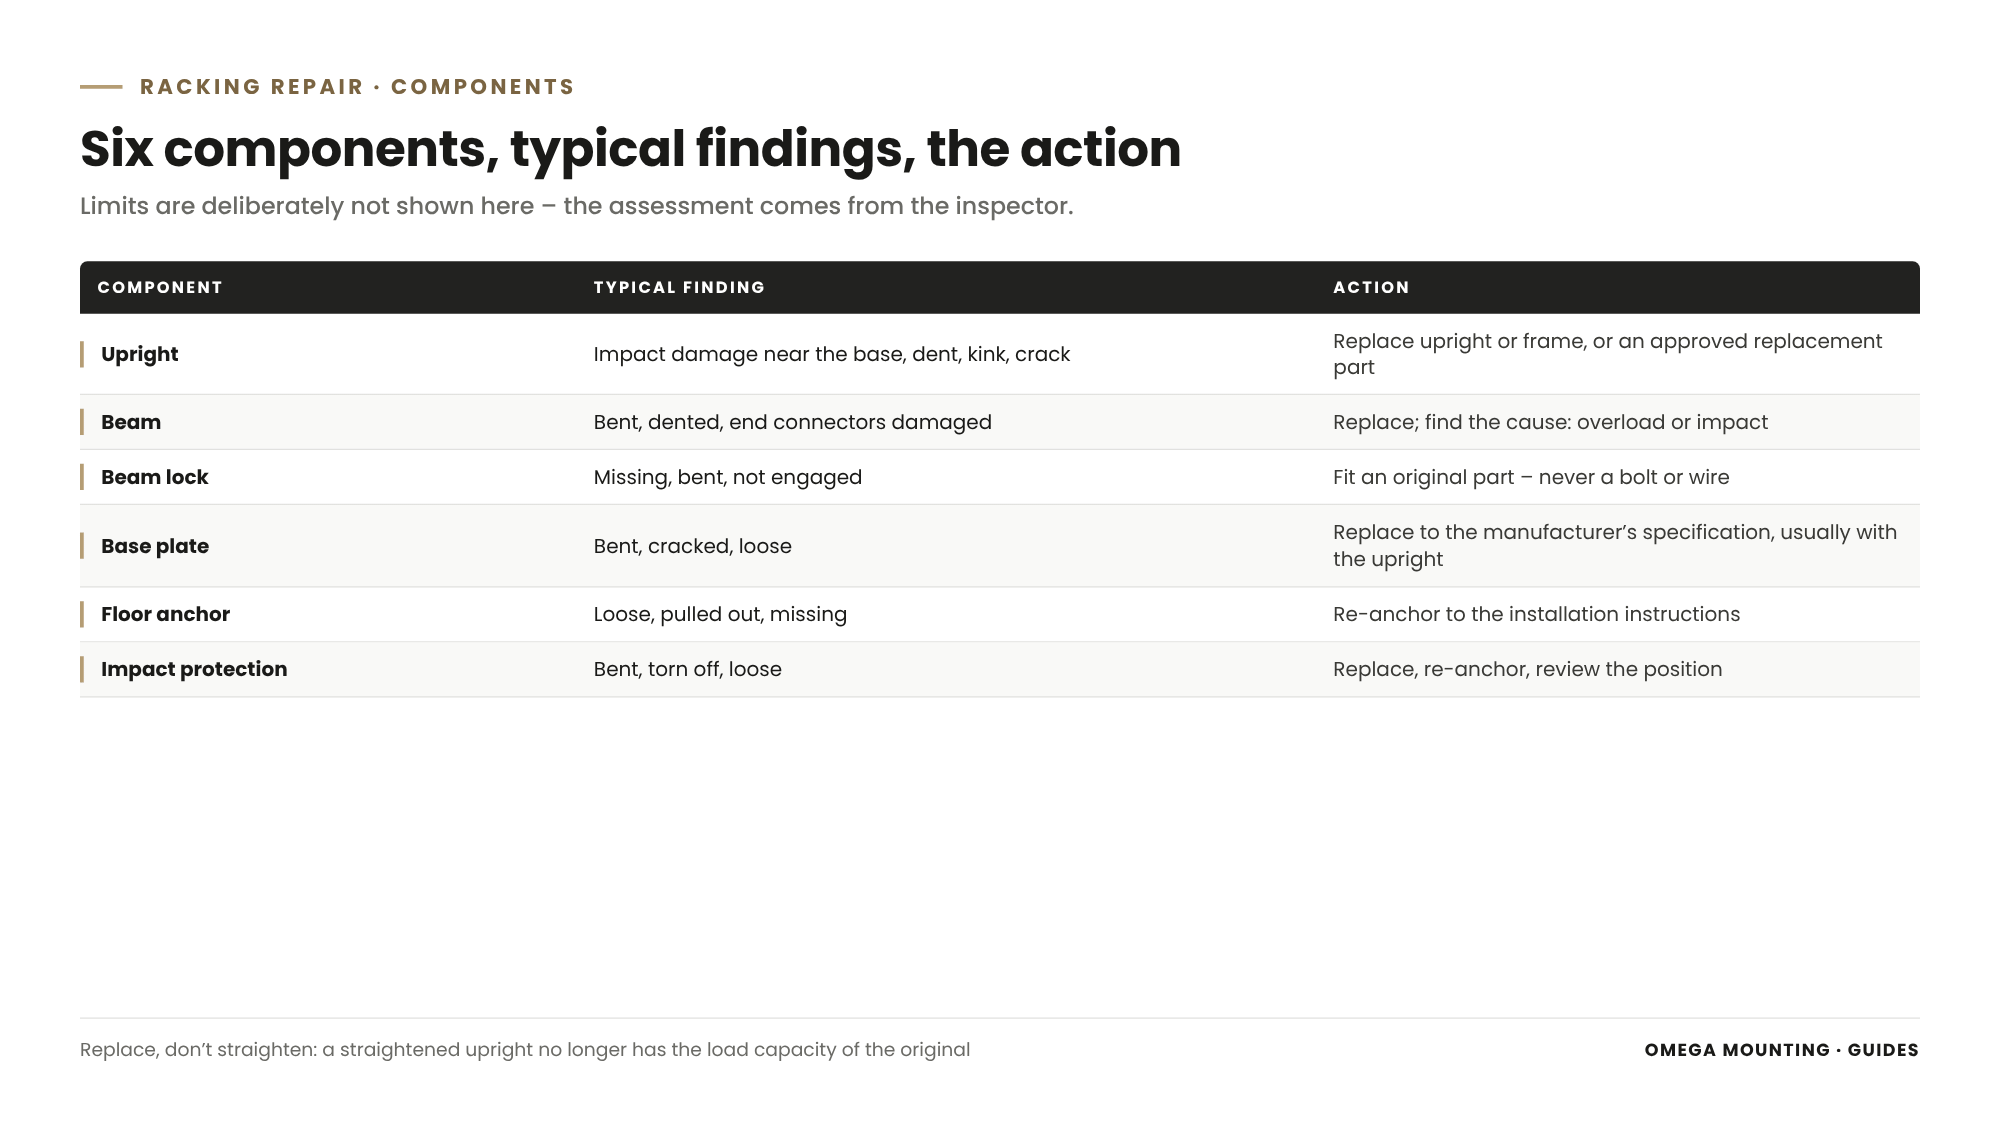
A racking repair mainly replaces or adds six components: uprights, beams, beam locks, base plates, floor anchors and impact protection – exactly the parts that forklifts and pallets hit every day.
The table shows what is typically found and what follows from it. Limit values are deliberately left out; the assessment comes from the inspector.
| Component | Typical finding | Action |
|---|---|---|
| Upright (vertical frame section) | Impact damage near the base, dent, kink, crack | Replace the upright or frame; on some systems replace only the lower section with an approved replacement part |
| Beam (horizontal member carrying the pallets) | Bent, dented, damaged end connectors | Replace the beam; establish the cause: overload or impact during put-away |
| Beam lock (safety locking pin) | Missing, bent or not engaged | Fit the correct original part – never a bolt or wire |
| Base plate | Bent, cracked, loose on the upright | Replace to the manufacturer’s specification, usually together with the upright |
| Floor anchor | Anchor loose, pulled out or missing | Re-anchor to the installation instructions and the anchor manufacturer’s data |
| Impact protection | Bent, torn off, anchors loose | Replace and re-anchor; check the position |
Then there is the bracing – the diagonal and horizontal members in the frame. It often buckles along with the upright on impact, even when the upright itself still looks fine.
Replacing an upright: the most common job
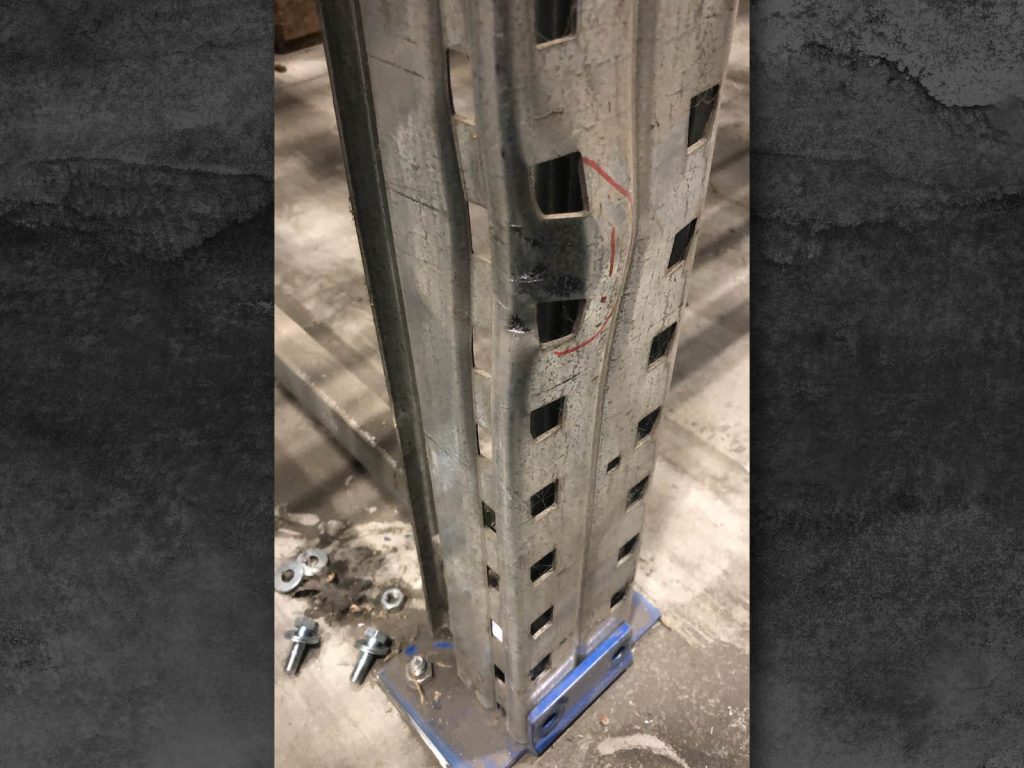
If an upright on pallet racking has to be replaced, impact damage is almost always the reason. It is the most common job in pallet racking repair. A forklift hits the lower part of the upright and the section dents. Depending on the system, the whole frame is replaced or only the lower part, using an approved replacement section. The manufacturer will tell you whether one exists for your system. Either way, the adjacent bays are emptied first.
Beams and beam locks
A bent beam often points to excessive loads or rough put-away. Replacing it is quick. The more important question is why it bent – and whether the load notice is still correct. Missing beam locks look harmless. But they hold the beam in the upright when a pallet catches it from below during retrieval.
Base plates and floor anchors
Base plates and anchors transfer the load and keep the upright in place. A pulled-out anchor is not simply knocked back in. Where and how to re-anchor is set out in the racking installation instructions and the anchor manufacturer’s data. Before drilling, we check whether there are services in the floor. If the floor slab is cracked or an upright is sinking, a structural engineer needs to be involved.
Original parts and manufacturer’s specification: why replacing beats straightening
Damaged racking components are replaced, not straightened: the parts fitted are original parts from the racking manufacturer or parts it has approved for your system, installed to its instructions.
Why a straightened upright is not a repair
Racking sections are usually cold-formed, thin-walled steel profiles. If you push a damaged upright back with a lever or jack, you end up with a straight section – but one whose load capacity nobody knows. Bending and bending back has changed the material. The damage has not been repaired, just hidden. For the next inspector this is the worst case: they see a straight upright and cannot tell what it has been through.
The same applies to welded-on plates and reinforcements. Welding on load-bearing components requires detailed knowledge of the materials and an approval. The limits of repair welding are set out in our guide Rectifying UVV defects.
Why third-party parts do not fit
Racking systems differ in section, hole pattern, connector design and locking. A beam that “fits” into another manufacturer’s system will not necessarily carry the load the bay was designed for. The load notice then no longer applies. That is why we establish which system is installed before ordering anything. The rating plate, load notice, photos of the section and hole pattern, and a site survey all help.
When the manufacturer no longer supplies parts
With older installations, the original supplier is sometimes no longer available. There are then three routes: a successor product that the manufacturer approves for the old system, replacing entire bays, or a structural calculation by a structural engineer. Which route fits is not for the fitter alone to decide. General options for parts the market no longer supplies are covered in our guide on spare parts that are no longer available.
Offload, isolate, secure: before the first anchor comes out
Before any component is replaced, the affected bay is fully offloaded and cordoned off; when an upright is replaced, this also applies to the adjacent bays connected to that frame.
Offloading is the operator’s job
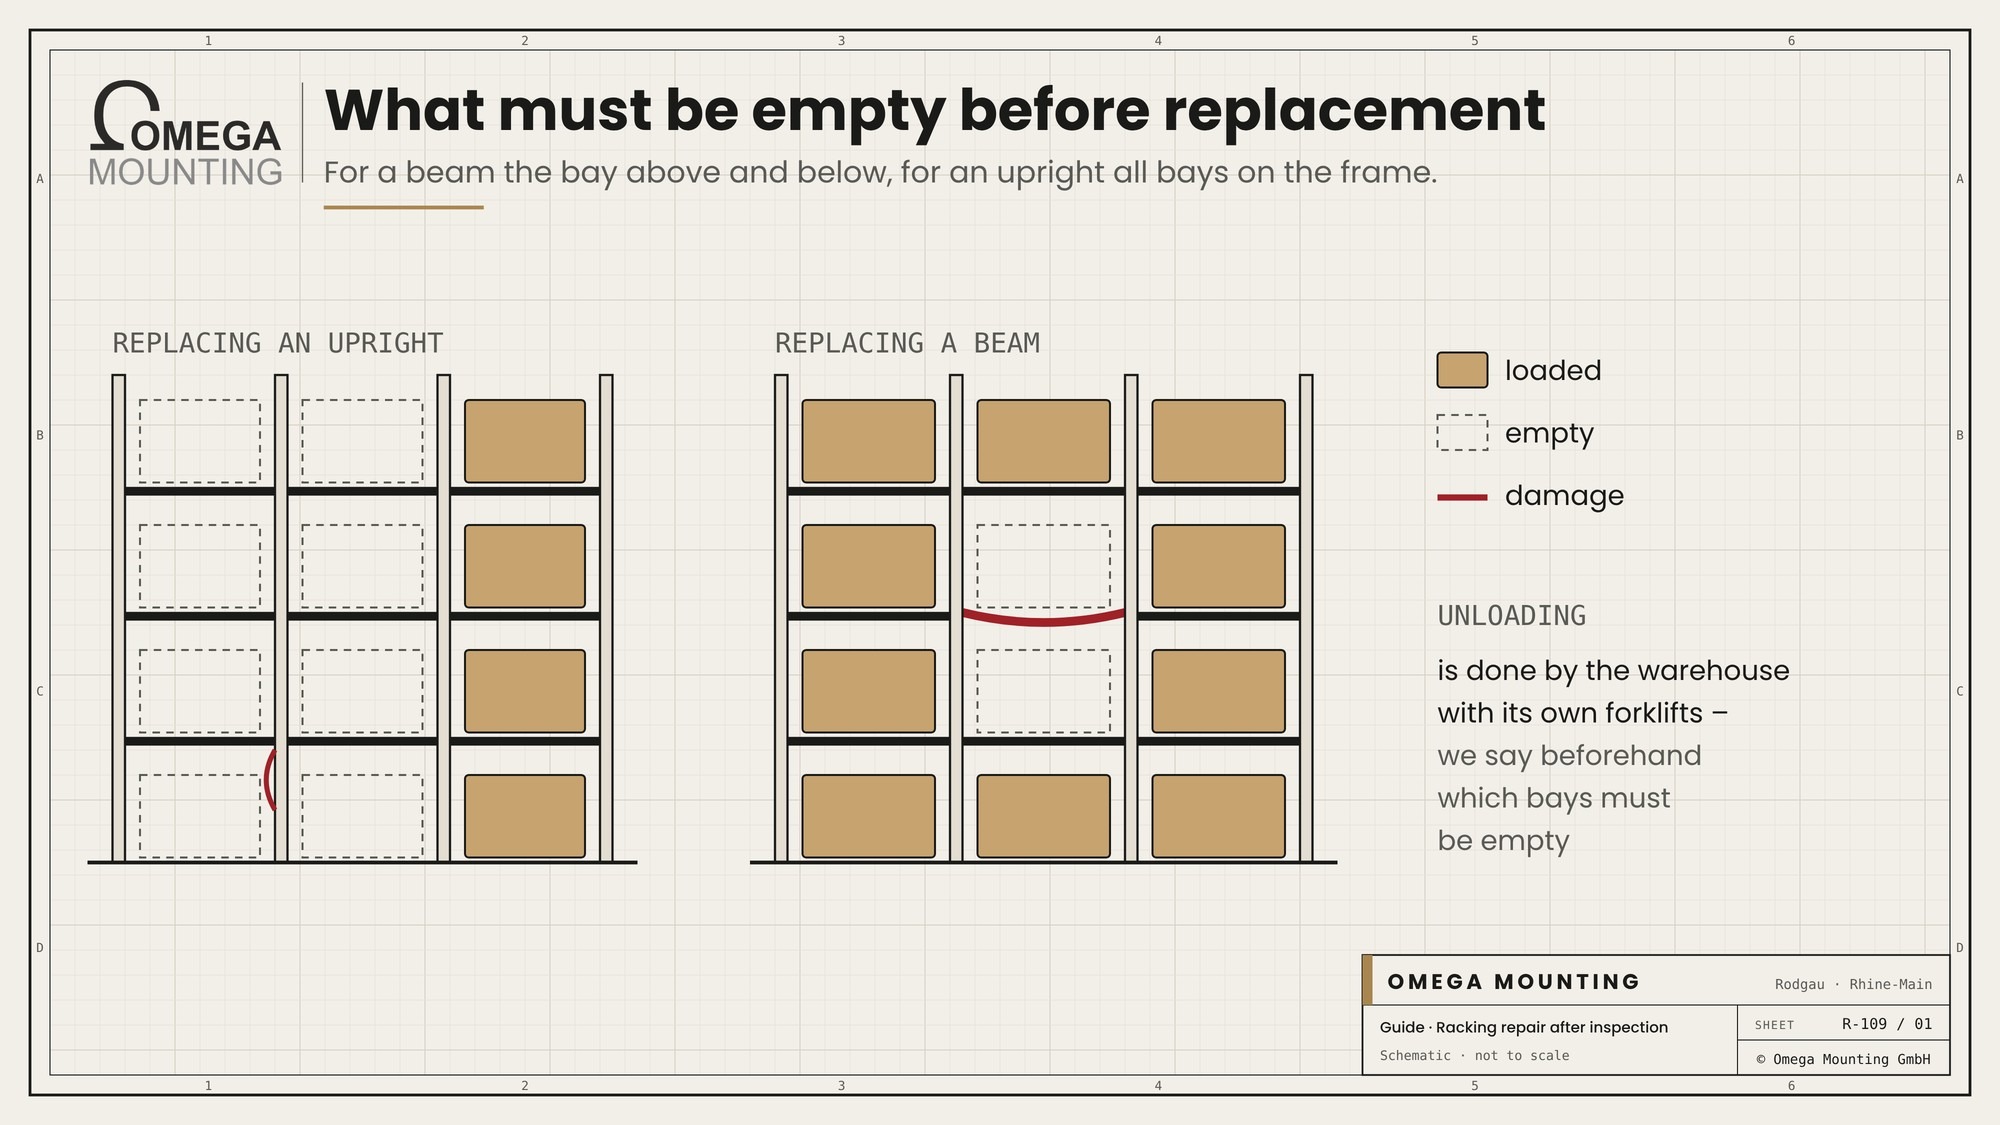
The warehouse team normally does the offloading with its own forklifts. The stock stays in the operator’s hands. We specify in advance exactly which bays and levels must be empty. For a beam, the levels above and below are often enough; for an upright, it is every bay on that frame over the full height.
Making the isolation visible
An isolated bay must be obvious to every forklift driver: barrier tape or barriers, an out-of-use notice on the racking and a clear briefing for the shift. Red findings stay isolated until the inspector clears them – even if the repair was finished long ago. Anyone who puts away “just one pallet” in the meantime breaks the whole chain.
Working at height
On high-bay racking, the work is done from a mobile elevating work platform (MEWP). Nobody stays in the aisle below while work is going on overhead. Everyone in the danger zone wears suitable protective equipment. Where the platform does not give adequate protection, personal fall protection equipment is added; details are in our guide on personal fall protection for installation work.
Racking repair in a live warehouse
A racking repair during live operations works if you go aisle by aisle: one section is emptied and isolated, the other aisles stay in use, and forklift and work areas are clearly separated.
Most warehouses cannot close just because a few uprights are being replaced. Nor do they need to. The sequence is what counts. Red bays first, then the amber ones in the same aisle, then the next aisle. Warehouse management plans the offloading so that enough pallet positions always remain free.
Coordinating traffic routes and shifts
Where work is in progress, no forklift drives. The diversion must be agreed and marked in advance. Agree the plan with the shift supervisors, not just warehouse management. A late-shift driver who finds an isolated aisle without warning will find their own way round.
Contractors in your own warehouse
For the operator, the installation contractor is an external contractor: site induction, access, contacts and, where needed, permits to work all come before the first visit. What this involves is covered in our guide to contractor management.
Larger interventions than replacing components – new beam levels, extra bays, a longer run – follow their own rules. How such a conversion works with a restocking plan is shown in our guide on converting racking during live operations.
A racking repair in seven steps
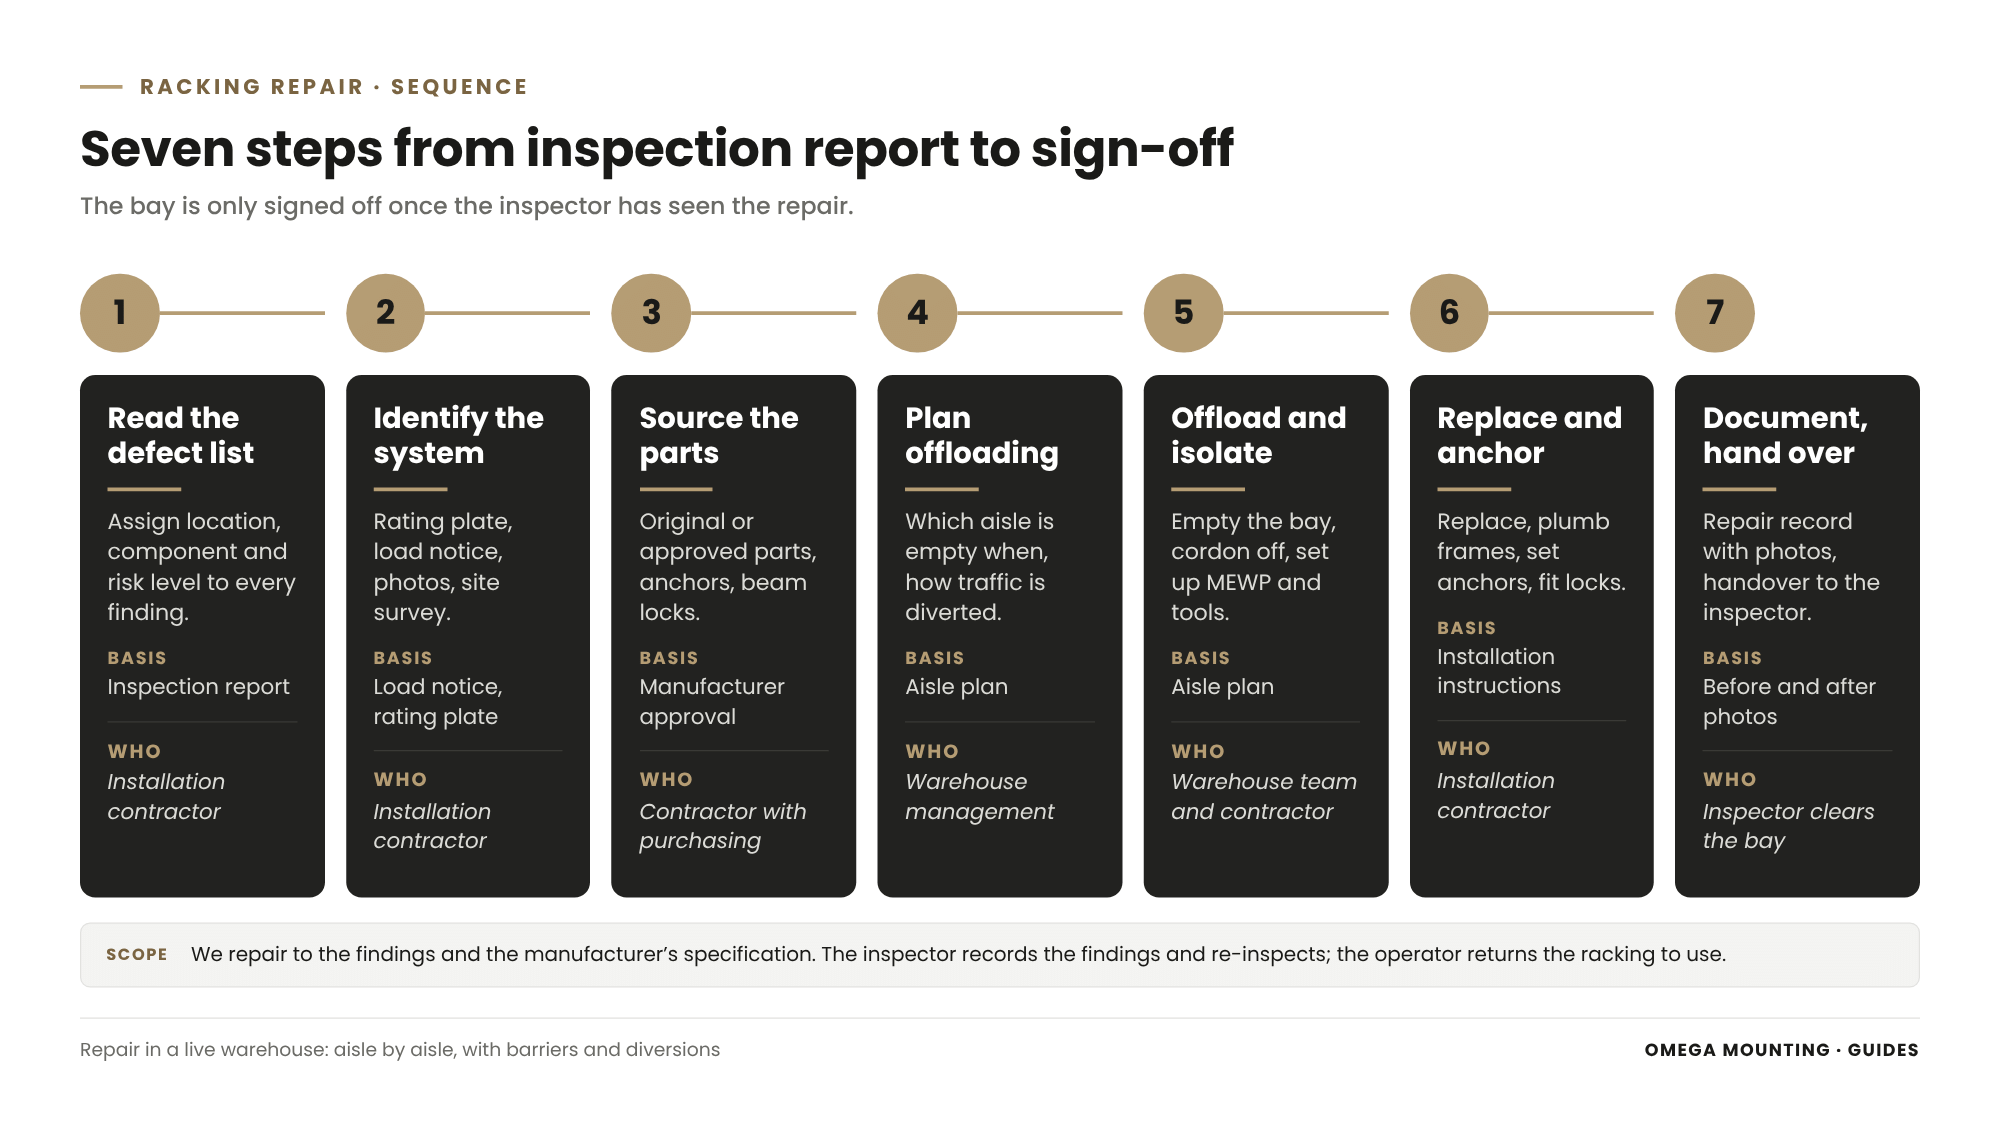
A racking repair follows seven steps: read the defect list, identify the racking system, source the parts, plan dates and offloading, offload and isolate, replace and anchor, document and hand over to the inspector.
- Read the defect list. We go through the inspection report finding by finding and assign a location, component and risk level to each.
- Identify the racking system. The rating plate, load notice, photos and, if needed, a site survey show which system is installed.
- Source the parts. Original parts or parts approved by the manufacturer, plus anchors and beam locks in the correct version.
- Plan dates and offloading. With warehouse management we agree which aisle is empty when and how traffic is diverted.
- Offload and isolate. The warehouse team offloads; we cordon off the work area and set up the MEWP and tools.
- Replace, align, anchor. Damaged components are replaced to the installation instructions, frames plumbed, anchors set and locks fitted.
- Document and hand over. A repair record shows what was replaced where; then the inspector re-inspects and the operator signs off.
Preparation decides how long it takes
Most of the time in a repair goes into steps two and three. If the parts fit, the replacement itself is routine work. If they don’t, an isolated aisle stays blocked for days. That is why we ask for photos and the list of findings before every visit – and would rather come for one extra site visit than turn up once with the wrong parts.
Documentation and sign-off: who returns the racking to use
It is not the fitter who returns the racking to use but the operator – based on a re-inspection by the competent person confirming that the defects have been put right.
What we document
For each finding, our repair record lists the location, the component replaced or added, where the part came from and the date. Photos before and after the replacement are added. For anchors, we record the specification they were set to. This record is the basis for the inspector’s re-inspection.
What the inspector checks
The inspector works through the defect list again and checks that each finding has been put right. The result goes into the installation’s inspection log. Only then does the operator lift the isolation. If the configuration has changed, the load notice must be reassessed too.
Don’t let the chain break
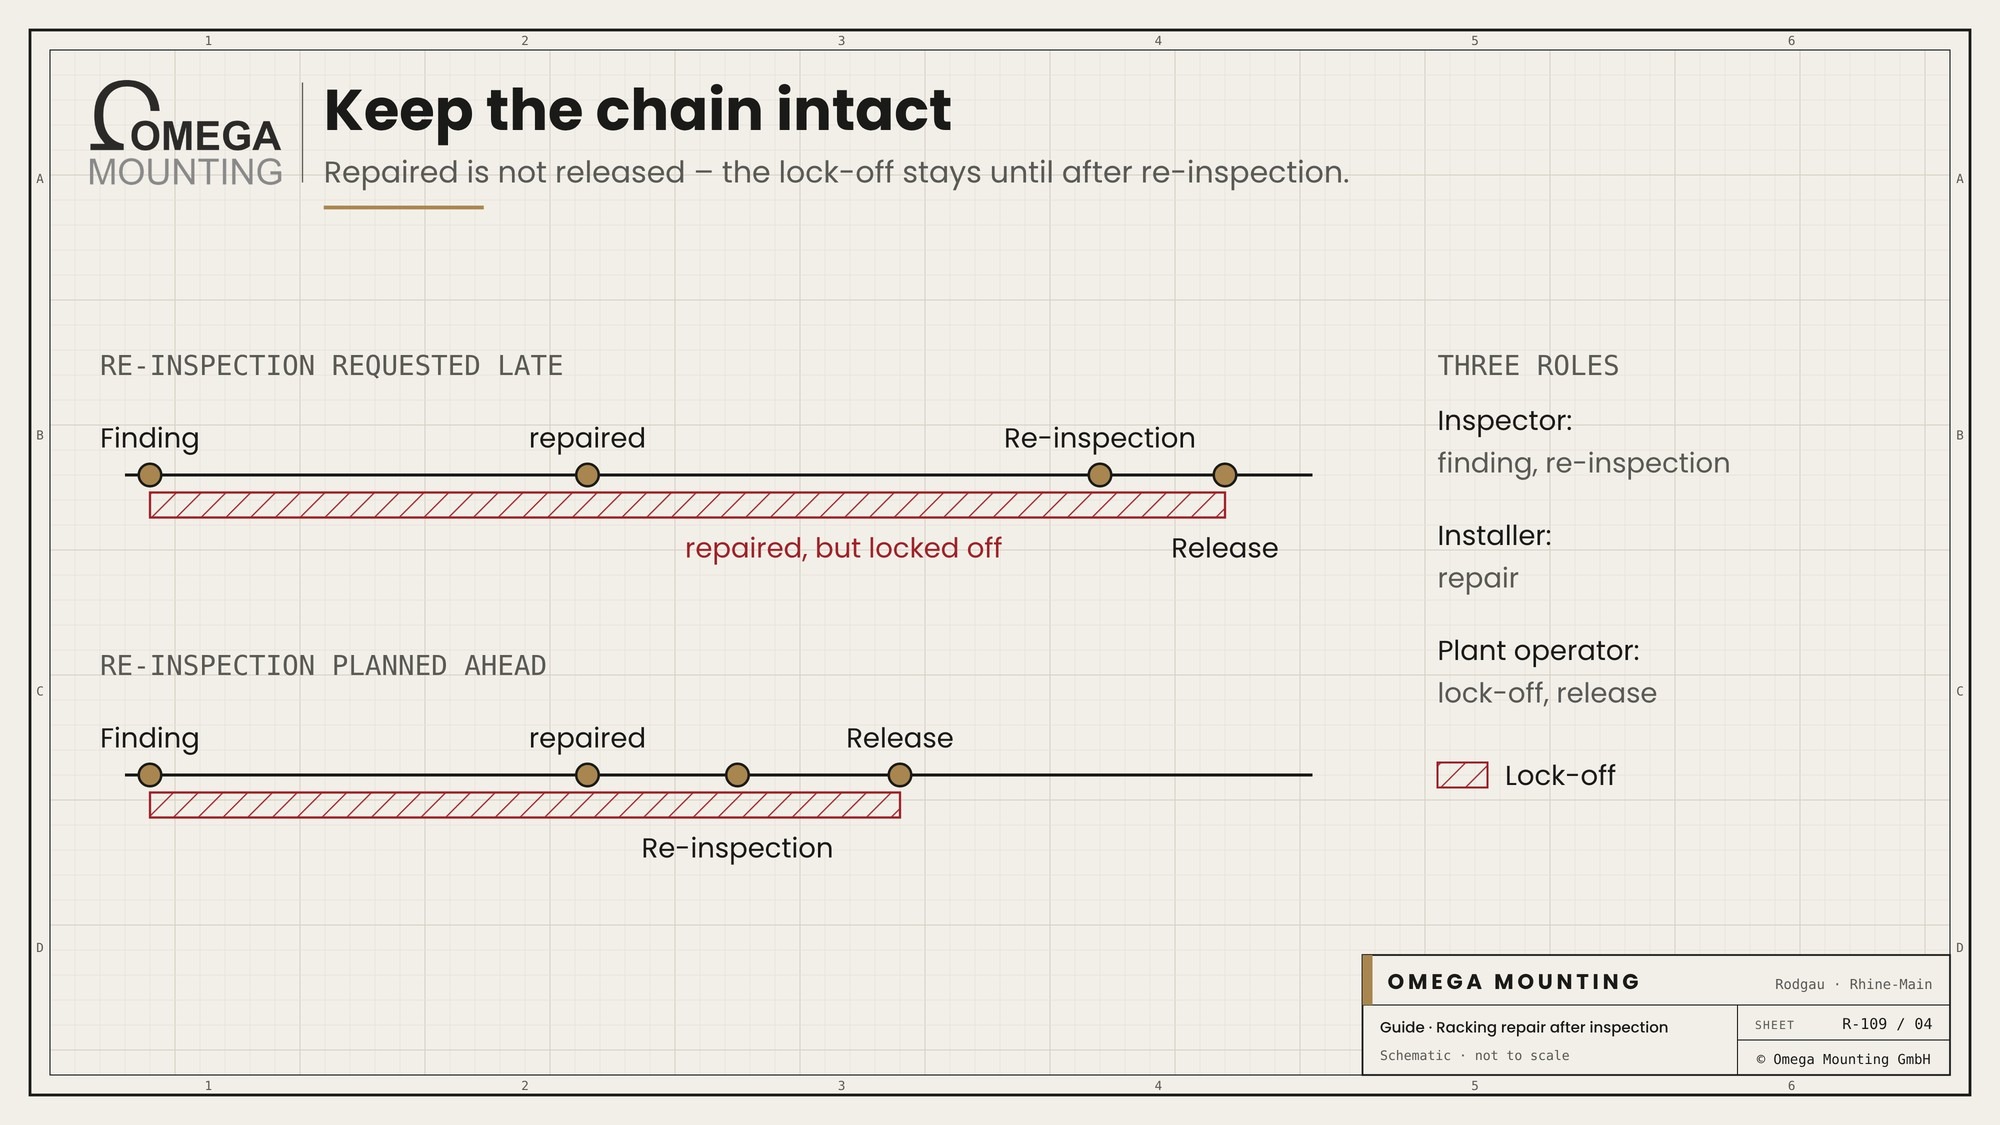
The most common hold-up is between repair and re-inspection. The bay was repaired long ago, but the inspector only comes days later. So book the inspector as soon as the repair date is fixed. Which inspections you need to keep track of as an operator overall is set out in our overview of inspection obligations for operators.

Impact protection as a follow-up measure
Where the same end of a run is hit again and again, floor-anchored impact protection is part of the repair – otherwise the same finding will be back on the list at the next inspection.
Impact damage to racking is rarely chance. It happens where aisles are narrow, where forklifts turn or where visibility is poor. The defect list shows these spots fairly precisely. Replacing only the upright repairs the consequence, not the cause.
Anchored, not bolted on
A corner guard stands free in front of the upright and is anchored to the floor. That way the impact goes into the floor, not into the racking frame. An upright protector fitted directly to the section is an addition, not a substitute. After every impact, the guard itself is checked too: if it is bent or its anchors are loose, it is replaced.
Plastic, steel or custom-made?
Whether plastic or steel is the better fit depends on the type of impact, the floor and the traffic. This trade-off is covered in our guide Impact protection: plastic or steel. When a made-to-measure guard is worth it instead of a catalogue part is explained in our guide on custom-made impact protection.
Typical mistakes in racking repair
The typical mistakes in racking repair are straightened instead of replaced components, third-party parts, reloading before sign-off, and a repair that fixes only the consequence, not the cause of the damage.
- Straightening instead of replacing. The upright looks straight again, but nobody knows its load capacity.
- Third-party parts. A beam from another system hooks into the upright but does not carry the load stated on the load notice.
- Reloading before sign-off. The repair is finished, the inspector has not been yet, and the shift is already putting stock away again.
- Overlooking adjacent bays. When an upright is replaced, adjacent bays connected to the same frame stay loaded.
- Forgetting the locks. After a beam has been replaced, the beam locks are missing because nobody brought the right ones.
- Reusing anchors. A loose anchor is retightened instead of being replaced as specified.
- Not fixing the cause. The upright is replaced, the impact protection is not – and the same corner is back on the list the following year.
The mistake before the repair
A mistake often happens before anyone repairs anything: an impact goes unreported. The forklift driver clips an upright and drives on. Racking damage that nobody knows about is neither isolated nor repaired until the next inspector finds it. A genuine reporting culture is therefore the cheapest racking repair there is. Every reported impact is a finding that gets fixed early.
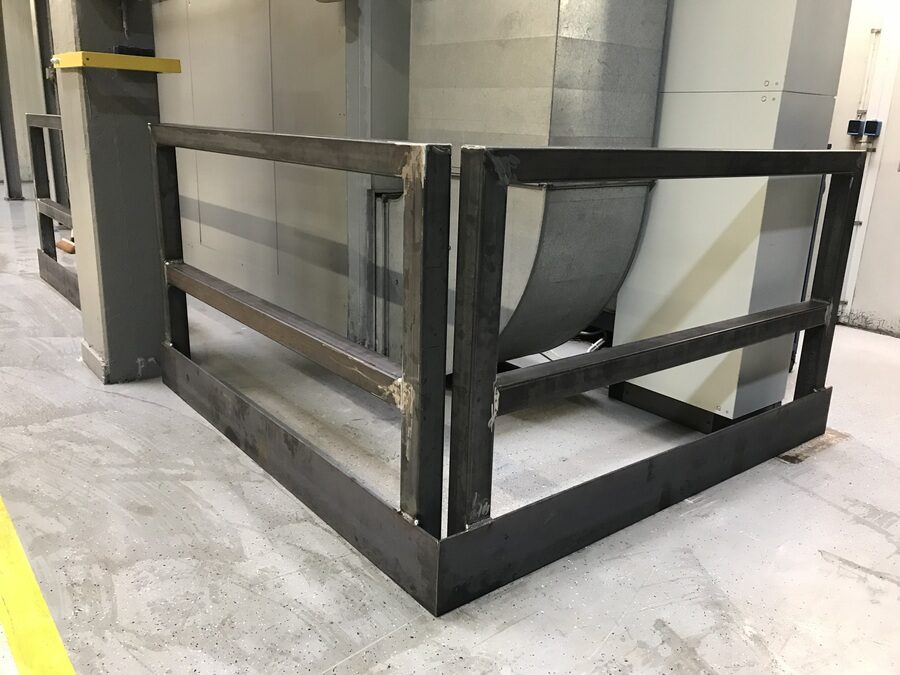
Racking repair in the Rhine-Main region: how we work
In the Rhine-Main region we carry out racking repairs based on the findings. We read the defect list, source the parts, replace to the manufacturer’s specification, anchor, fit impact protection and document – and, on request, our competent person carries out the racking inspection and re-inspection. Sign-off for use stays with the operator.
From Rodgau, Frankfurt, Offenbach, Hanau, Darmstadt and Aschaffenburg are a short drive away. The logistics centres around Frankfurt, in Raunheim and Dietzenbach, handle high volumes at speed. Impact damage is part of everyday life there, and every isolated pallet position is missed at once. That is why we like to start with a short site visit. It clarifies the racking system, the parts and the order of the aisles.
Racking and storage systems fall under our service area Workshop equipment, which we install and maintain. What else we deliver in Maintenance and servicing for industrial plants is set out on our service page. Where catalogue parts do not fit, our workshop in Rodgau makes impact and upright protection to measure.
We tell you in advance what we do not take on. Sign-off for use is given by the operator. Structural calculations come from the structural engineer, parts approvals from the manufacturer. We coordinate with everyone so that the inspector can re-inspect promptly after the repair. For a racking repair in the Rhine-Main region this means one contact for the repair, short travel times and a record the inspector can work with.
Project examples
Three jobs from our project diary show what matters when repairing racking and storage systems. To be clear from the start: only the first is a racking repair in the strict sense. The other two show working methods that help with any racking repair – spare parts on site and impact protection that transfers the impact into the floor.
Fulda: defect list worked through, aisle by aisle
For a Racking repair in Fulda the starting point was a completed inspection with a defect list: repair the racking and replace damaged parts. Inspection and maintenance had not been carried out properly for several years, and more and more components had gradually been damaged. We arranged a lifting platform and the right spare parts. Uprights, beams and bracing were replaced, one component after another.
The client wanted the repair carried out during live operations. So individual aisles were emptied and isolated. While work was going on at height, nobody was in the aisle. Thanks to good preparation, the job was finished within two days. The client could use every pallet position in its high-bay racking again and received a new racking inspection – with a year until the next one.
The lesson for your repair: the defect list is the brief, preparation decides how long it takes, and the inspection – not our record alone – comes at the end.
Frankfurt Airport: spare parts on site shorten the downtime
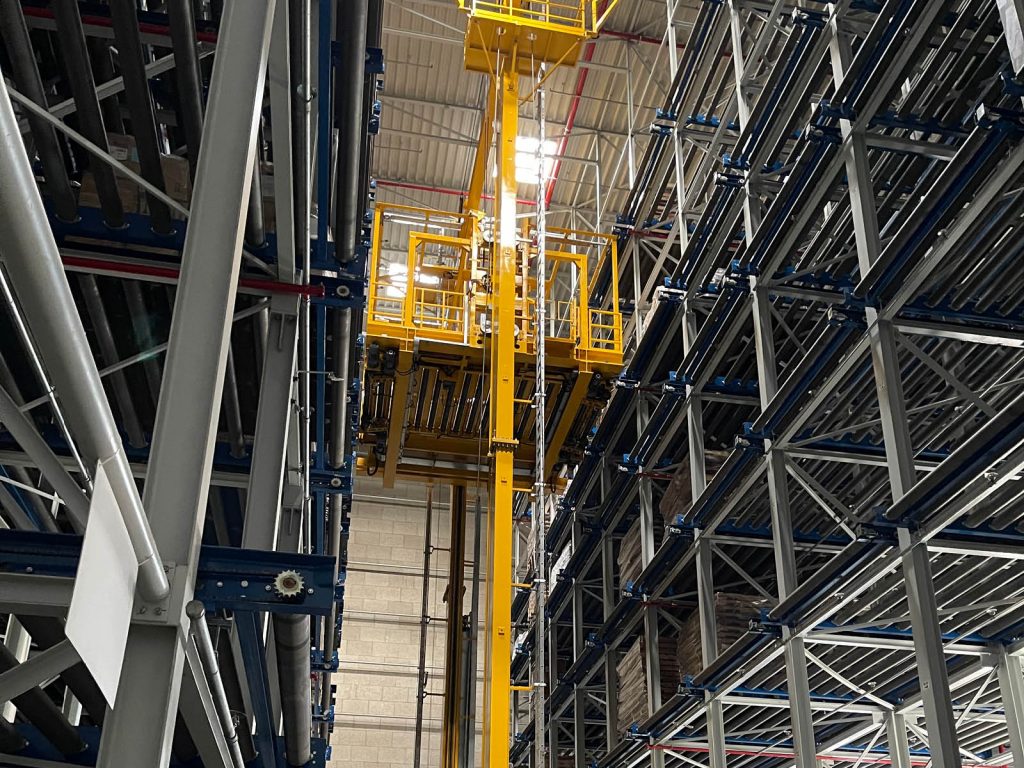
At the High-bay warehouse at Frankfurt Airport the cause was not racking damage but the conveyor system. The only report was that the installation no longer worked. On site it turned out that the roller conveyor had stopped conveying. A worn sprocket in the drive unit had jammed the drive chain, which had partly jumped off. Because the client had the right spare parts on site, we were able to dismantle the chain conveyor, replace chains and sprockets and readjust the chain and transfer units. After that the installation ran without further faults.
Applied to racking: if you keep beam locks, a spare beam or a set of anchors for your system in stock, you shorten the time a bay stays isolated. Which parts are suitable is best agreed with the manufacturer.
Offenbach: impact protection that transfers the impact into the floor
Our made-to-measure impact protection near Offenbach protects not racking but a production line and its ventilation equipment from forklifts carrying mesh pallets. The design principle, though, is the same one racking impact protection needs. A 200 × 100 × 10 mm steel angle forms the floor rail and is fixed with heavy-duty anchors. Above it, a welded frame of 80 × 80 × 5 mm steel box section takes the impact. Two people built the structure in our workshop in Rodgau in around a day. Two metalworkers installed it in one day on site, primed it and painted it signal yellow.
For your warehouse: where a corner is hit again and again, a guard like this is the follow-up measure that prevents the next finding.
Got a defect list on your desk?
Then get in touch with us. Send us the inspection report and photos of the findings and the load notice. A short site visit lets us clarify the racking system, the parts and the order of the aisles.
What this means for your role
For buyers: Award inspection and repair separately on purpose, or define the scopes clearly, so that nobody signs off their own work. In the repair quotation, ask for the origin of the parts and a repair record for each finding. Include the re-inspection as a separate line item.
For designers: Every end of a run you place on a tight turning circle becomes a finding. Plan impact protection, traffic routes and aisle widths so that repairs remain the exception. Prefer systems in which the lower section of the upright can be replaced.
For project managers and site managers: As project manager, you coordinate the inspector, installation contractor and warehouse management so that repair and re-inspection fit together in time. As site manager, you induct the fitters, check the isolation and make sure no bay is loaded before sign-off.
For maintenance managers: Turn the defect list into a work package: red findings at once, amber ones bundled, green ones monitored. Bring the inspection log and repair records together so that every finding gets a close-out entry.
For warehouse and logistics managers: You decide which aisle is empty when. Plan the offloading with the shift supervisors and keep isolated bays empty until sign-off. Make reporting every impact part of forklift driver training.
For occupational safety specialists and HSE coordinators: Check that red findings really are isolated at once and that the re-inspection is documented. For work at height, make sure the aisle is cordoned off and fall protection is in place. The basics of risk levels and the competent person are covered in our guide to racking inspection.
Racking defect action list: template on request
The racking defect action list is a one-page working document for the time between inspection and sign-off. It has one row per finding: location, finding as per inspection report, risk level, action, part required and its origin, isolation, date completed and signed off by. Warehouse management, maintenance and the inspector see on one sheet what is still open and who needs to act. It deliberately contains no limit values or prices. Request the template via our contact form – just mention “racking defect action list”.
Why Omega Mounting?
We are based in Rodgau near Frankfurt, can be reached by phone (Mon–Fri 9 am–3 pm) and WhatsApp, and have our own workshop. The linked jobs show how we work. In Fulda we worked through a defect list in two days, aisle by aisle during live operations. At the high-bay warehouse we cleared a breakdown using spare parts on site. Near Offenbach we built impact protection that transfers the impact into the floor. You can get inspection and repair from us as a single contractor – with our own competent person; sign-off for use stays with you. In practice: a single point of contact for component replacement, anchoring and impact protection, with a full record and short travel times in the Rhine-Main region.
Conclusion
A racking repair follows the findings: the inspector classifies, the installation contractor repairs, and the operator signs off after a re-inspection. Red is offloaded and isolated at once, amber repaired promptly, green monitored. Damaged components are replaced, not straightened – with original or approved parts to the manufacturer’s specification. Where the same corner is hit again and again, impact protection is part of the job. Once your defect list is in, send us the inspection report and photos – we’ll come back with an honest assessment of parts, sequence and approach.
Planning a move-in, installation or maintenance in the Rhine-Main region?
Tell us briefly what you need – we'll come back with an honest assessment.
Free, no-obligation callback
You may also be interested in these guides
Maintenance & Servicing
About the author
Tobias Schott
Managing director of Omega Mounting GmbH, Rodgau · more than 20 years of hands-on experience in installation and maintenance
A trained mechatronics technician, working in maintenance, servicing and industrial installation since 2004 – first alongside his father, and with Omega Mounting since 2012: from overhead conveyors in Frankfurt to the crane system in a new-build hall. He plans and leads lifting operations as an appointed person (AP) in data centers and on industrial sites in the Rhine-Main region, trains and examines operators of cranes, mobile elevating work platforms and telehandlers, and is a qualified occupational safety specialist. On jobs abroad he is known as the “German Troubleshooter” – the person you call when a site gets stuck. He learned what quality means from his father, not from a manual: Made in Germany as a standard for his own work, not a label. That is why quality comes first at Omega Mounting – ahead of speed and price. He writes these guides from that practice: what works on our sites is in them – what exists only on paper is not.
Frequently asked questions
Racking is repaired by an installation contractor or the racking manufacturer – with us, on request, together with the inspection by our own competent person. The inspector records and classifies the damage. The installation contractor replaces the damaged components to the manufacturer’s specification and documents every replacement. The competent person then re-inspects, and the operator returns the racking to use.
No, a damaged upright is replaced, not straightened. Racking uprights are usually cold-formed, thin-walled steel sections whose load capacity suffers when they are bent and bent back. After straightening, the upright looks straight, but nobody knows its remaining capacity. Only original parts or parts the manufacturer has approved for your system are fitted.
Not all of it, but every bay being worked on must be empty. When a beam is replaced, this usually means the levels above and below. When an upright is replaced, it means every bay on that frame over the full height. The rest of the warehouse can keep running if the work moves aisle by aisle and the work area is cordoned off.
The operator returns the racking to use – but only after a re-inspection by the competent person, who confirms that the findings have been put right and records this in the inspection log. The installation contractor provides a record of the replaced components, the origin of the parts and photos. Book the inspector at the same time as the repair.
There is no flat figure, because the effort depends on the defect list. Cost drivers are the number and type of findings, the availability of suitable parts, the height of the installation and the use of a MEWP. Add to that offloading, working windows outside shift hours and any new impact protection. A reliable estimate is based on the inspection report, photos and a short site visit.
In Germany, the basis is the Industrial Safety Ordinance (BetrSichV): the operator must use racking safely, have damage repaired and document inspections. The racking standard EN 15635 only allows repairs to damaged components with the agreement of the racking supplier. DGUV Information “Sicherheit von Regalen” (safety of racking) summarises both for operators. UK readers: EN 15635 applies in the UK as BS EN 15635, and inspections are often carried out by SEMA-approved rack inspectors.
Yes, the process is the same for all types of racking: findings, classification, isolation, replacement to the manufacturer’s specification, re-inspection, sign-off. Cantilever racking usually has no deformation limits, so any safety-relevant damage is put right. Heavy-duty racking repairs at height are carried out from a MEWP. In automated high-bay warehouses, the conveyor system is a separate trade.
For replacing components, installation contractors from the region are the shortest route. From Rodgau we carry out racking repairs in Frankfurt, Offenbach, Hanau, Darmstadt and Aschaffenburg – with a site visit, parts sourced to the manufacturer’s specification, replacement, anchoring and impact protection. On request, our competent person carries out the inspection and re-inspection; sign-off for use stays with the operator.
Send a short enquiry with three things: the inspection report with risk levels, photos of the findings and the load notice, and the location of the installation. From this we identify the racking system and parts, arrange a site visit if needed and send a written assessment with the aisle sequence and parts required. Your contact is Tobias Schott – via our contact form, or by phone or WhatsApp if something has broken down.
 English
 German