
- Guide – Installation
Installing impact protection: planning, anchoring and handing over plastic barriers properly
By Tobias Schott · 20-minute read · As of November 2026
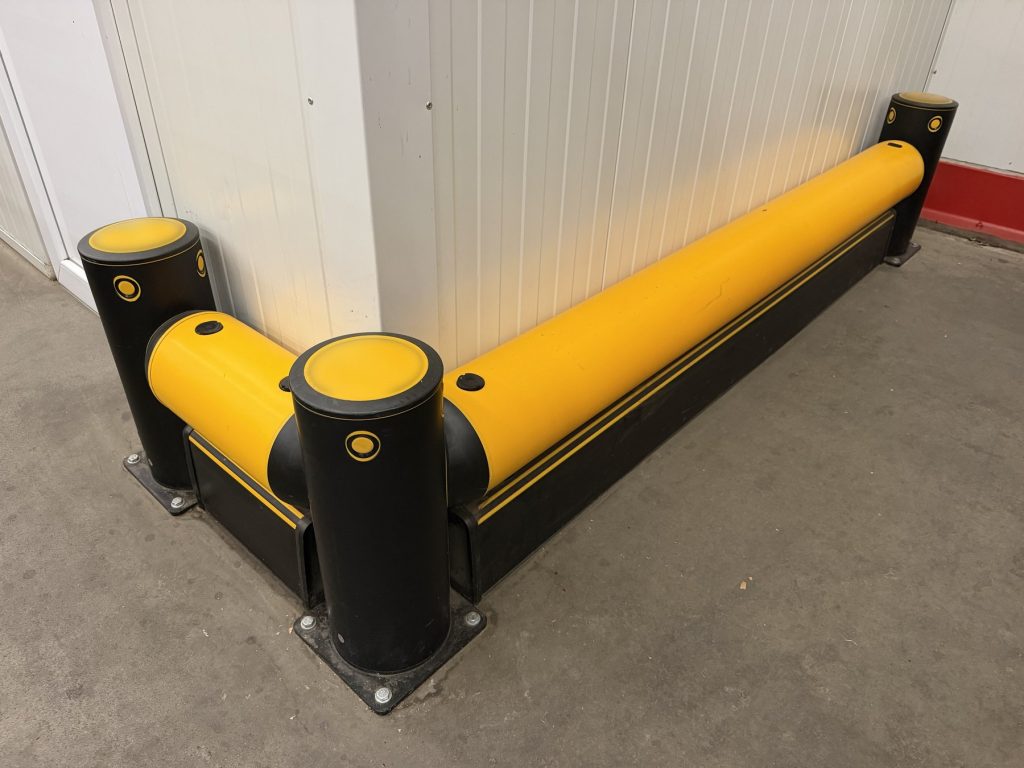
Installing impact protection means: planning the line at a distance from the protected object, checking the floor and services, anchoring the posts in concrete to the manufacturer's specification, pushing in the rails and floor rail, aligning everything and handing over the installation properly. Plastic impact protection only holds as well as it has been planned and anchored.
At first glance, plastic impact protection looks simple. Stand the posts up, push in the rails, done. But this is exactly where most mistakes happen. The distance to the wall does not suit the system, the anchors sit in the wrong floor, or a drill hits a service. Anyone having impact protection installed should therefore know what matters.
The plastic gives way on impact and springs back. For that it needs space behind it and firm anchoring beneath it. Both are decided during planning and drilling, not during assembly. Anyone searching for “installing safety barriers”, “anchoring impact protection” or “installing plastic barriers” usually has exactly these questions: where does the protection go, what is it anchored in, and how is it assembled safely?
This guide shows the installation step by step – from the survey through locating services to the handover. It is written for logistics and site managers, maintenance managers, occupational safety specialists, planners, project and site managers and buyers. Which material belongs where is explained in the guide Impact protection: plastic or steel?.
Key points at a glance
- Installing impact protection means: plan, check floor and services, anchor, assemble, align, hand over.
- Keep the distance. The plastic deflects on impact. Behind the barrier there must be as much space as the manufacturer specifies.
- The floor decides. Anchoring is done in load-bearing concrete. Screed, joints and edges are clarified beforehand.
- Locate first, then drill. Cables, heating pipes and earthing in the floor are located before the first drill hole.
- Anchors as specified. Type, depth and tightening of the anchors are specified by the system manufacturer.
- Think of walkways. Pedestrian barriers separate pedestrians and forklifts. Crossings and escape routes remain clear.
- During operation. Cordon off, extract drilling dust, work in pairs.
- Handover with photos. Every section is checked, documented and handed over to the operator.
What does installing impact protection actually involve?
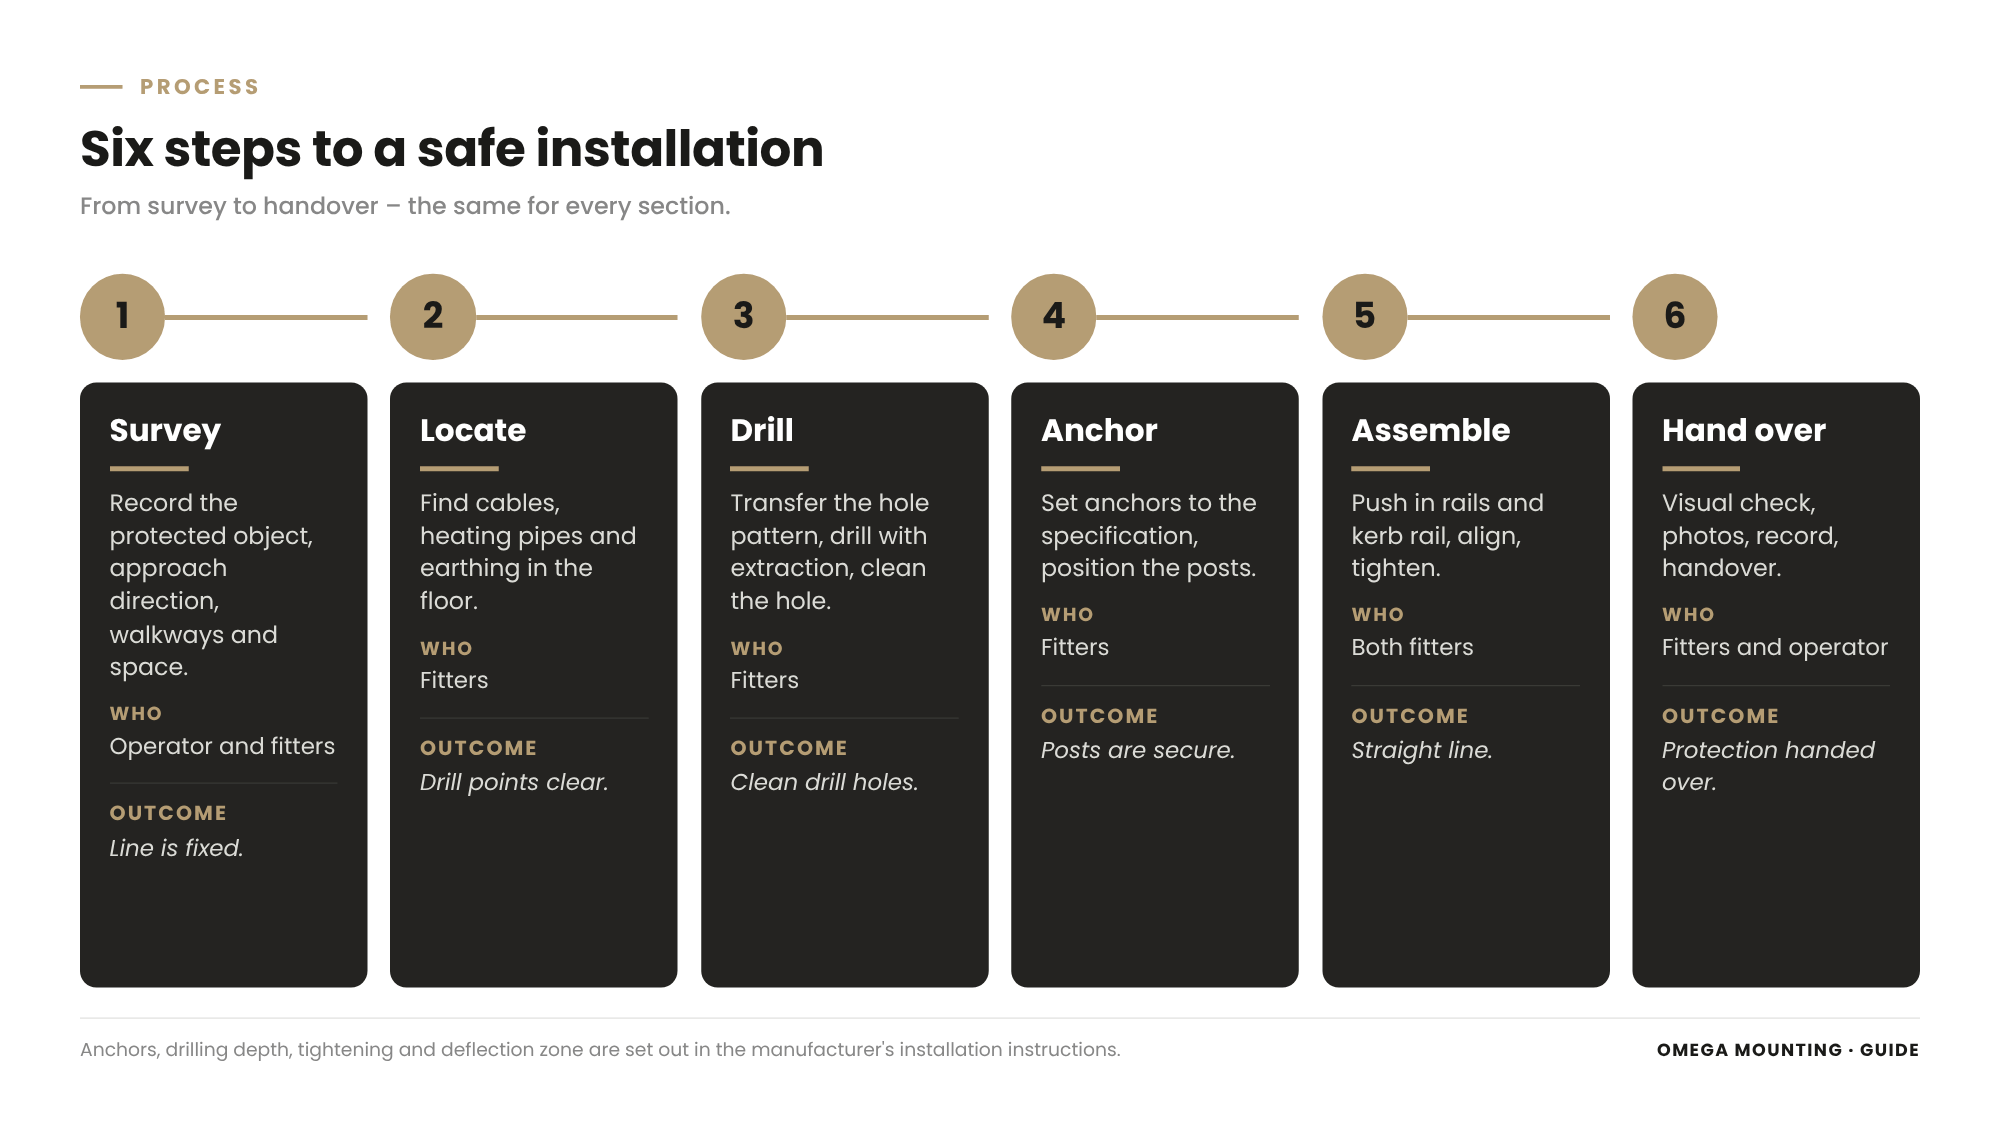
Installing impact protection means setting up a protection system of posts, rails and floor rails so that it keeps forklifts and pallet trucks safely away from walls, plant, racking and walkways. The installation covers survey and planning, locating services, drilling and anchoring, assembly and handover.
Anyone having impact protection installed works through six steps. Survey: record the protected object, approach direction and space. Locating: find services in the floor. Marking and drilling: transfer the hole pattern from the base plate. Anchoring: set anchors to the manufacturer's specification. Assembly and alignment: fit posts, rails and floor rail. Handover: check, photograph, hand over.
Why plastic needs a special installation
A steel guard is rigid. It passes the force of an impact directly to the anchors and the floor. Plastic impact protection, on the other hand, gives way. It bends, absorbs part of the energy and then stands up again. For that it must be allowed to move. If the space the manufacturer specifies behind it is missing, it cannot do that.
What the installation is not
The installation is not the selection. Which system belongs where is decided by the operator with the manufacturer and the occupational safety specialist. Which types there are is shown in the article Types of impact protection. We install what has been planned – and say beforehand if something does not fit on site.
What plastic impact protection consists of
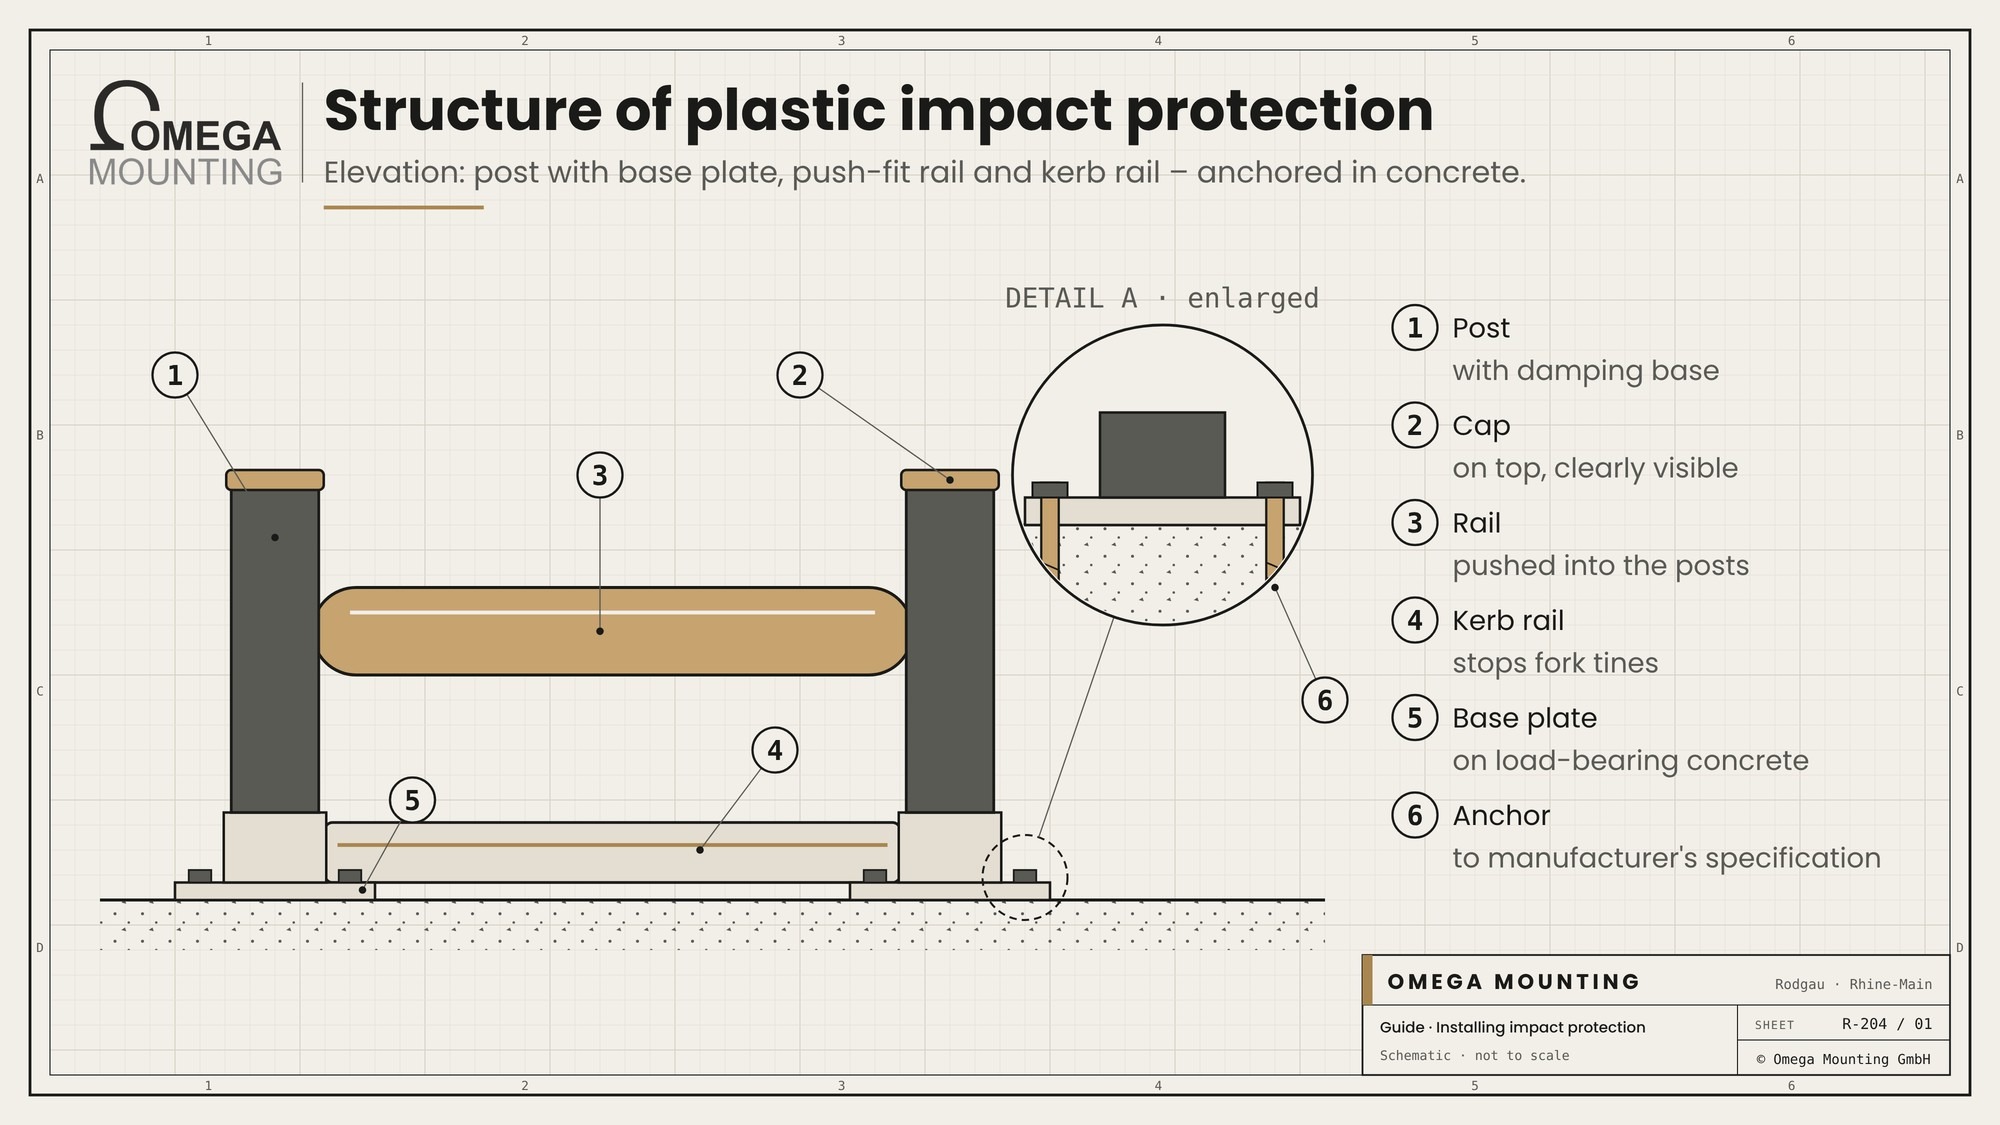
Anyone who knows how the system is built also knows where the critical points of the installation are.
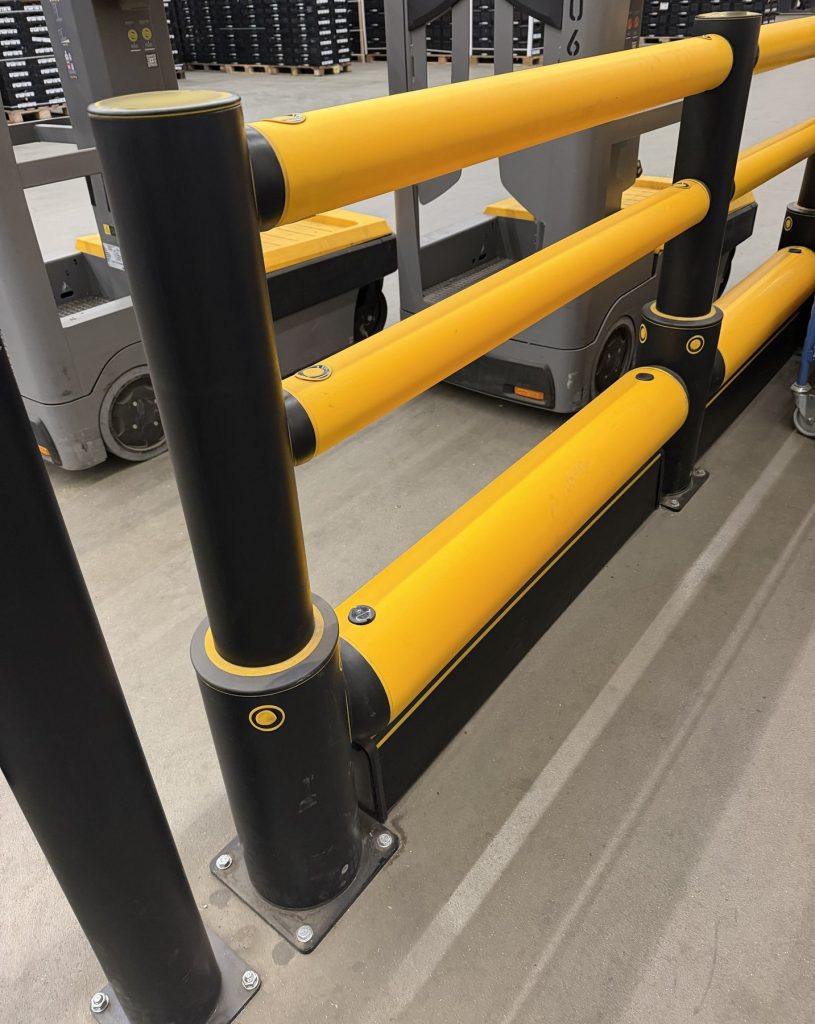
Post with base plate
The post is the load-bearing part. It stands on a base plate that is anchored in the floor. The base plate usually contains an element that gives way on impact and dampens the blow. The base plate is the most important point of the whole installation.
Rails
The rails connect the posts. They are pushed into the posts and secured. On impact, they distribute the force over several posts. Depending on the system, there are one or more rails one above the other.
Floor rail
The floor rail sits right at the bottom. It stops fork tines and pallets at floor level that would slide under a rail. Especially in front of walls and racking, it is often the part that takes the most knocks.
Corners, ends and caps
Corner posts connect two lines at an angle, as at a hall corner. End posts close off a line. Caps on top of the posts protect the inside from dirt and make the post visible.
Pedestrian barriers for walkways
For walkways there are barriers with a handrail. They are higher than plain impact protection and often have an additional rail near the floor. The barrier shows the way and keeps vehicles away from pedestrians.
Planning: line, approach direction and deflection zone
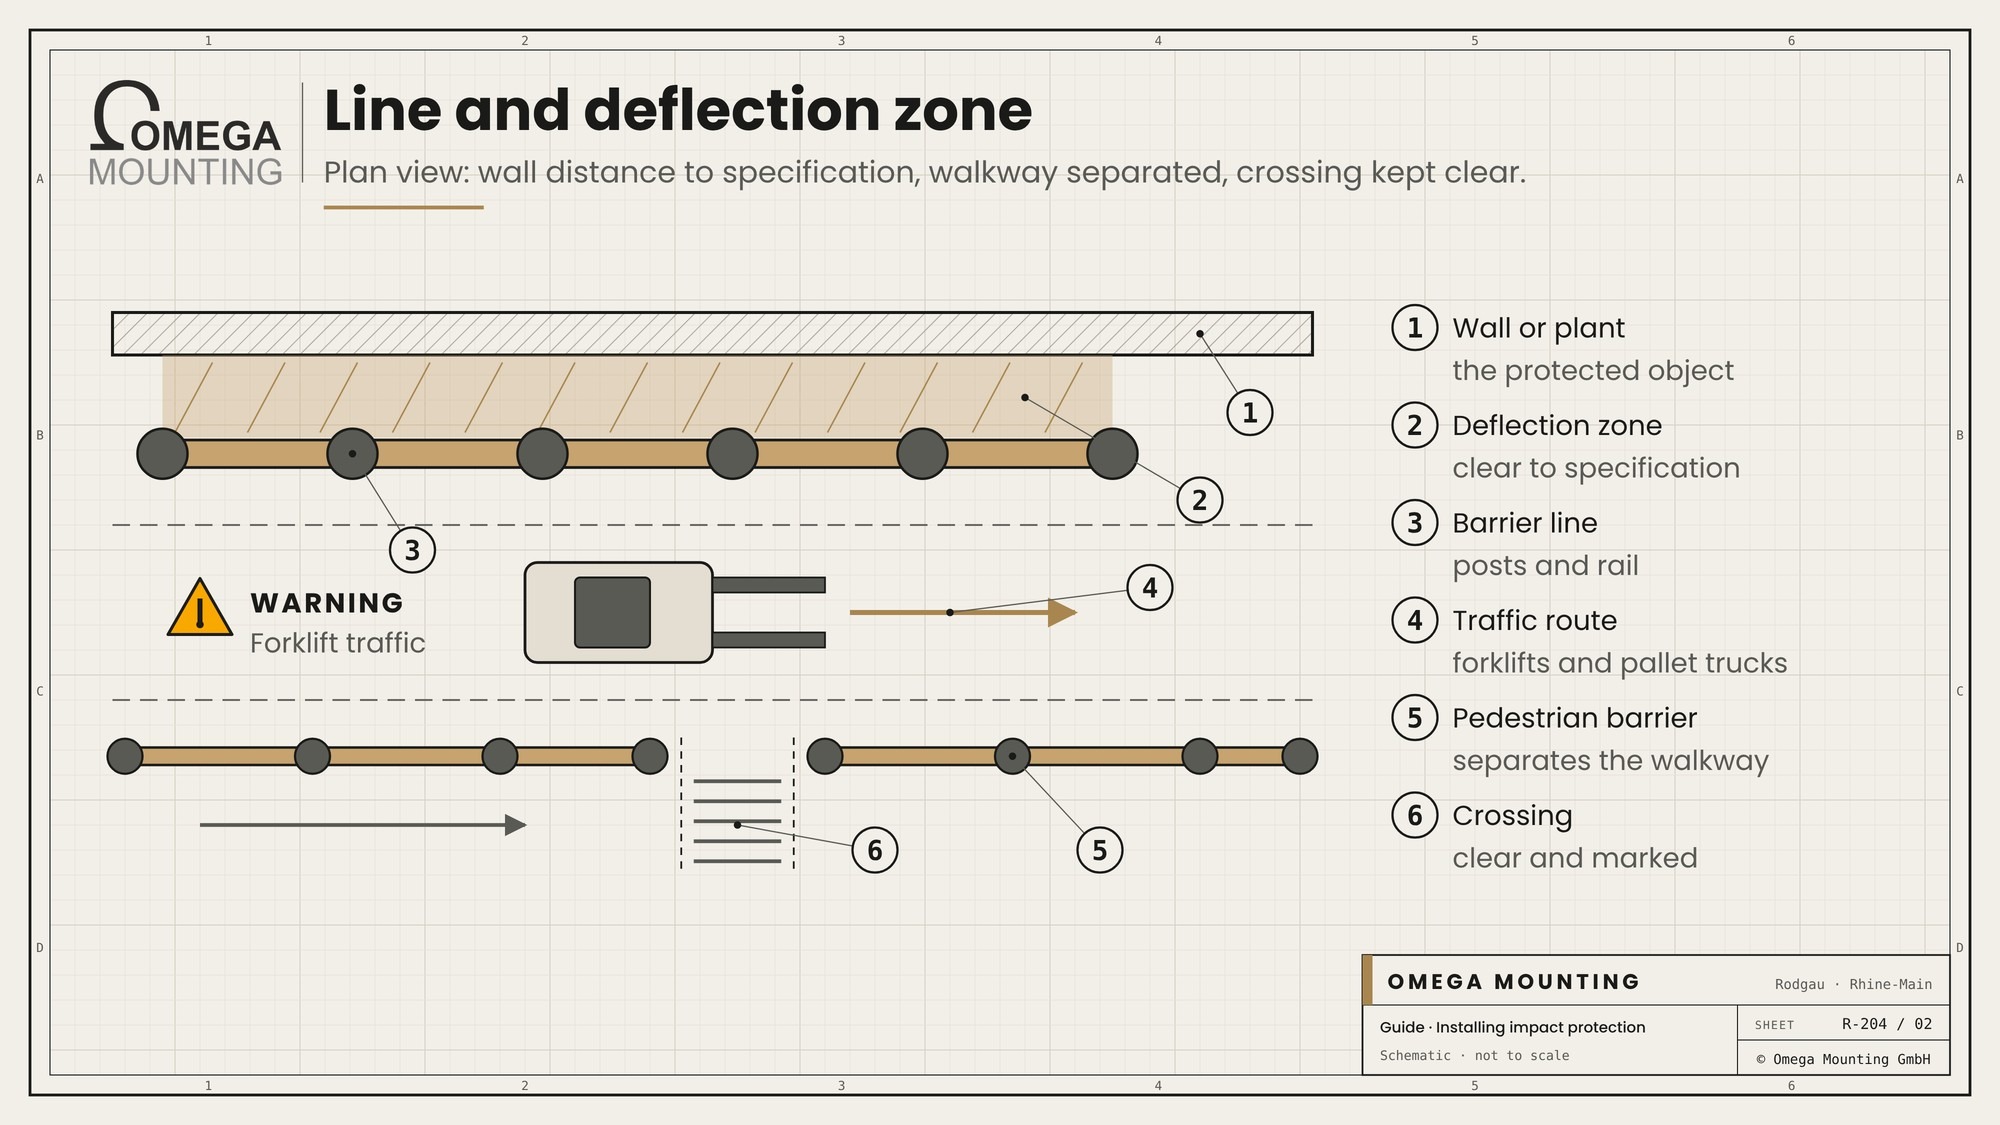
Before a hole is drilled, the line is fixed. Planning decides whether the impact protection will work later.
What is to be protected
First, it is decided what is to be protected: a wall, a hall column, racking, plant, a pipe or a walkway. This determines where the protection must stand and how high it should be.
From which direction it is approached
Forklifts rarely drive straight at an obstacle. They come at an angle out of a bend, reverse or swing out with the rear. The line must cover these paths – at the ends too. Protection that leaves a corner open only shifts the damage to the next point.
The deflection zone
Plastic impact protection deflects on impact. The manufacturer specifies how much space it needs behind it for this. Planning must keep this deflection zone clear. It varies by system: low rails and floor rails often need little space, high barriers need more. If the space is missing, the barrier presses on impact against what it is meant to protect.
height
The height depends on what hits it. Fork tines strike low, loads on the forks higher up, pallet trucks right at the bottom. That is why many lines combine a high rail with a floor rail. The height needed follows from the vehicles in the hall.
Visibility
Impact protection should be seen before it is hit. The signal colours of the systems help here. During planning we make sure that posts do not disappear behind racking or in shadow and that ends are easy to see.
Cold and temperature
In cold stores and freezer areas, plastic behaves differently than in a warm hall. The manufacturer specifies the temperature range for which the system is suitable. This information belongs in the planning before ordering.
Crossings and escape routes
Escape routes, emergency exits and fire extinguishers must not be obstructed. Pedestrian crossings get a gap in the barrier or a gate. These points are marked during the survey.
Separating walkways and traffic routes
Where people and forklifts share a hall, the pedestrian barrier is often more important than the impact protection at the wall.
What the workplace requires
Under the German Workplaces Ordinance, pedestrians must have a sufficient safety distance from vehicles, and the boundaries of traffic routes must be recognisable where use requires it. How this is implemented in the individual case follows from the operator's risk assessment. A pedestrian barrier is one of the most effective measures for this.
Where barriers make sense
Typical points are walkways along aisles, exits from offices and welfare rooms, crossings at doors and charging areas where industrial trucks are charged and parked. Especially where vehicles manoeuvre, the barrier clearly shows where the walkway is.
Height and floor rail
A barrier needs a handrail at the right height and a rail at the bottom that stops forks and wheels. Both are set by the system. During installation we make sure the line runs straight and that no gap remains through which a vehicle could reach the walkway.
Before the first drill hole: floor and services
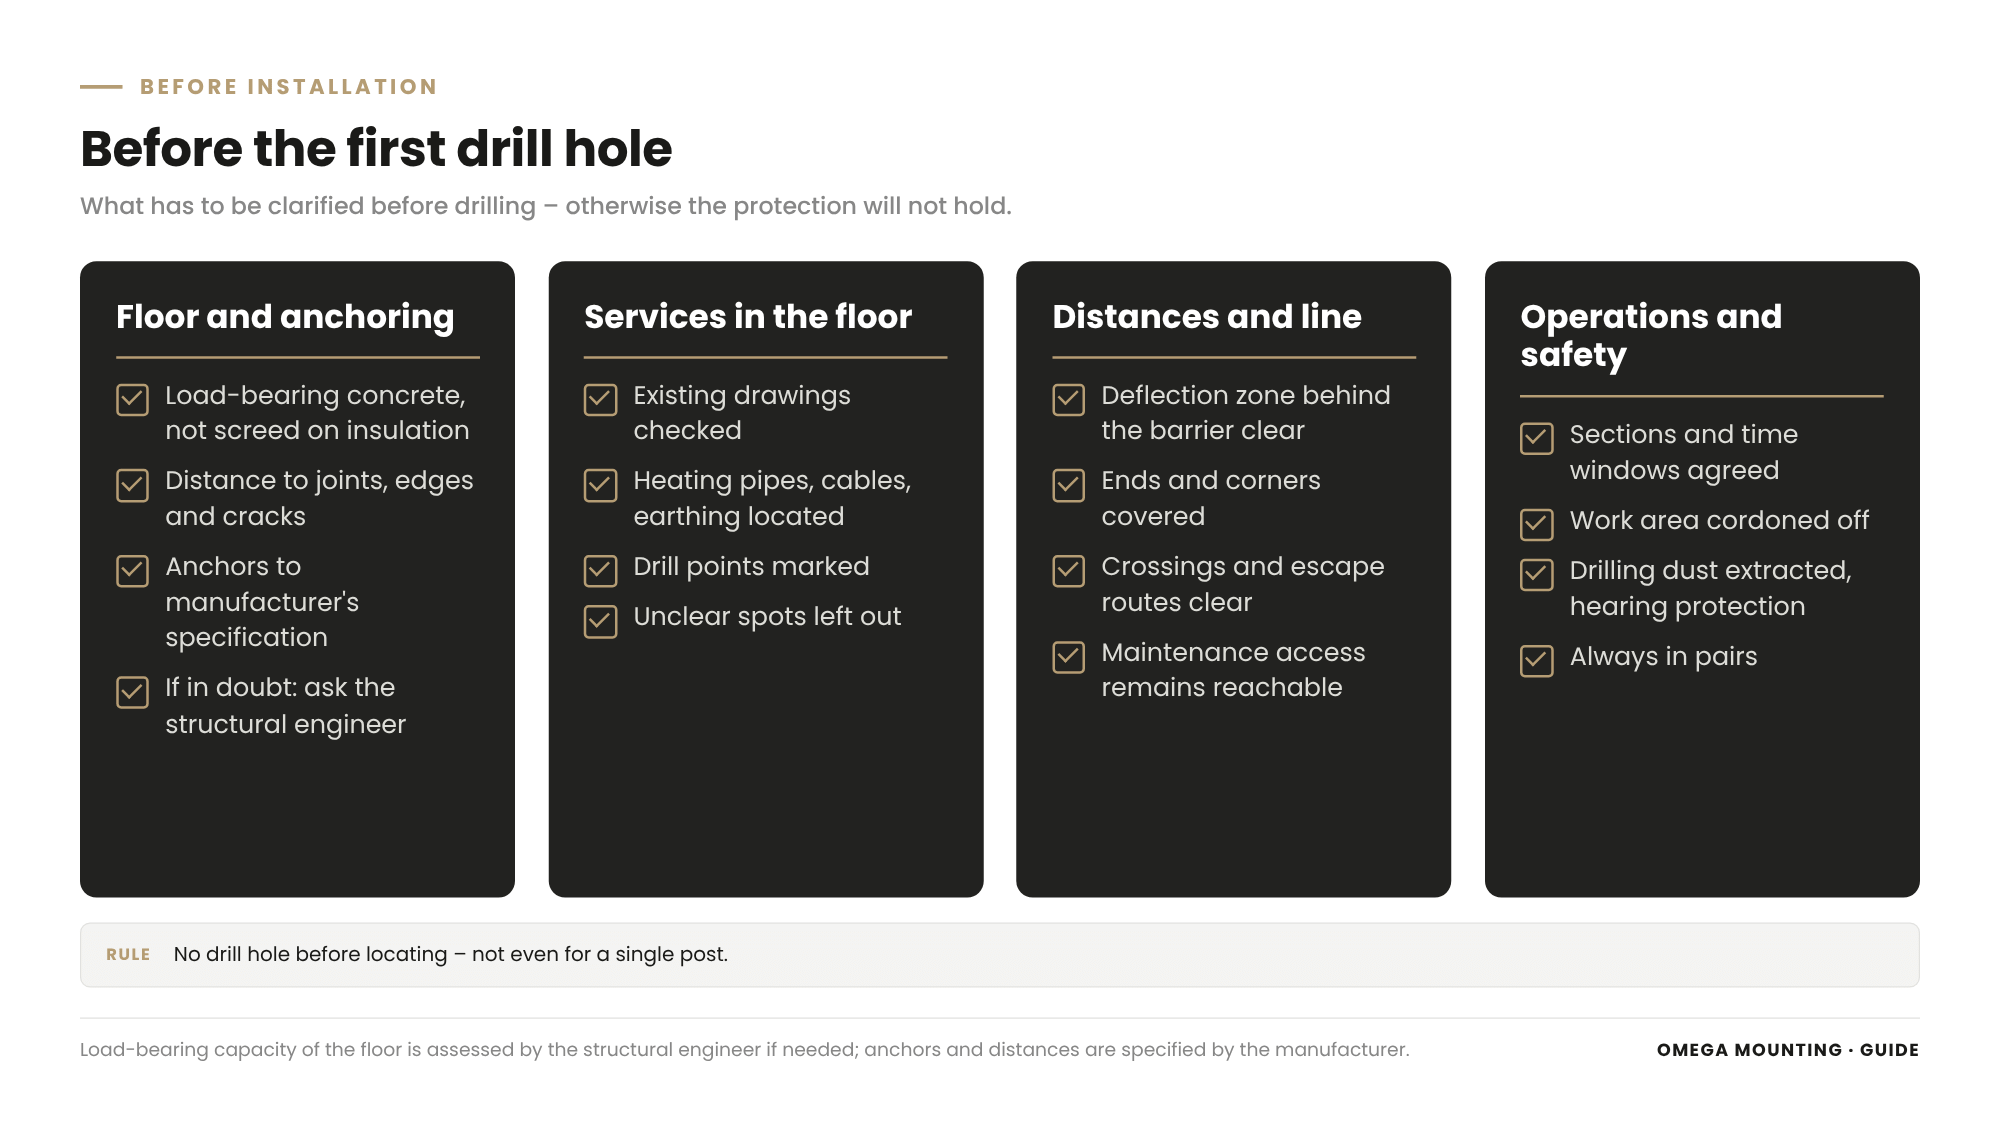
Impact protection is only as good as its anchoring – and the anchoring only as good as the floor it sits in.
Which floor?
Anchoring is done in load-bearing concrete. An industrial concrete floor takes anchors differently from screed on insulation or mastic asphalt. Clarify beforehand what you are drilling into. If there is doubt about the load-bearing capacity, the structural engineer belongs at the table.
Joints, edges and gradient
Anchors need distance from joints, edges and cracks. A post directly at an expansion joint holds less well. A gradient in the floor is compensated during alignment – to the manufacturer's specification, not with improvised packing.
Services in the floor
Hall floors often contain heating pipes, cables, earthing strips or drainage pipes. Existing drawings help but do not replace locating on site. Before every drill hole, what lies beneath is checked. A drilled heating pipe under a warehouse aisle costs more than any knock.
Drilling dust and noise
Drilling into concrete produces dust that can contain quartz. We drill with extraction and wear respiratory protection where necessary. Hearing protection is part of it. How core drilling in industrial floors works is shown in the guide Core drilling in industry.
Installing impact protection: step by step
Once the line, floor and services are clarified, assembly begins. We always work in the same order.
Marking out
The line is marked on the floor. The base plates are laid out and the hole pattern transferred. The distance to the wall or plant is checked once more.
Drilling
Drilling is done to the manufacturer's specification for the chosen anchors. Drill diameter and drilling depth are set out in the installation instructions. Where there is reinforcement in the concrete, the hole is not simply drilled through but moved as specified.
Cleaning the drill hole
A drill hole full of drilling dust holds no anchor. It is blown out and brushed until clean. With bonded anchors this step is decisive.
Setting the posts
The posts are placed over the drill holes, the anchors set and initially only lightly tightened. That way the line can still be aligned.
Pushing in rails and floor rail
Rails and floor rail are pushed into the posts and secured as specified. Now it becomes clear whether the distances are right.
Aligning and tightening
The line is aligned and the posts set vertical. Then the anchors are tightened to the specified torque. How to do this properly is shown in the guide Using a torque wrench correctly. Finally, the caps go on the posts.
Anchoring: drilling, cleaning, setting anchors
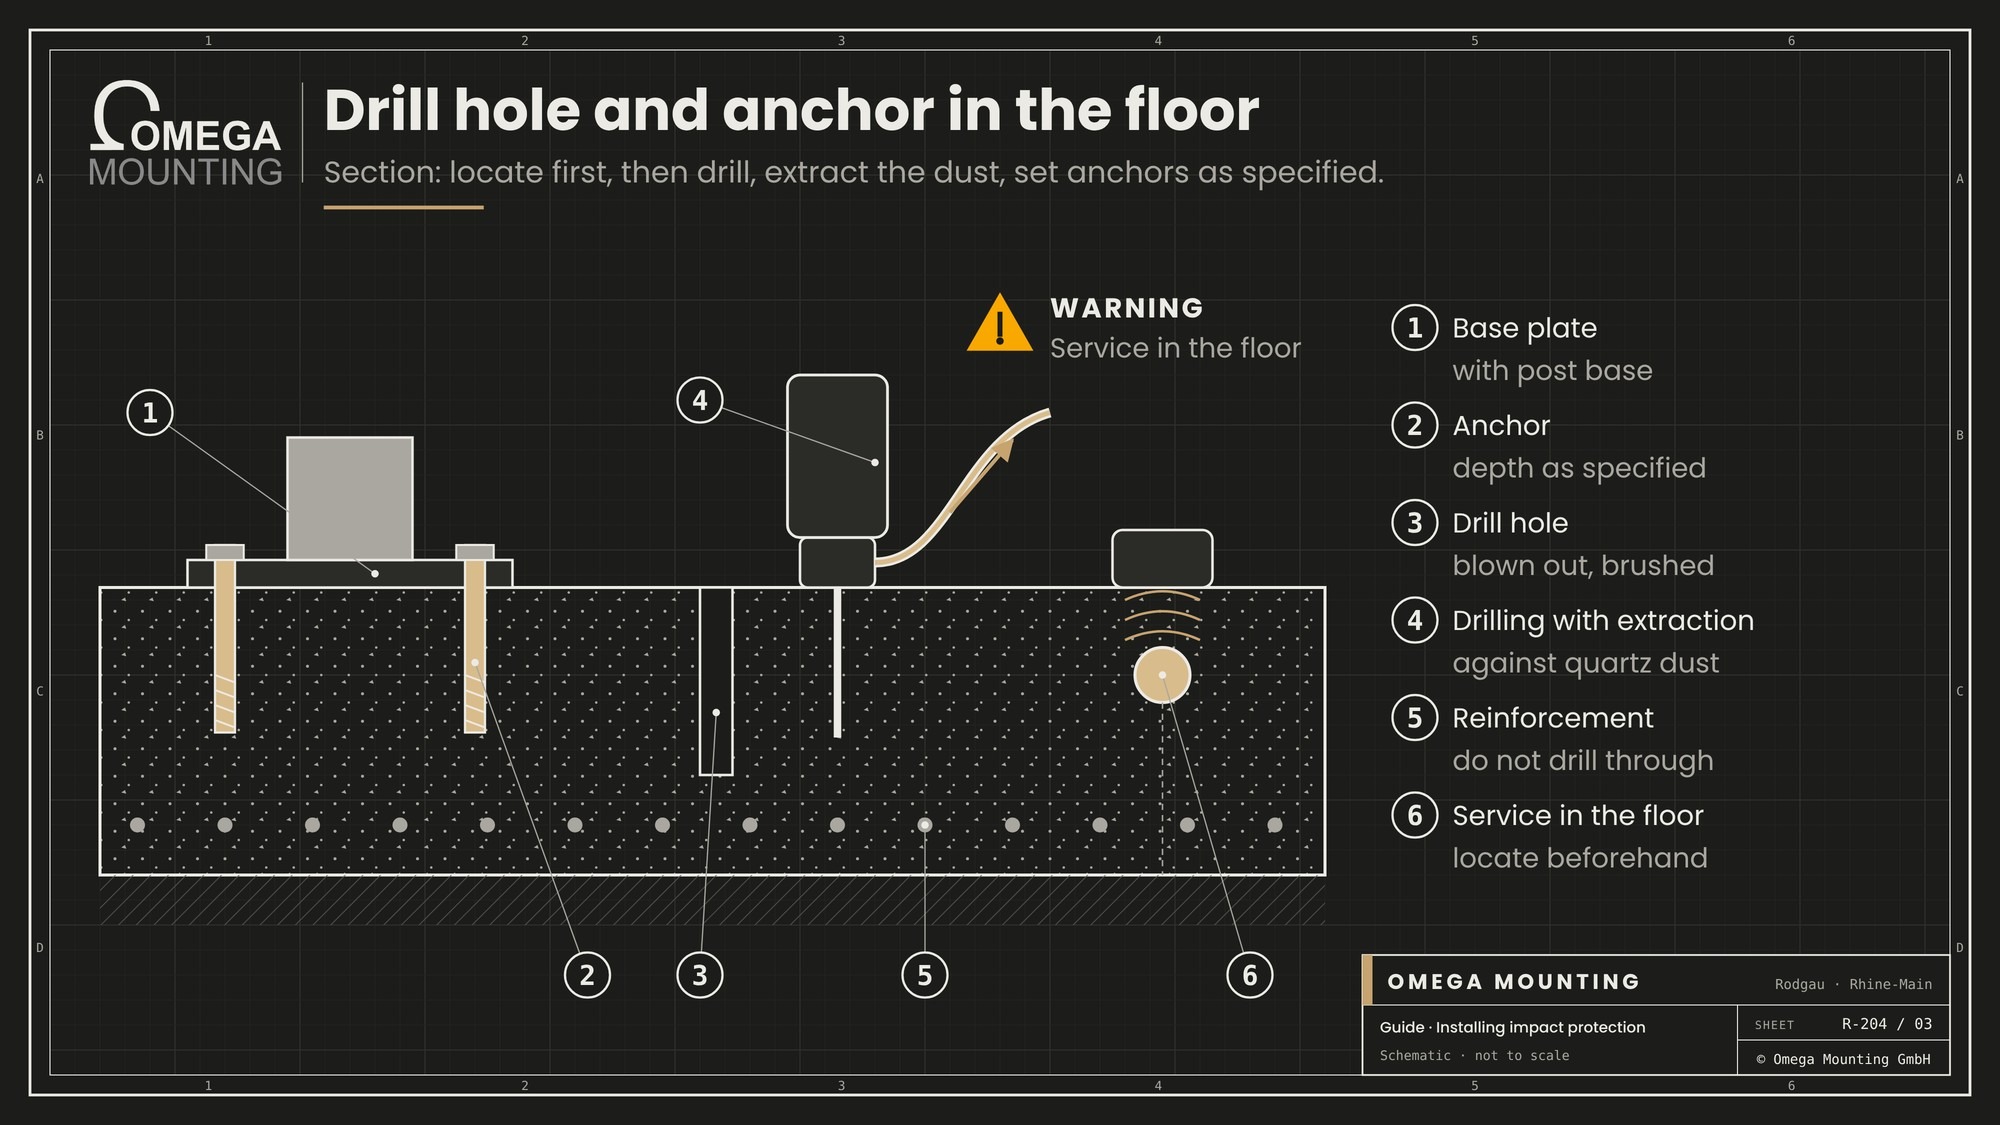
Anchoring is the part of the installation that you no longer see later. That is exactly why it has to be right.
Which anchor?
Which anchor is used is specified by the system manufacturer. Often these are heavy-duty anchors or bonded anchors, matched to the floor and load. We do not set anchors other than those specified. How heavy-duty anchors work is shown in the article Heavy-duty anchors.
Depth and edge distance
Every anchor needs a minimum depth in load-bearing concrete and distance from the edge. Both are stated in the anchor approval and the installation instructions. If there is not enough space, another solution is agreed with the manufacturer.
Tightening
The anchor is tightened to the specified torque – no more and no less. Too tight can crack the concrete, too loose lets the post wobble. We tighten with a torque wrench and note it in the record.
Testing
After tightening, every post is checked by hand. If anything wobbles, assembly stops until the cause is clear.
Hall column, racking, door: what matters at typical locations
Every location in the hall places its own demands on the installation.
Hall column
Columns carry the roof. An impact can weaken them, even if little is visible on the outside. Around the column, the protection is set so that it covers it from every side from which it can be hit. The anchors do not sit in the column foundation if the manufacturer or structural engineer rules this out.
End of racking
The ends of racking are hit particularly often. The protection must cover the first upright without narrowing the aisle. How damaged racking is repaired after an impact is shown in the guide Rack repair after the inspection finding.
Door and door reveal
To the right and left of doors, posts or short lines protect the reveal and the guide rails of the door. The protection must not obstruct the door and must stand so that vehicles can still pass safely through the door.
Machines and pipes
In front of plant, control cabinets and pipes, the protection is set so that maintenance access remains clear. Where maintenance regularly needs to reach the plant, an opening or a removable element is planned in.
Installation during operation
Impact protection is almost always installed while the hall keeps working. That needs coordination.
Sections and time windows
We install in sections. The operator decides which aisle is free when. That way traffic in the other areas keeps moving.
Cordoning off
The work area is cordoned off and marked. Forklifts are diverted. Pedestrians can see where they can walk.
Noise and coordination
Drilling into concrete is loud. Where offices, picking stations or break rooms are nearby, we agree the noisy work beforehand and move it to quieter times if the business wishes.
In pairs
We always work in pairs. One drills and sets, the other holds, aligns and watches the traffic. What applies to lone working is shown in the guide Lone working on construction sites.
Handing over clean
Drilling dust, packaging and offcuts are removed immediately. A drill hole that was not needed is sealed. After the installation, the hall should look as it did before – only better protected.
Acceptance and documentation
The installation is only finished once it has been checked and handed over.
Visual check
Every section is walked: are all posts secure? Are the rails secured? Is the distance to the wall right? Are crossings and escape routes clear? Are all caps fitted?
Photos and record
We photograph every section and record anchors, tightening and special features. Later you can see from this how the protection was installed – including what lies under the base plate.
Instruction
At handover we show where the crossings are, which parts can be replaced and what to look out for on walk-rounds. That way staff know how the new protection works.
Handover to the operator
The operator receives the record, photos and installation instructions. He decides how the protection is included in his checks.
After installation: checking and acting after an impact
Installed impact protection is not something you forget.
Looking regularly
On walk-rounds, the protection is looked over: are posts leaning, rails displaced, caps missing? Does a base plate wobble?
After an impact
After a heavier impact, it is checked whether the plastic has recovered, whether the base plate still sits firmly and whether the anchors have suffered. What to do then is described in the guide Impact protection: plastic or steel? in the chapter on impacts.
Replacing parts
With modular systems, individual rails, posts or caps can be replaced. We use original parts and check the anchoring at the same time.
Combining plastic and steel
Not every location in a hall needs the same protection. Often the best solution is a combination.
Where plastic fits
Along walkways, at walls, racking and doors, where forklifts approach at normal speed, plastic is usually the right choice. It is light, quick to install and recovers after an impact.
Where steel comes in
Where heavy vehicles hit the same spot very fast or again and again, plastic reaches its limits. There we build steel impact protection to measure. How such a custom-made solution is created is shown in the guide Impact protection: standard or custom-made?.
Transitions
Where plastic and steel meet, there must be no gap. We plan the transitions so that a vehicle cannot get through between two systems.
Extending and rebuilding: when the layout changes
Halls change. Racking is moved, traffic routes relocated, new plant arrives. Modular impact protection can move with it.
Extending the line
New sections are connected to existing posts if the system provides for this. Here too: locate first, then drill.
Moving posts
If a post is moved, the old anchoring is removed and the drill hole sealed. Whether anchors may be reused is stated in the approval. Usually new ones are set.
Old drill holes
Open drill holes are trip hazards and collect dirt. They are sealed flush so that the floor stays clean and cleaning machines do not get caught.
Spare parts and wear parts
With plastic systems, some parts wear faster than others.
Typical parts
Caps, floor rails, rails at heavily used points and the damping elements in the base plates are among them. Which parts are available is stated in the manufacturer's documentation.
Stock
For busy halls, a small stock of rails and caps is worthwhile. That way a damaged section is quickly closed again.
Original parts
For posts, rails and anchors: original part or a part approved by the manufacturer. Only then is the behaviour on impact right.
Safety rules during installation
A few rules apply to every impact protection installation.
- Locate services before drilling.
- Cordon off and mark the work area.
- Extract drilling dust, wear hearing protection.
- Set anchors only to the manufacturer's specification.
- Keep the deflection zone behind the barrier clear.
- Never obstruct escape routes and crossings.
- Always work in pairs.
Typical mistakes when installing impact protection
We see a few mistakes again and again.
- Deflection zone ignored: the plastic cannot deflect and presses against what it is meant to protect.
- Drilled without locating: a heating pipe or cable is damaged.
- Anchored in screed: the anchors do not hold on the first impact.
- Drill hole not cleaned: the anchor does not sit firmly.
- Wrong anchors: an anchor other than the one specified holds differently.
- End left open: the forklift hits the corner next to the protection.
- Escape route obstructed: the protection blocks an exit.
- No floor rail: fork tines slide under the rail.
The mistake behind the mistakes
Almost all of these mistakes happen because planning is skipped. A survey with locating takes time. Impact protection that does not work costs more.
Who does what when installing impact protection?
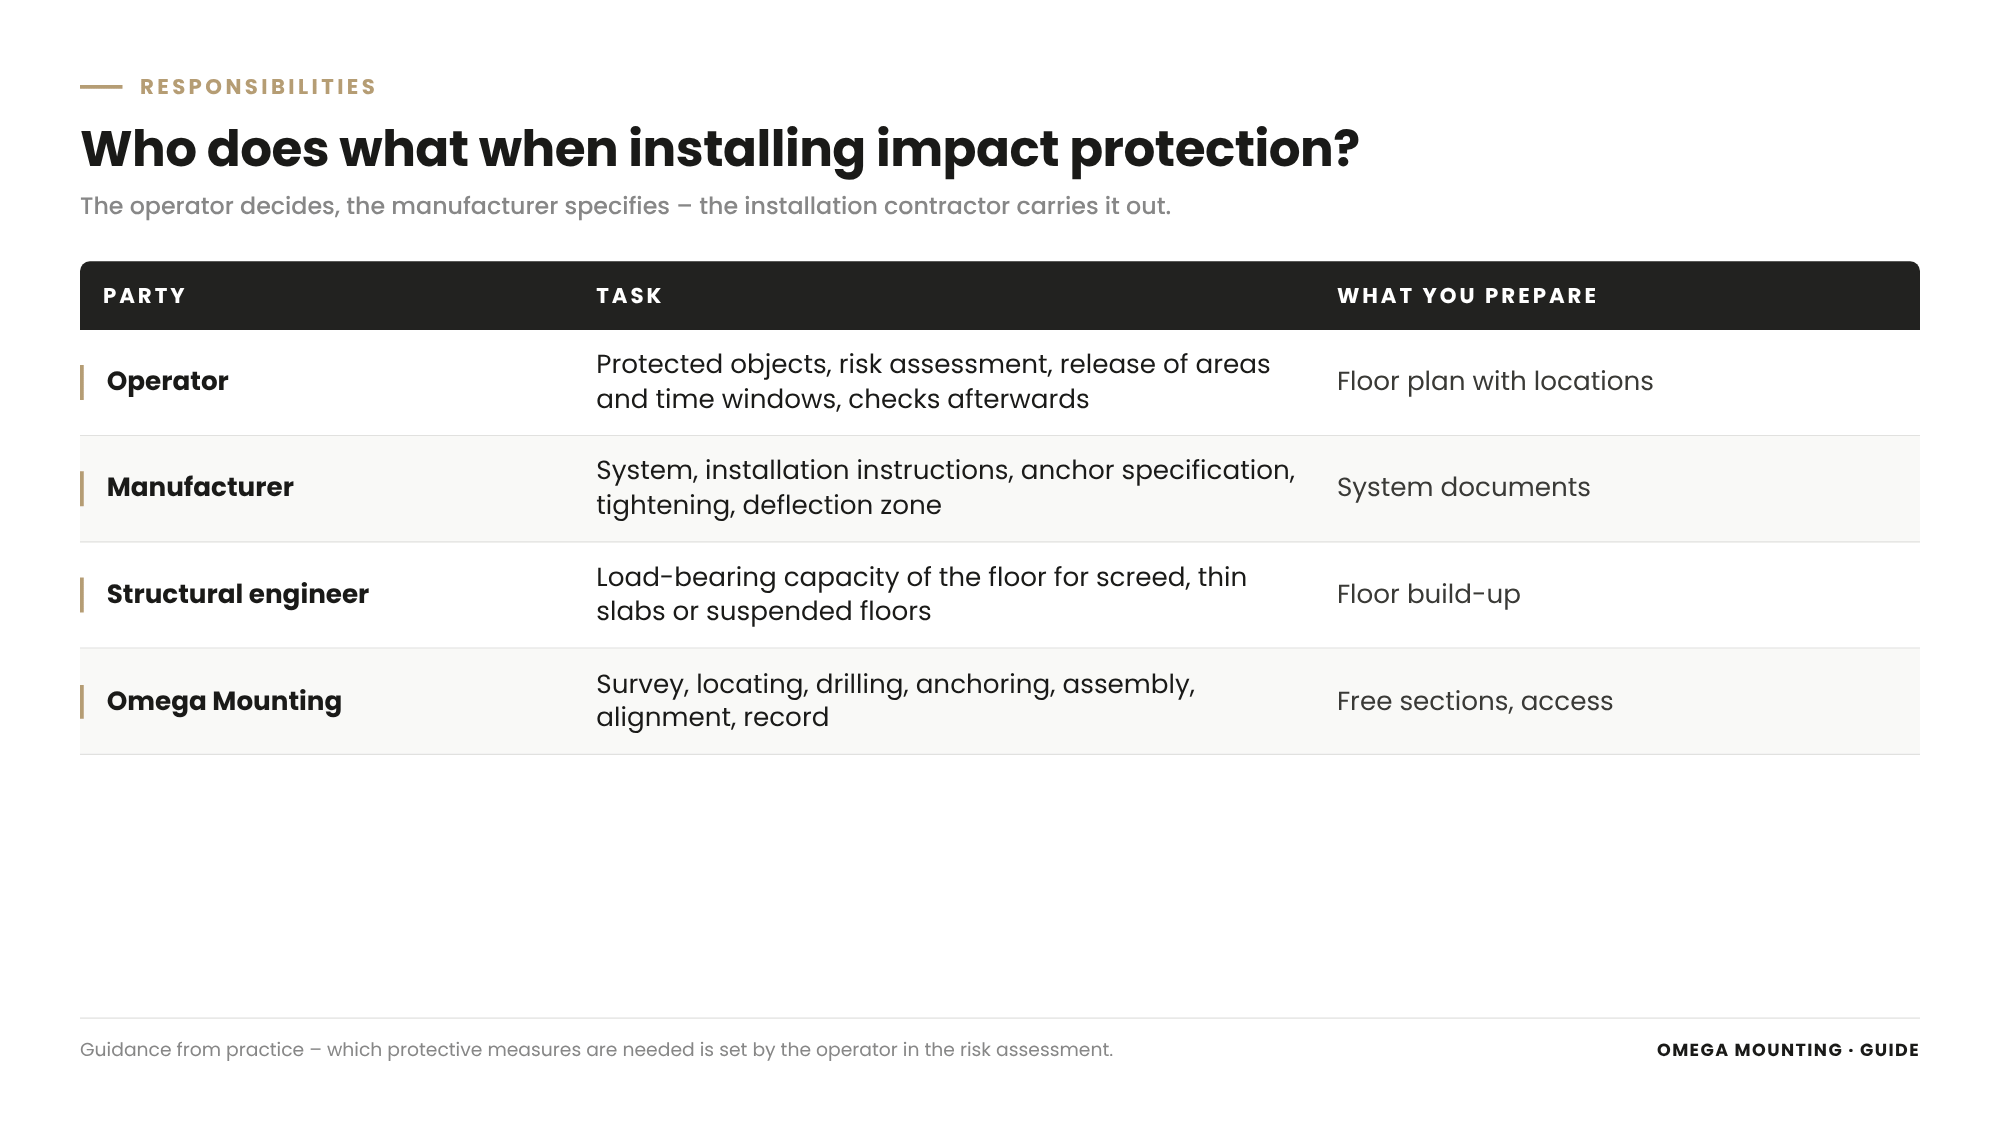
When installing impact protection, several parties work together. Clear roles prevent things from being left undone.
Operator
They decide what is protected, assess the risks, release areas and time windows and include the protection in their checks after installation.
Manufacturer
They supply the system with installation instructions, anchor specification, tightening and information on the deflection zone.
Structural engineer
If needed, they assess whether the floor can take the anchoring – for example with screed, thin slabs or suspended floors.
Omega Mounting
We survey, locate, drill, anchor, assemble, align and document – with our own fitters, our own tools and always in pairs.
Installing impact protection: what it means for your planning
Four questions help to set up the installation well.
What is to be protected?
Define the protected objects and walkways. The line and system follow from that.
What floor is there?
Clarify the floor build-up and drawings. If unclear, ask the structural engineer.
When are the areas free?
Plan time windows for each section. The installation then runs without downtime.
How will it be documented?
Decide who receives the record and photos and how the protection is included in your checks.
What belongs in the order when installing impact protection
A good quotation names each of these points explicitly.
Service
Survey, locating services, drilling with extraction, anchoring to the manufacturer's specification, assembly, alignment, handover.
The frame
Sections, time windows, cordoning off, disposal of packaging.
Record
Record per section with photos, anchor details and tightening.
Legal framework
Impact protection and pedestrian barriers are subject to, among other things, the German Workplaces Ordinance with the technical rules for traffic routes, the operator's risk assessment and the manufacturers' information. Many manufacturers have their systems tested to a British guideline with defined impact tests. This guide is not legal advice – clarify which obligations apply in your case with your occupational safety specialist.
Installing impact protection in the Rhine-Main region and throughout Germany: how we do it
From Rodgau we quickly reach Frankfurt, Offenbach, Hanau, Darmstadt, Aschaffenburg and the logistics areas of the region – and we work throughout Germany with our own teams. Anyone who wants impact protection installed in Rhine-Main gets survey, locating, installation and handover from a single source.
We install plastic systems to the manufacturer's specification and build steel protection to measure in our workshop. How we work in logistics in general can be found on the page on Logistics.
For you, that means protection that stands in the right place, sits firmly and does not hold up operations.
Project examples
Three jobs show how we install impact protection in halls and logistics.
Plastic impact protection in a warehouse
In a warehouse, we installed plastic impact protection: at a wall corner with a corner post, rails and floor rail, and along a walkway with a pedestrian barrier and floor rail. The posts were anchored in the concrete floor after locating, the rails pushed in and the line aligned. The installation was carried out section by section while the hall kept working.
Steel impact protection to measure
Where plastic reaches its limits, we build in steel. At a production business near Offenbach, we welded impact protection in our workshop and anchored it on site with heavy-duty anchors. The job is described in the report made-to-measure impact protection near Offenbach. How we installed protection made of square tube at a loading dock at Frankfurt Airport is shown in the report Impact protection for a loading dock.
Shall we install your impact protection?
Send us a floor plan with the locations to be protected and the system details – we will tell you what the installation could look like. Get in touch now.
What this means for your role
Buyers: Ask whether survey, locating, extraction when drilling, handover and a record are included in the quotation.
Planners: Plan the deflection zone behind the barrier and the walkways in the layout from the start.
Project and site managers: Plan sections and time windows and clarify floor build-up and services beforehand.
Maintenance managers: Include the impact protection in your walk-rounds and keep spare parts available.
Logistics managers: Decide which aisles are free when and inform drivers about diversions.
Occupational safety specialists: Check whether walkways, crossings and escape routes are properly taken into account in the planning.
Impact protection installation sheet: template on request
For your installation, we have put together the impact protection installation sheet. For each section it asks about planning and deflection zone, floor and locating services, anchoring and tightening, assembly and handover. Request the template via our contact form – keyword “Impact protection installation sheet”.
Why Omega Mounting?
With over twenty years of experience in installation and maintenance, we know that impact protection is only as good as its anchoring. That is why we locate before every drill hole, anchor only to the manufacturer's specification, keep the deflection zone clear and hand over every section with photos. We always work in pairs and, during operation, in such a way that your hall keeps running. For you, that means protection that stands where it is needed and holds on the first impact. Talk to us about your hall – get in touch.
Conclusion
Installing impact protection means planning the line with its deflection zone, checking the floor and services, anchoring to the manufacturer's specification, assembling properly and handing over. Anyone who saves on planning pays on the first impact.
With a survey, locating, the right anchors and a handover with photos, plastic impact protection delivers what it promises. If you want impact protection installed, get in touch with us.
Planning a move-in, installation or maintenance in the Rhine-Main region?
Tell us briefly what you need – we'll come back with an honest assessment.
Free, no-obligation callback
You may also be interested in these guides
Maintenance & Servicing
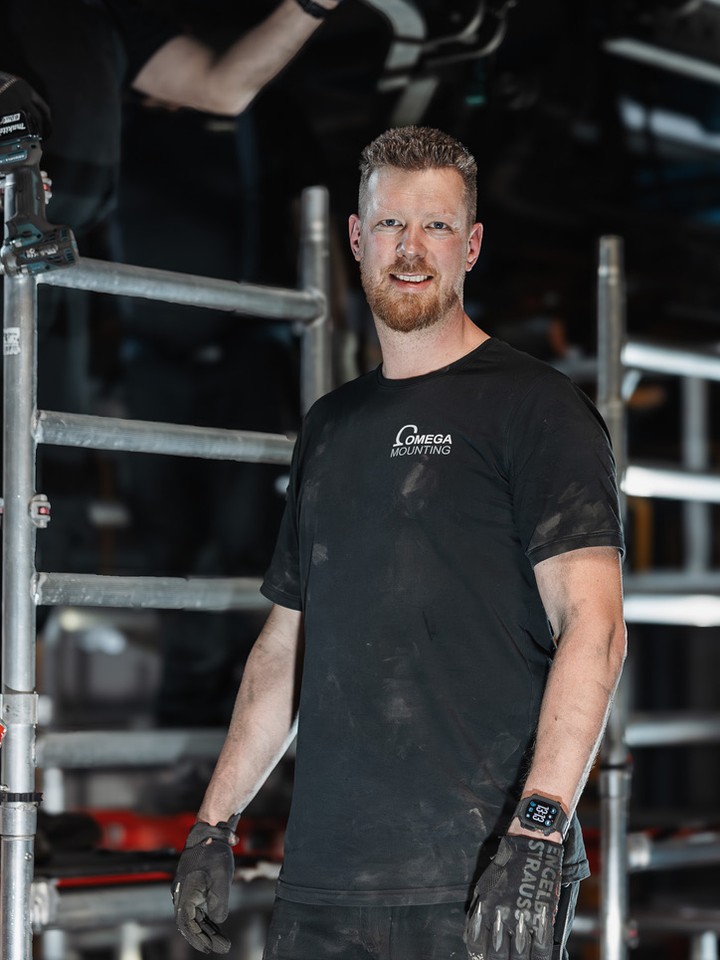
About the author
Tobias Schott
Managing director of Omega Mounting GmbH, Rodgau · more than 20 years of hands-on experience in installation and maintenance
A trained mechatronics technician, working in maintenance, servicing and industrial installation since 2004 – first alongside his father, and with Omega Mounting since 2012: from overhead conveyors in Frankfurt to the crane system in a new-build hall. He plans and leads lifting operations as an appointed person (AP) in data centers and on industrial sites in the Rhine-Main region, trains and examines operators of cranes, mobile elevating work platforms and telehandlers, and is a qualified occupational safety specialist. On jobs abroad he is known as the “German Troubleshooter” – the person you call when a site gets stuck. He learned what quality means from his father, not from a manual: Made in Germany as a standard for his own work, not a label. That is why quality comes first at Omega Mounting – ahead of speed and price. He writes these guides from that practice: what works on our sites is in them – what exists only on paper is not.
Frequently asked questions
The line is planned, services are located, the posts are anchored in the concrete with anchors to the manufacturer's specification, rails and floor rail are pushed in, everything is aligned and handed over.
As much as the manufacturer specifies as the deflection zone for the system. The plastic gives way on impact. If this space is missing, it presses against the wall it is meant to protect.
No. Anchoring is done in load-bearing concrete. With screed, mastic asphalt or thin slabs, it is clarified beforehand whether and how anchoring is possible – with the structural engineer if needed.
Those specified by the system manufacturer. Usually these are heavy-duty or bonded anchors. Drilling depth, edge distance and tightening are set out in the installation instructions.
Yes. We install in sections, cordon off the work area and agree the time windows with you.
Where pedestrians and forklifts share a hall, a pedestrian barrier is often the most effective measure. Whether it is needed follows from the operator's risk assessment.
The protection is looked over: has the plastic recovered, are the base plate and anchors still firm? Damaged parts are replaced.
Yes. From Rodgau we are quickly on site in the region, and we work throughout Germany with our own teams.
Send us a floor plan with the locations to be protected and the system details. We will assess the effort and come back to you with a proposal. Go to the contact page.
 English
 German