
- Guide – Maintenance
Using a torque wrench correctly: types, setting, calibration
By Tobias Schott · Reading time approx. 29 minutes · As of: October 2026
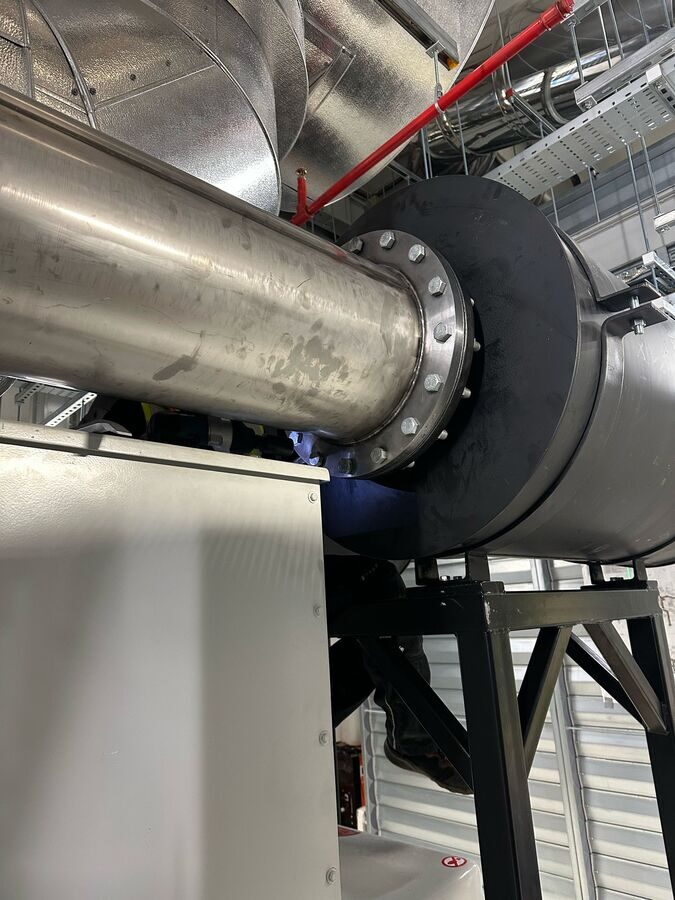
A torque wrench only applies the specified tightening torque to the bolt if it suits the task, is set correctly, is pulled steadily at right angles and is demonstrably calibrated – if any of these points is missing, the set value is just a number on the scale and says nothing about the joint.
Anyone who wants to use a torque wrench correctly quickly notices: the tool looks simple but is unforgiving. A pipe on the handle, an extra push after the click, a wrench that has not been checked for years – and the bolt is too tight or too loose. You cannot see it. You only notice when the joint loosens or the bolt breaks.
This guide explains the torque wrench from type to calibration. It shows which wrench suits which range, how to set, apply and pull it, what it cannot do and how to look after and document it. It is aimed at maintenance technicians, fitters, foremen and everyone who orders or accepts bolting work.
Which tightening torque a bolt needs is deliberately not covered here. Guide values by property class, the influence of friction, overstretching, flange connections and bolt locking are covered in our sister article, the torque table. This one is about the tool and the technique.
We write from the point of view of an installation and maintenance contractor from Rodgau near Frankfurt. We work with regularly calibrated torque wrenches and record tightening torques in the installation and maintenance record. We do not calculate tightening torques – they are specified by the designer or manufacturer.
Key points at a glance
- A torque wrench is a measuring tool, not an ordinary spanner – it measures or limits the torque with which a bolt is tightened.
- There are indicating wrenches, which show the value, and click wrenches, which give a signal at the set value.
- Choose the range so that the target value lies in the middle, not at the edge of the scale.
- Pull at the grip mark, at right angles to the handle, evenly and without jerking – stop immediately at the signal.
- Pipes on the handle are taboo; insert tools with a different lever length require the set value to be corrected.
- The torque wrench is not made for loosening, as a hammer or for retightening “to be on the safe side”.
- After use, wind it back to the lowest scale value, store it clean and have it calibrated regularly – check it immediately after a fall.
What is a torque wrench?
A torque wrench is a hand-operated tool that shows the acting torque when tightening a bolt or gives a signal when a set value is reached.
Torque is the product of force and lever arm. It is given in newton metres, Nm for short. Anyone pulling with the same force on a longer lever creates a greater torque. That is exactly what the torque wrench measures – and exactly why the point at which you pull matters.
The tightening torque is, however, only a means to an end. What holds a bolted joint together is the preload with which the bolt presses the parts together. A large part of the torque goes into friction in the thread and under the head. Why that matters is explained in detail in our torque table.
Indicating or click type: the two basic types
The DIN EN ISO 6789 standard divides hand-operated torque tools into two basic types:
- Type I – indicating wrenches. They show the current torque while tightening, via pointer, dial gauge or display.
- Type II – click wrenches. They give a signal at the set value, usually an audible and tangible click or a brief break-over of the handle.
The standard further divides both types into classes, for example by design, adjustability and scale. For practice, the basic distinction is enough. An indicating wrench tells you where you are. A click wrench tells you when to stop.
Why a torque wrench is a measuring instrument
A torque wrench is not an ordinary ring spanner with a scale. It contains a spring, a deflecting beam or a sensor – in other words, a measuring system. This measuring system ages, fatigues and can be knocked out of adjustment by overload or a fall. That is why the torque wrench belongs in test equipment management like a calliper, with a number, calibration date and next due date.
Types of torque wrench: an overview
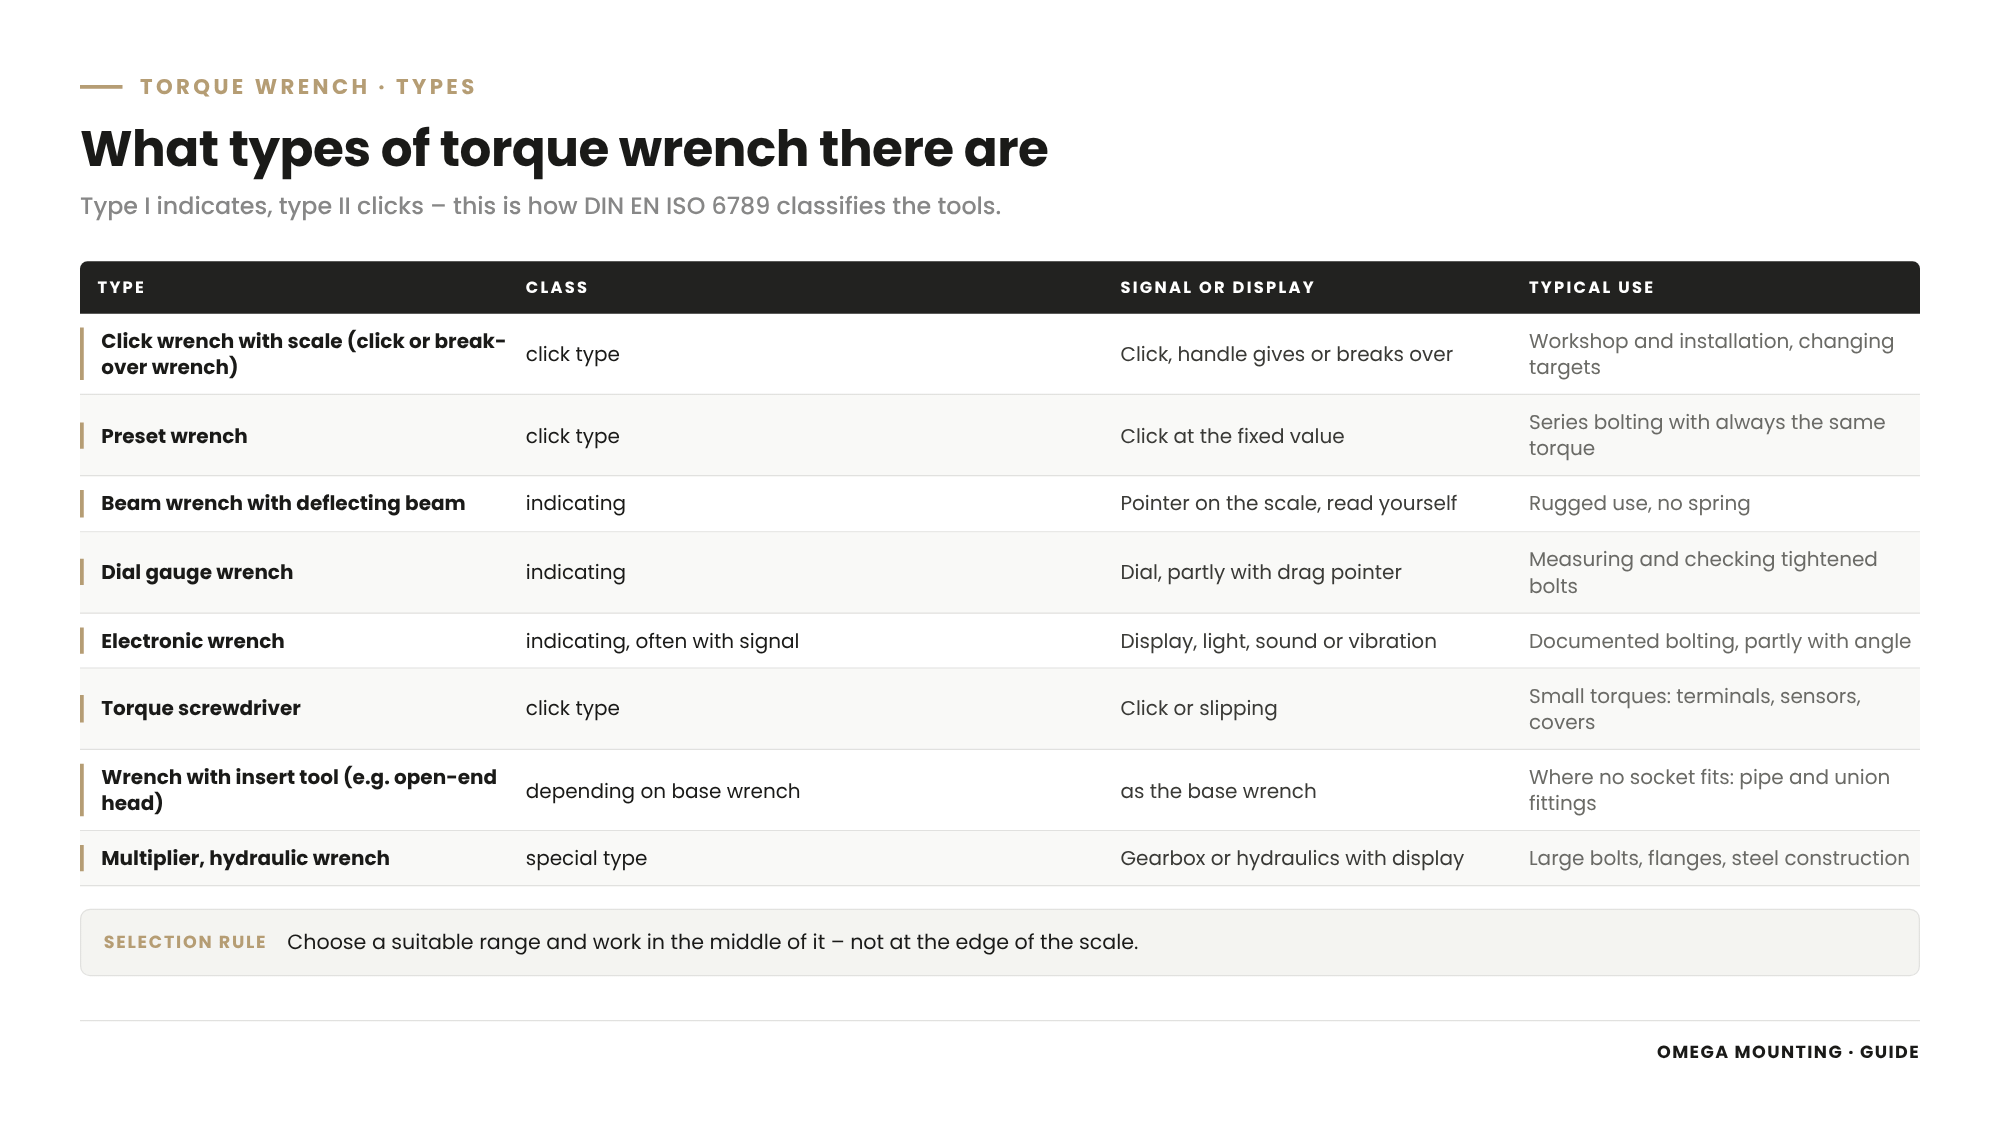
The most important types of torque wrench are click wrenches with scale, preset wrenches, beam wrenches, dial gauge wrenches, electronic wrenches, torque screwdrivers and wrenches with insert tools – for large torques, multipliers and hydraulic wrenches are added.
Anyone searching for “types of torque wrench” finds many names for few principles. The following overview sorts them.
Click wrench with scale
The click wrench is the most common type in the workshop and on installation. You set the target value at the handle, and a spring is preloaded. When the value is reached, a mechanism triggers: it clicks and the handle gives briefly.
Depending on the mechanism, it is called a click wrench or a break-over wrench. With a break-over wrench, the handle noticeably breaks over when triggered and then straightens up again. The signal can therefore be felt well even with gloves and in noise. Both belong to the click-type wrenches.
Preset wrenches
Preset wrenches have no scale for the user. The value is set once and secured, often with a tool or seal. They are suitable for series bolting with always the same torque. Accidental adjustment is impossible. In return, each value needs its own wrench.
Beam wrench and deflecting beam
The beam wrench is the oldest type. A deflecting beam bends under load, while a separate pointer stays put and shows the torque on a scale. It has no spring that can fatigue and is robust. But you have to keep an eye on the scale while pulling. In tight spaces or overhead that is difficult.
Dial gauge wrench
With dial gauge wrenches, the torque is shown on a round dial. Some have a drag pointer that holds the maximum value. That also makes it possible to check what torque a bolt has already been tightened to – with limitations, more on that under the limits of the tool.
Electronic wrenches
Electronic torque wrenches measure via a sensor and show the value on a display. Many give a light, sound or vibration signal at the target value. Some also measure the angle of rotation and store every bolting operation with value and time. That makes documentation considerably easier. In return they need charged batteries and more care.
Torque screwdrivers
For small torques there are torque screwdrivers. They work on the same principle as the large wrenches, just with a handle instead of a lever. Typical uses are terminals, covers, sensors and fine bolted joints in equipment. A large wrench is too inaccurate for such values.
Torque wrench with insert tool
A torque wrench with an insert tool has a standardised receptacle instead of a fixed square drive. There you insert the suitable head: ratchet head, ring head, open-end head, open ring head or square drive.
The open-end torque wrench is a torque wrench with an open-end head as the insert tool. It is needed where no socket fits – for example on union nuts of pipe fittings, on refrigeration and hydraulic lines or on joints where the line has to pass through the head. Important: every insert tool has its own lever dimension. If it changes the effective lever length, you must correct the set value. How is explained in the chapter on applying the wrench.
Multipliers and hydraulic wrenches
For large bolts, muscle power is no longer enough. A torque multiplier increases the torque of a normal wrench via a gearbox and is supported against a neighbouring part. Hydraulic wrenches generate the torque with a pump. Both require instruction, secure support and values from the tool manufacturer's data. For very large joints there are also hydraulic tensioning methods that stretch the bolt instead of turning it – that belongs in the hands of specialists with the right equipment.
Which torque wrench for which range?
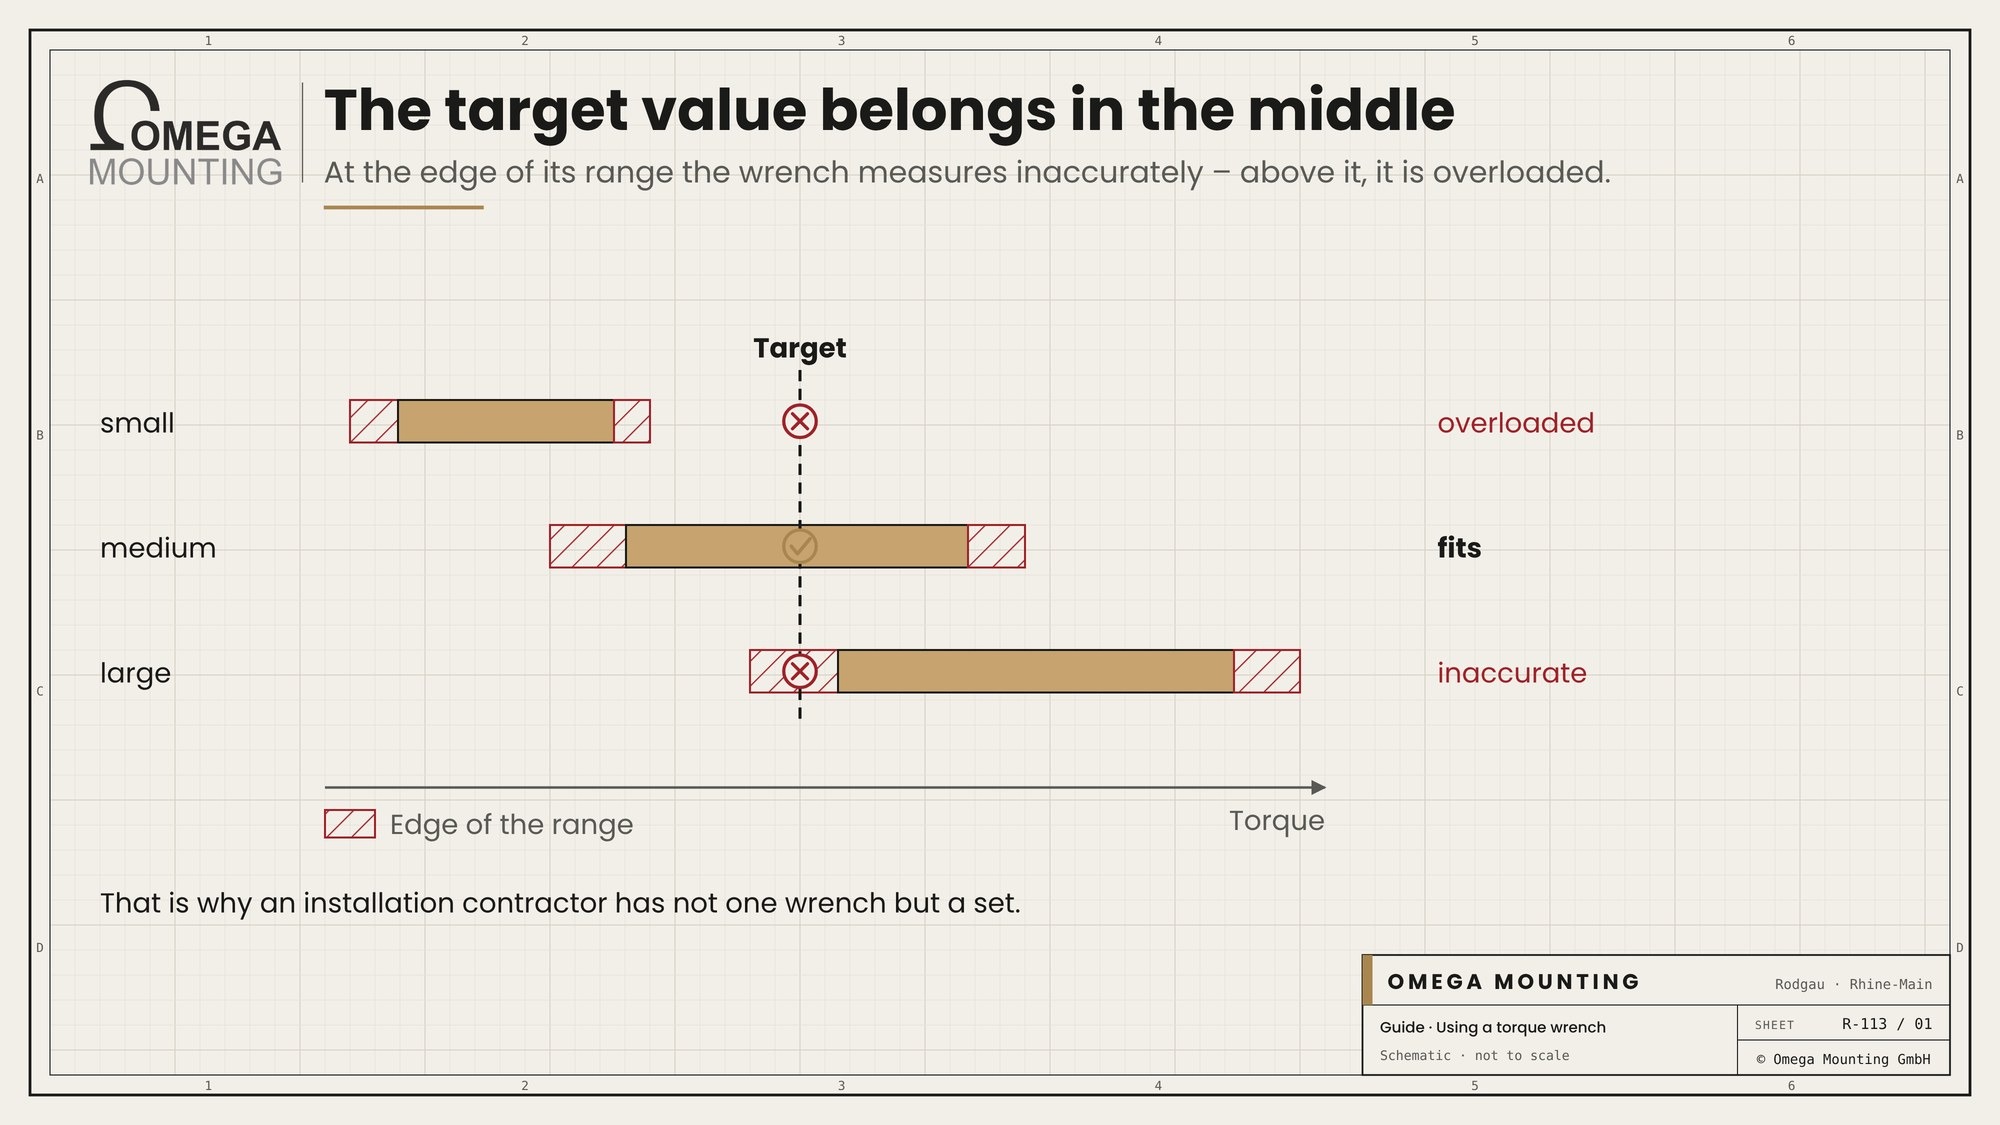
The right torque wrench is the one whose range has the target value well in the middle – not at the lower or upper edge of the scale.
Every wrench has a range with a lower and upper limit. The permissible deviation relates to this range. At the edges, especially at the lower end, friction in the mechanism and setting inaccuracies have a stronger effect. Anyone who tightens a small value with a large wrench measures inaccurately. Anyone who forces a large value with a small wrench overloads it.
Small, medium, large
In practice, a graded set has proven itself:
- Small values. Torque screwdrivers and small wrenches for equipment, covers, terminals and fine threads.
- Medium values. The classic workshop wrench for mechanical engineering, conveyors, brackets and smaller steel construction joints.
- Large values. Long wrenches, multipliers or hydraulic wrenches for crane runways, heavy machine feet, large flanges and anchors.
That is why an installation contractor has not one torque wrench but a set. If you order bolting work, it is worth asking which wrenches come along for which values.
Space, accessibility and drive
Besides the range, space counts. A long lever needs room to swing. A ratchet head needs less room than a fixed square drive with a socket. On pipework and in tight frames, often only an open-end or open ring head is possible. Also watch the square drive: the socket must fit the drive without chains of adapters.
How easy a bolted joint is to reach later is decided during installation. Our guide to maintenance-friendly installation describes how accessibility is planned in from the start.
Left-hand and right-hand threads
Many click wrenches only work clockwise, i.e. for right-hand threads. For left-hand threads you need a wrench that expressly triggers in both directions, or a separate wrench. A wrench that does not trigger in the opposite direction becomes an ordinary lever there – with no limit at all.
Setting a torque wrench: scale, fine scale, lock
You set a torque wrench by releasing the lock, setting the value on the main and fine scale, checking the unit and closing the lock again.
That sounds trivial. In practice, however, many mistakes happen here: wrong unit, misread fine scale, lock left open. That is why it pays to go through the steps deliberately.
Step by step
- Release the lock. Depending on the design, a knob at the end of the handle, a slide switch or a pull ring.
- Set the main scale. Turn the handle until the main mark is at the next lower scale value.
- Set the fine scale. Keep turning until the fine scale on the handle circumference adds the rest. Main and fine scale together give the target value.
- Check the unit. Many wrenches have two scales, newton metres and an imperial unit. Read only the Nm scale.
- Lock. Close the lock so that the value does not change while pulling.
- Check. Take one look at the set value before applying the wrench.
With electronic wrenches you enter the target value in the menu. Check the unit there too and, if available, whether the right mode is selected – torque or angle.
Where the target value comes from
The target value comes from the drawing, the installation instructions, the design specification or the manufacturer's data. It does not come from feel or from memory of the last site. If there is no specification, guide values help – with all the limitations regarding friction, material and coating. Guide values by thread and property class can be found in our torque table for bolts.
The tolerance belongs in the calculation
Every torque wrench has a permissible deviation. If the specification is a maximum value, the wrench with its tolerance must not exceed it either. So never set above the specified value to be “on the safe side”. With bolts, more is not safer.
Using a torque wrench correctly: applying and pulling
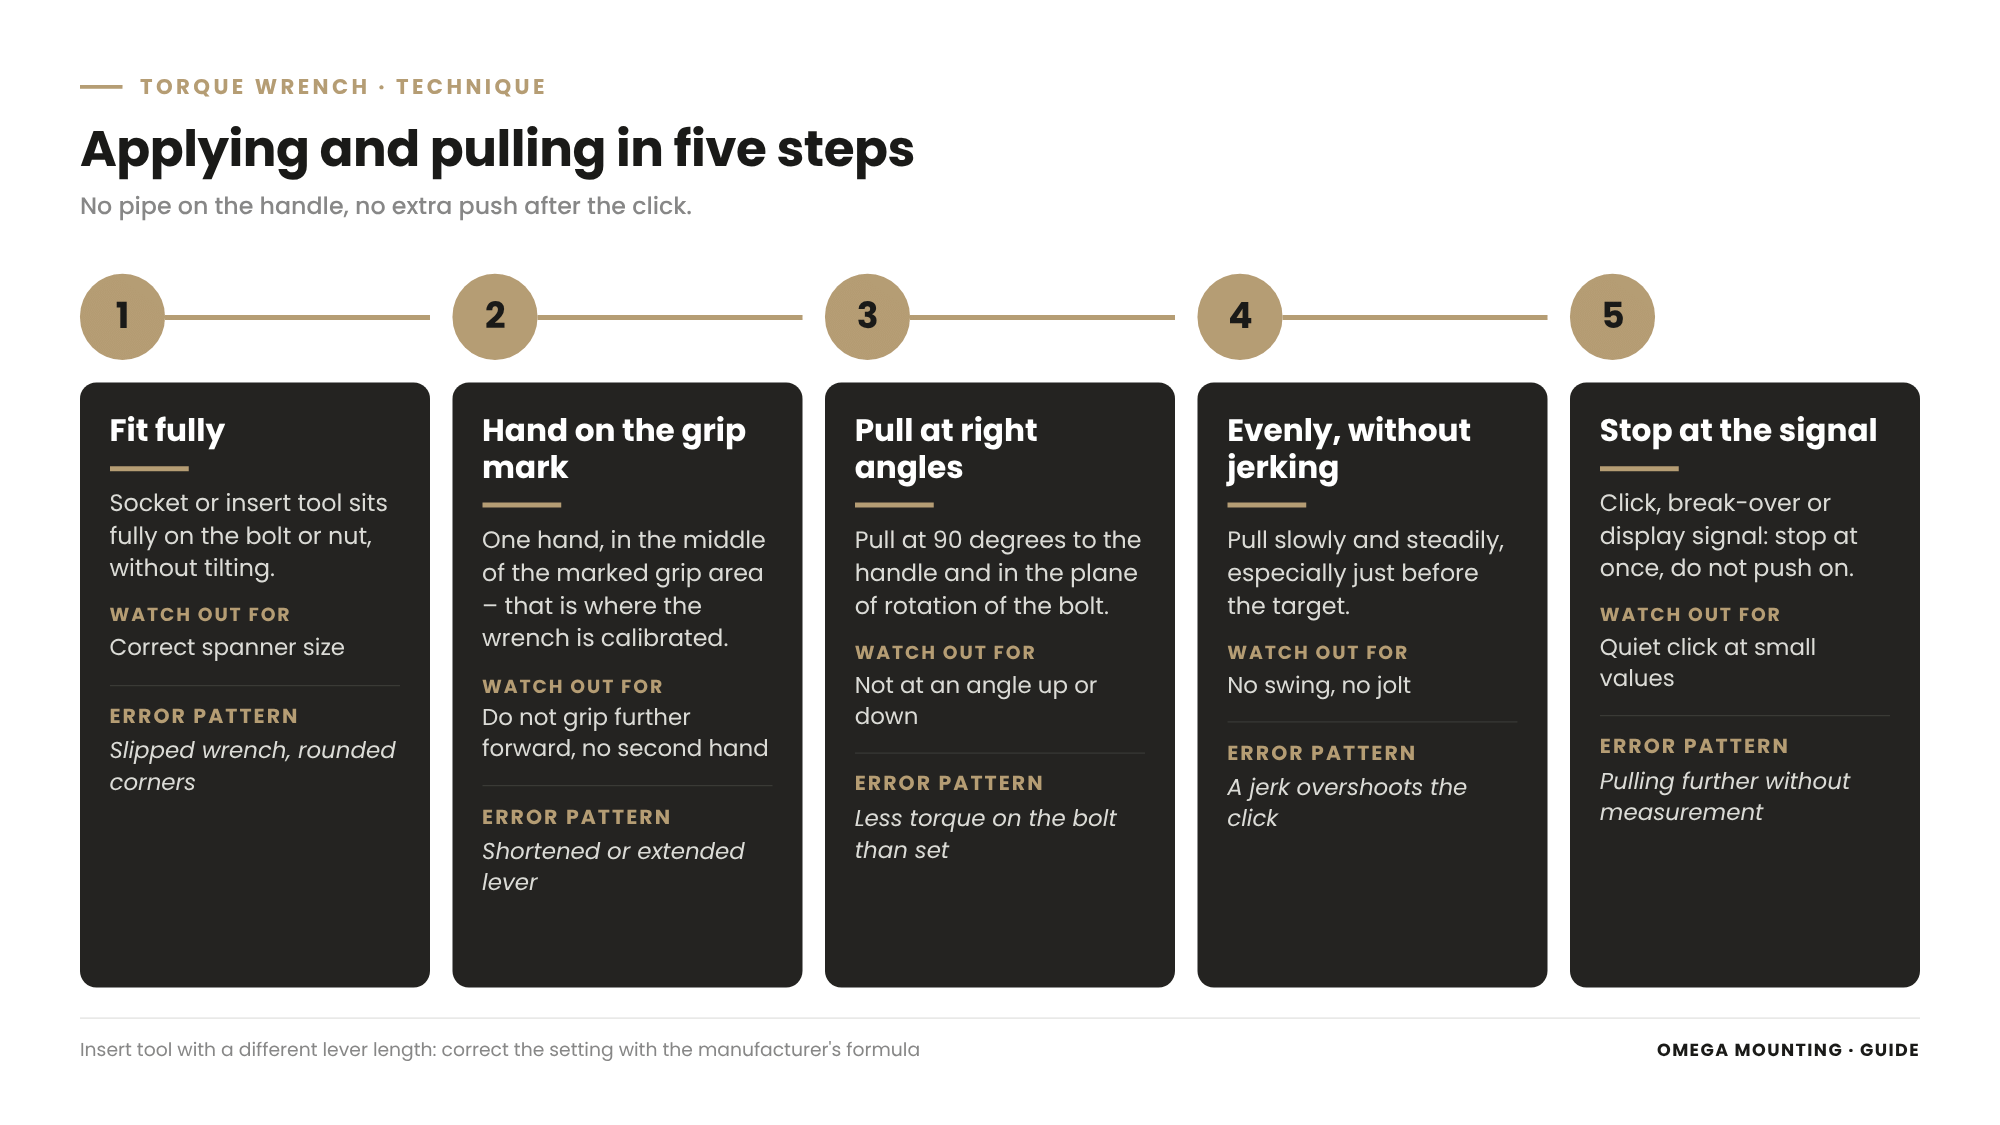
Using a torque wrench correctly when pulling means: fit the tool fully, hand on the grip mark, pull evenly at right angles to the handle and in the plane of rotation, and stop immediately at the signal.
This is where it is decided whether the set value reaches the bolt. The chapters before are preparation; this one is the actual technique.
Fit fully
Socket, insert tool or open-end head must sit fully and straight on the bolt head or nut. A half-fitted head tilts when pulled, rounds off the corners and distorts the torque. Also check that the socket locks cleanly onto the square drive. Dirty or worn sockets should be sorted out.
Hand on the grip mark
Many torque wrenches have a grip mark or a clearly defined grip area. That is where the wrench is calibrated. Grip the handle in the middle of this area, with one hand. Anyone gripping further forward shortens the lever. Anyone gripping further back or helping with the second hand changes the ratio of force and lever. With many click wrenches, triggering depends on where the force is applied. Whether your wrench is independent of this is stated in the manufacturer's data – if in doubt, always grip at the mark.
At right angles and in the plane of rotation
Pull at an angle of 90° to the handle and in the plane in which the bolt turns. An angled pull shortens the effective lever arm and tilts the wrench on the bolt. A pull out of the plane of rotation loads socket and square drive sideways and distorts the result.
If space allows, pull the wrench towards your body instead of pushing it away. That gives you more control and you do not slip when it clicks. Stand securely, keep your fingers out of the area into which the wrench swings when it clicks, and with nuts hold the counterpart with a second spanner if the bolt would otherwise turn with it.
Evenly, slowly, without jerking
Pull evenly and slowly towards the end. A jerky pull makes the torque briefly overshoot the target before the mechanism reacts. With click wrenches that means: the bolt is already further than the click says. With indicating wrenches you overestimate the reading.
Stop immediately at the signal
At the click, the break-over or the signal on the display, that's it. Do not push on, do not reapply to “make sure”, and do not pull through beyond the click. A click wrench does not limit the torque like a slipping clutch. Anyone pulling on after the click is pulling without measurement. Once it has clicked, the bolt is at the target value.
No pipe as an extension
A pipe on the handle lengthens the lever. The force is applied at a different point than intended, the click is no longer right and the wrench is loaded beyond its limit. Anyone who needs a pipe has chosen the wrong wrench.
Torque wrench extension: what changes the torque and what does not
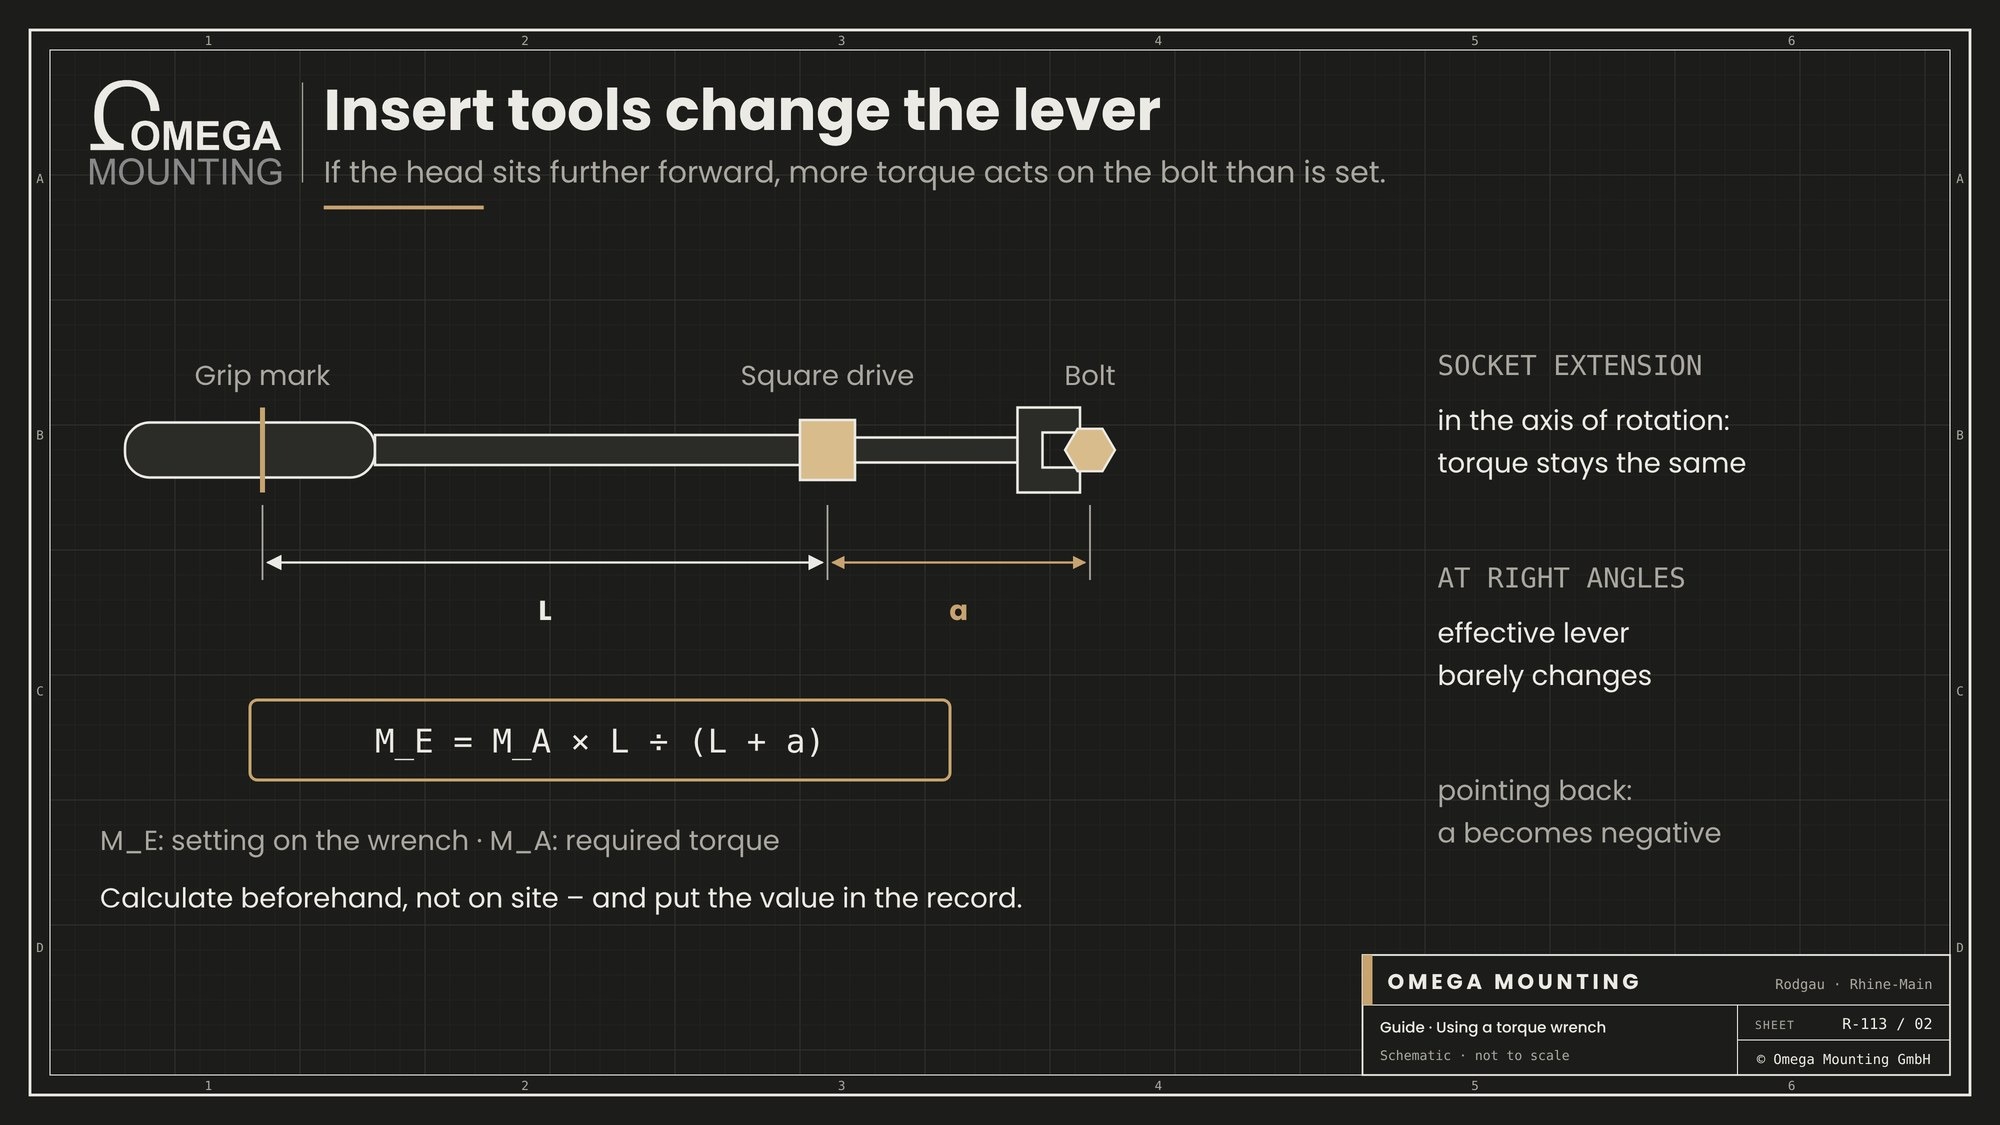
A socket extension between square drive and socket lies in the bolt's axis of rotation. It therefore does not change the torque. But make sure that you do not support the extension sideways with your free hand and that it stays straight. Universal joints create additional friction and lateral forces – use them only if there is no other way, and then as straight as possible.
It is different with insert tools that lengthen or shorten the lever. If the open-end or ring head sits further forward than the wrench's reference point, a greater torque acts on the bolt than is set. You then calculate the setting as follows:
M_E = M_A × L ÷ (L + a)
- M_E is the value you set on the wrench.
- M_A is the required tightening torque on the bolt.
- L is the effective lever length of the wrench, from the grip mark to the centre of the insert receptacle, according to the manufacturer's data.
- a is the offset of the insert tool, from the centre of the insert receptacle to the centre of the bolt. If the tool points back towards the handle, a becomes negative.
If the insert tool points at right angles to the lever, the effective lever barely changes. Many manufacturers state dimension a for their insert tools or allow the offset to be entered on electronic wrenches. Do not calculate in your head on site, but beforehand – and write the setting into the record.
Several bolts on one part
Where several bolts hold a part, they are not tightened to the final value one after another. First seat all bolts by hand or with a low torque, then tighten crosswise in stages to the target value. With flanges, this procedure is particularly important. The stages and the sequence are described in our torque table in the chapter on flange connections.
What the torque wrench cannot do
A torque wrench is not made for loosening bolts, not as a hammer, not as a lever and not for retightening “to be on the safe side” – each of these uses can knock the measuring system out of adjustment.
Not for loosening
Loosen tight bolts with normal tools. A breakaway torque is often well above the tightening torque. If it is applied with the torque wrench, the spring or mechanism can be overloaded. With wrenches that only click in one direction, there is no limit at all in the loosening direction. Whether a particular wrench is approved for loosening is stated in the manufacturer's data – if in doubt, it is not.
Not as a hammer and not as a lever
A torque wrench must not be struck against a part or used for aligning, prising or supporting. Blows and bending moments across the measuring direction knock the measuring system out of adjustment without it being visible from outside.
No retightening “to be on the safe side”
A bolt that has been tightened to the target value is not tightened again to make sure. A second pull adds no safety. Because of the higher static friction, the wrench often clicks before the bolt turns at all. A jerky second pull, on the other hand, can turn it a little further and beyond the target value. Neither says anything about the joint. If you do not know whether a bolt has been tightened, it is better to mark every tightened bolt – for example with a paint line.
Not a reliable test tool for finished joints
The torque wrench can only check to a limited extent what torque a bolt was tightened to. The further-turning torque, i.e. the torque at which a tightened bolt moves again in the tightening direction, differs from the original tightening torque. There are methods with indicating wrenches and drag pointers for checking. The assessment belongs in the hands of someone who knows the joint.
If the bolt keeps turning
If a bolt keeps turning without the torque rising, stop. That can be a pulled thread or a bolt that is stretching. Pulling on does not help. How to recognise an overstretched bolt and why it is replaced is explained in our torque table.
Angle tightening with the torque wrench
In angle tightening, a bolt is first seated with a snug torque and then turned further by a specified angle – snug torque and angle always come from the manufacturer's data.
The method is called angle-controlled tightening. It is less dependent on friction than tightening by torque alone, because the angle is directly related to the bolt's elongation. It is prescribed where an even preload is important.
How it works
- Snug torque. The bolt is tightened to the specified snug torque. That seats the parts firmly against each other.
- Mark or fit the measuring device. An angle gauge is placed between wrench and socket and supported with its arm at a fixed point. Electronic wrenches measure the angle themselves.
- Apply the angle. The bolt is turned evenly by the specified angle, without stopping.
- Record it. Snug torque and angle go into the record.
What to watch out for
Angle tightening only works with specifications from the manufacturer. Choosing or estimating your own angle is not permitted. Bolts that have been angle-tightened are not reused – unless the manufacturer expressly allows it. The same applies to stretch bolts. Why is described in our torque table in the chapter on tightening methods.
Care and storage: winding back the torque wrench
After use, wind a click-type torque wrench back to the lowest scale value, clean it and store it dry in its case.
Winding back the torque wrench – but not below zero
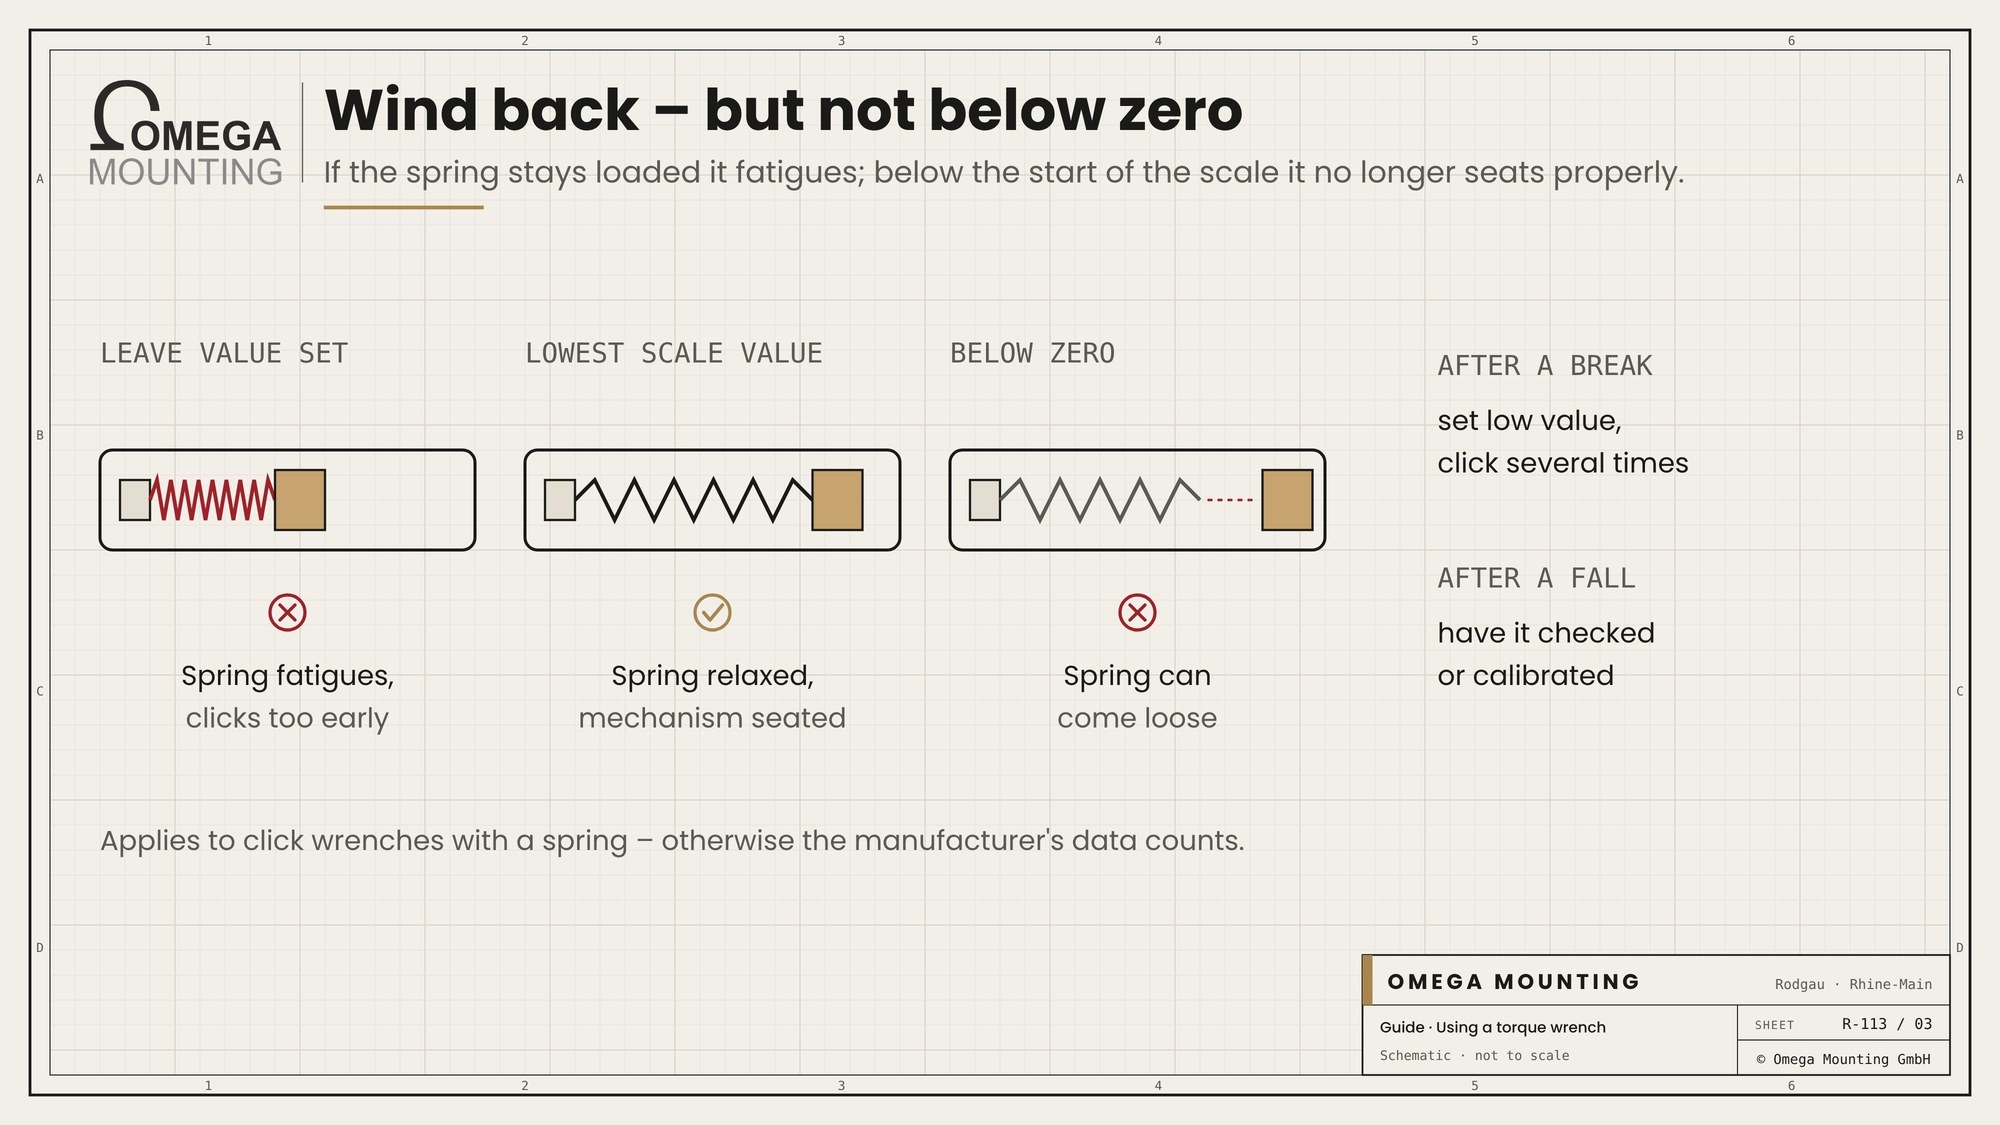
The spring in a click wrench is preloaded at the set value. If it stays loaded for a long time, it fatigues and the wrench later clicks too early. So: wind the torque wrench back to the lowest value on the scale. But do not turn below the start of the scale. The spring can come loose there, and the mechanism no longer seats properly.
The question of whether you have to wind back the torque wrench applies to click wrenches with a spring. Beam wrenches and many electronic wrenches have no preloaded spring. There, the manufacturer's data counts.
Cycle it after a break
After long storage, the lubricant in the mechanism may have settled. Set a low value and let the wrench click several times before working on the real joint. That distributes the lubricant, and the first clicks are even.
Clean and dry
Wipe the wrench after use. Do not dip it in solvent and do not oil the mechanism from outside – that can wash out or change the internal lubrication. Store it dry, in the case, not loose among other tools.
Check after a fall
A torque wrench that has been dropped is not used on as if nothing had happened. A fall can knock the mechanism out of adjustment without it being visible. Have it checked or calibrated before it goes on a joint again, and note the fall on the test equipment card. The same applies after an overload, for example if someone has pulled beyond the range.
Calibration to DIN EN ISO 6789
Calibrating a torque wrench means comparing its reading or click with a reference standard and documenting the deviation – according to DIN EN ISO 6789 after 12 months or 5,000 load cycles at the latest, whichever comes first.
The manufacturer's data may differ. A company can also set its own, shorter intervals if a wrench is used heavily. A load cycle is one loading operation, i.e. each tightening up to the click or reading.
Calibration and adjustment
Calibration and adjustment are often confused. Calibration measures and documents how far the wrench deviates. Adjustment resets it so that it is back within tolerance. A good calibration certificate states both: the condition on arrival and the condition after any adjustment.
How large may the deviation be?
For most torque wrenches the standard gives a permissible deviation of ±4 % in the range 10 to 1,000 Nm. For smaller wrenches ±6 % often applies. Which tolerance applies to your wrench is stated in its calibration certificate or in the manufacturer's data.
This tolerance belongs in the choice of the target value. For critical joints, the designer sets the tightening factor to VDI 2230, which also includes the scatter of the tool. In practice: never set above the specification. The guide values and their limits are explained in our torque table.
Where calibration is done
Torque wrenches are calibrated by a calibration laboratory with traceable reference standards or by the manufacturer. For companies with quality management, what counts is that the calibration is documented traceably. Between calibrations, a simple check on a torque tester helps to detect outliers early. It does not replace calibration.
What to do if a wrench was out of tolerance?
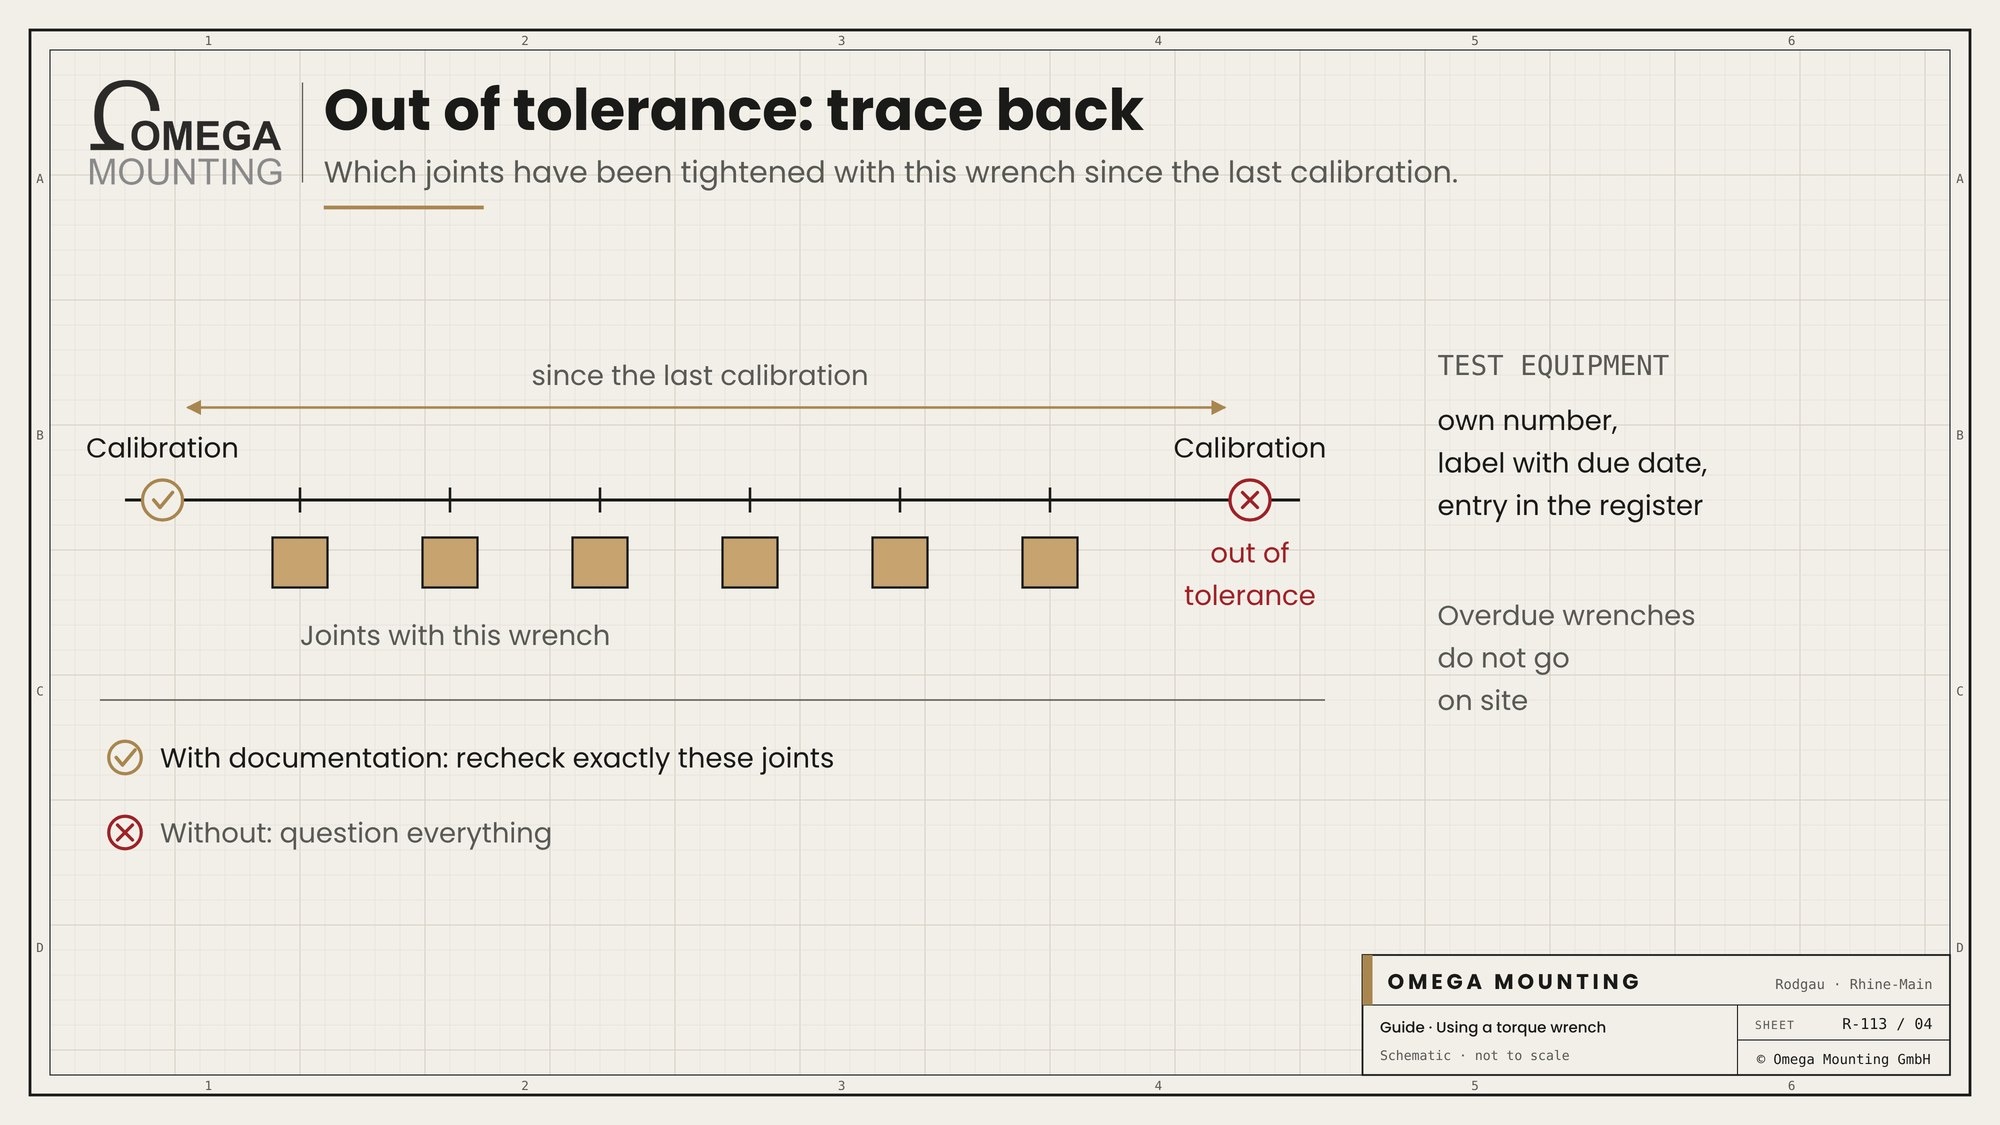
If a wrench is out of tolerance at calibration, it does not just need adjusting. The question then is which joints have been tightened with it since the last calibration. That is exactly what the documentation from the next chapter is for. Anyone who knows which wrench was used on which joint can recheck specifically instead of questioning everything.
Test equipment management
Each torque wrench gets its own number, a test label with the next due date and an entry in the test equipment register. Overdue wrenches do not go on site. Sounds strict, but it saves many discussions at acceptance.
Documenting: which wrench on which joint
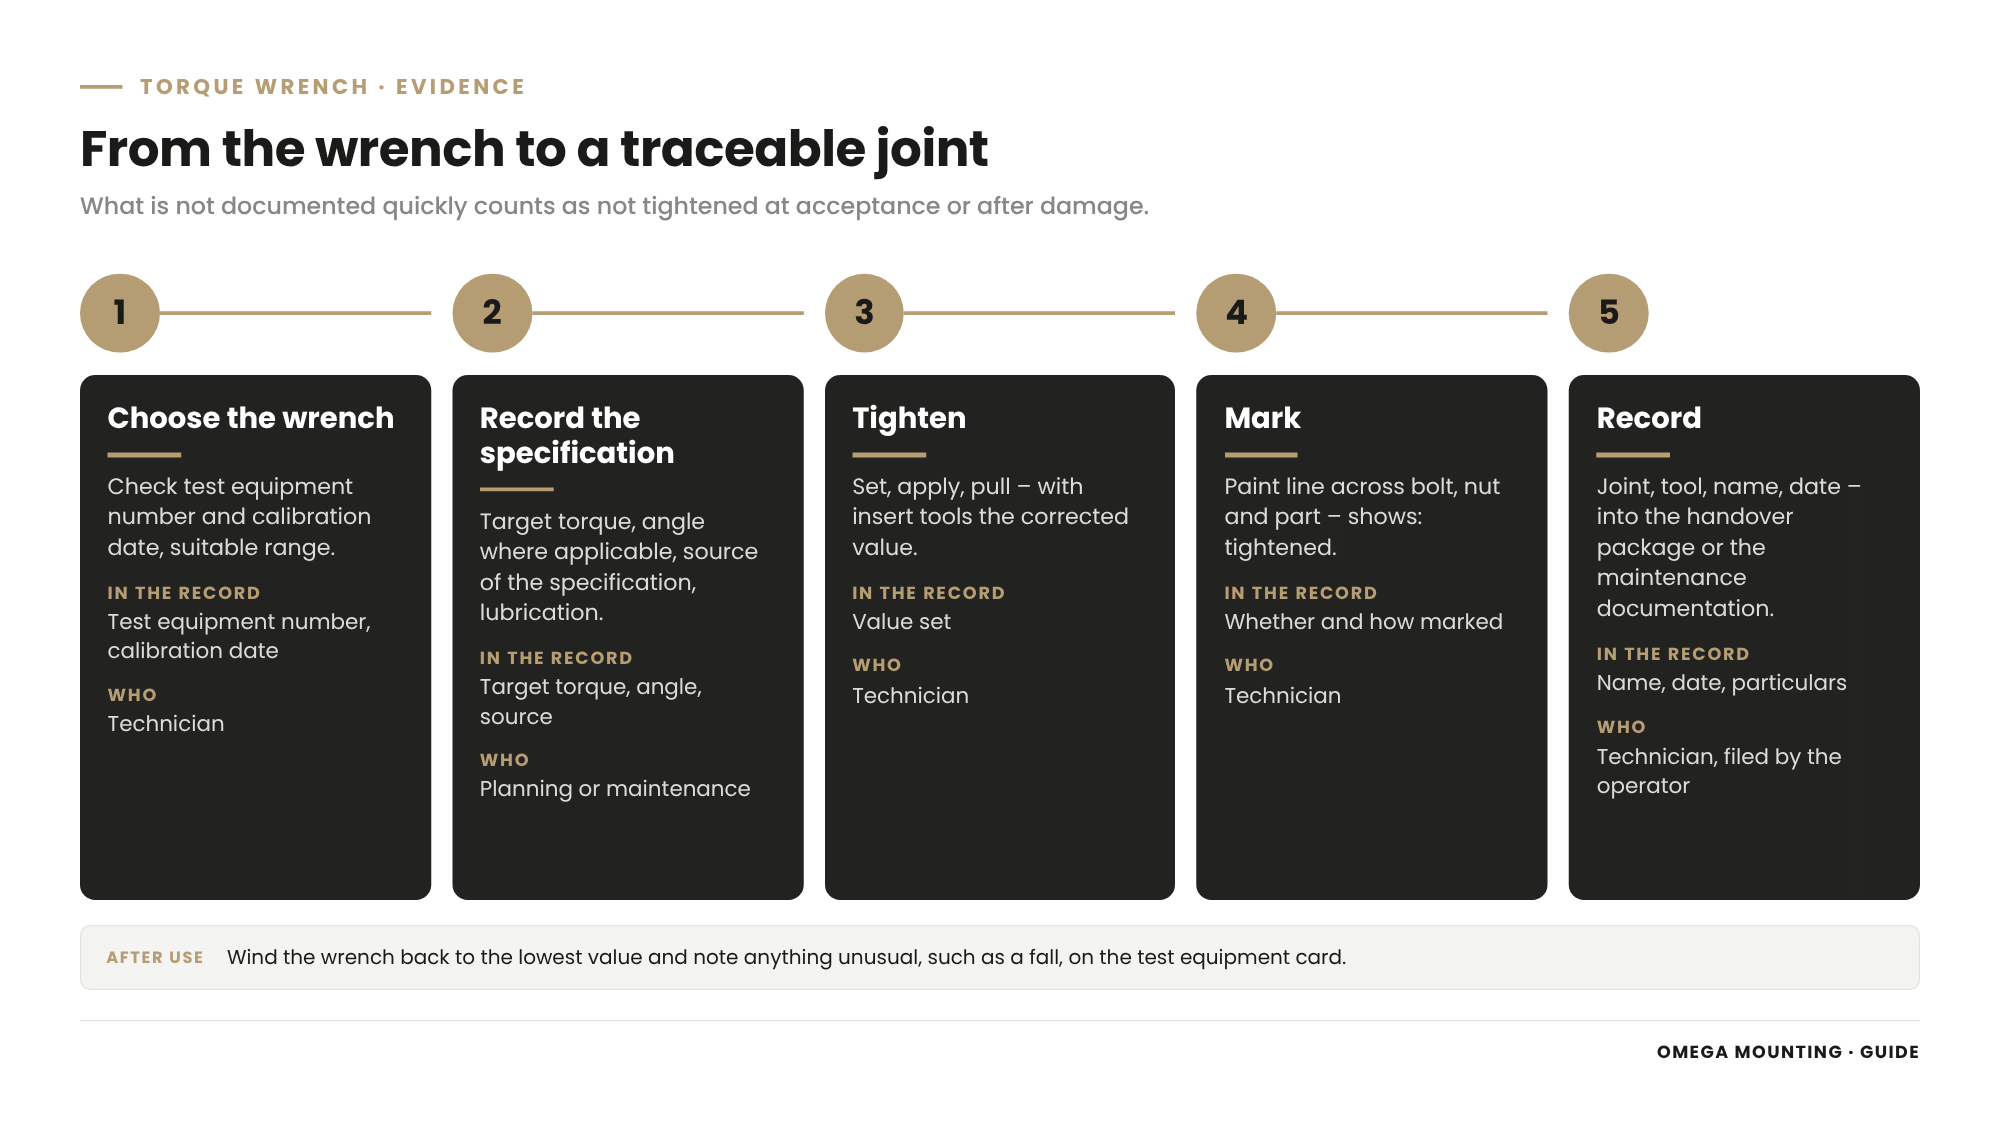
For each joint, the target torque, the torque wrench number with calibration date, who tightened it and when are documented – and the tightened bolt is visibly marked.
A bolted joint that is not documented quickly counts as not demonstrably tightened at acceptance or after damage. The record is therefore not paperwork, but proof of your work.
What belongs in the record
- Joint. Part, position or bolt pattern, so that anyone can find the spot again.
- Specification. Target torque, where applicable snug torque and angle, source of the specification.
- Tools Test equipment number of the wrench, calibration date, with insert tools the calculated setting.
- Execution Name, date, particulars such as lubrication as specified or replaced bolts.
- Marking. Whether and how the bolts were marked after tightening.
The paint marking
Many companies mark tightened bolts with a paint line across bolt, nut and part. The check line shows at a glance which bolt has been tightened and whether it has turned later. But it does not lock the bolt. What it can and cannot do is described in our torque table under bolt locking.
Records during installation and maintenance
For a new installation, the torque record belongs in the handover package. For maintenance, it belongs in the plant's maintenance documentation. For machines anchored on a foundation, the torque per anchor is part of the positioning record – what that looks like is shown in our guide to aligning and anchoring a machine.
Typical mistakes when working with the torque wrench
The typical mistakes are the wrong range, an angled or jerky pull, pushing on after the signal, a pipe on the handle, uncorrected insert tools, loosening with the torque wrench and an overdue calibration.
- Wrong range. A small value with a large wrench is inaccurate.
- Wrong unit. The second scale was read instead of the Nm scale.
- Angled pull. The lever is not pulled at right angles or not in the plane of rotation.
- Jerk instead of pull. The torque overshoots the target before the wrench clicks.
- Pushing on after the click. The bolt is tightened further without measurement.
- Pipe on the handle. Lever lengthened, wrench overloaded, value unknown.
- Insert tool without correction. The changed lever dimension is not taken into account.
- Loosening with the torque wrench. The measuring system is overloaded.
- Not wound back. The spring stays loaded and fatigues.
- Fall ignored. The wrench is used on as if nothing had happened.
- Calibration overdue. Nobody knows whether the value is still right.
- Nothing documented. Later it cannot be shown what was used for tightening.
The mistake behind the mistakes
Behind almost all mistakes is the same thought: the torque wrench is treated as a spanner, not as a measuring instrument. Anyone who treats it as a measuring instrument chooses the range deliberately, pulls cleanly, looks after it and proves that it is accurate.
Using a torque wrench correctly in the Rhine-Main region: how we work
In the Rhine-Main region we tighten bolted joints during installation and maintenance with regularly calibrated torque wrenches, record the tightening torques and mark tightened bolts with a paint line.
That applies to machine feet and brackets as well as to conveyors, steel construction joints and flange connections on pipework and refrigeration plants. We take the target value from the drawing, installation instructions or manufacturer's data. If it is missing, we ask before tightening.
From Rodgau, Frankfurt, Offenbach, Hanau, Darmstadt and Aschaffenburg are short trips. Our wrenches, insert tools and sockets go into the van, matched to the joints waiting on site. The scope of our Maintenance and servicing for industrial plants is set out on our service page.
We say beforehand what we do not take on. We do not calculate tightening torques – that is done by the designer or manufacturer, for safety-relevant joints according to the relevant rules. Pressure and leak tests on pressure equipment and refrigeration plants as well as structural design stay with the responsible specialist companies and competent persons. We make sure the mechanics sit at the specified torque and that this can be proven.

Project examples
Four jobs from our project diary show where bolting is part of the work. To be honest up front: none of these reports gives tightening torques, bolt sizes or the wrench used. They show work in which the technique with the torque wrench ultimately decides the quality.
Overhead monorail system in Frankfurt: dismantle, replace, bolt together again
With the maintenance of an overhead monorail system in Frankfurt we overhauled the switches of an older system in several planned weekend shutdowns. After an inventory, guide and running rollers were replaced, sometimes with complete dismantling of the switch. Switch shoes were replaced and adjusted, switch pins replaced and adjusted, rail transitions aligned and end positions set. At the end came the function test.
For your bolted joints this means: where things are dismantled, every joint is tightened to specification again – during a shutdown under time pressure all the more with the right wrench and not by feel.
Data center in Offenbach: flange connection and vibration
During the installation of turbo silencers in a data center in Offenbach we lifted the silencers onto base frames above the generators, aligned them and bolted them firmly. The stainless steel pipework to the turbochargers is connected to the silencer via a bolted flange connection. Rubber sleeves mechanically decouple the turbochargers from the silencers. The system was bolted and fixed so that vibration under full load causes no problems. Finally, measurements were taken under full load.
For your bolted joints this means: where vibration acts, an even preload counts. You only achieve it with a cleanly set and correctly guided tool.
Overhead monorail system at a food company: taking measuring instruments seriously
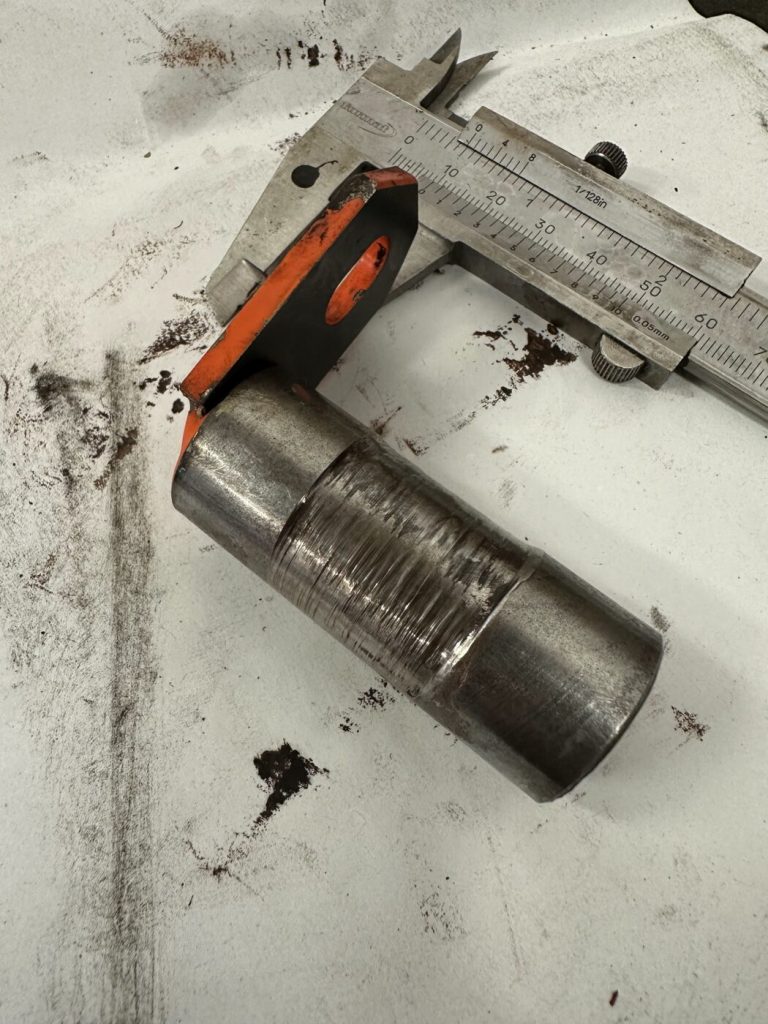
With the pin repair on an overhead monorail system at a food company a pin was pulled and measured with the calliper – it was visibly worn on the running surface. Then on every vehicle the hanger was jacked up, the pin pulled, the bearing seat checked and cleaned, the bushes replaced and a new pin fitted. The report also advises questioning “maintenance-free” critically.
For your bolted joints this means: measuring instruments are the basis of every statement about wear and installation quality. That applies to the calliper just as much as to the torque wrench.
Production plant in Offenbach: impact protection with heavy-duty anchors
We fabricated the bespoke impact guard for a production plant in Offenbach in our workshop in Rodgau. On site the structure was anchored in the floor with heavy-duty anchors, primed and coated in signal yellow. The report does not give the tightening torque of the anchors. With heavy-duty anchors it always follows the anchor manufacturer's installation instructions.
For your bolted joints this means: for anchors in concrete the anchor manufacturer's value applies – and the torque wrench must actually hit that value.
Do you have bolted joints that must demonstrably be right?
Then get in touch with us. Send us the drawing or installation instructions with the specifications. We will tell you which wrenches and insert tools we bring and how we document.
What this means for your role
For buyers: For installation and maintenance services, ask whether the torque wrenches are calibrated and whether a torque record is part of the service. Have the record assured as part of the handover. A quotation with documented tightening torques is not the same as one without.
For designers: State tightening torques, friction assumption and, where applicable, angle clearly in the drawing or installation instructions. Design bolted joints so that a torque wrench can be applied – with room to swing or with space for an insert tool.
For project managers and site managers: As a project manager, you decide which joints are recorded and who accepts them. As a site manager, you check test labels and records on site, look out for paint markings and have unsigned joints retightened before acceptance begins.
For maintenance managers: Manage torque wrenches in test equipment management, with number, interval and label. Make sure your team winds wrenches back after use, reports falls and does not use overdue wrenches. Ask contractors for proof too.
For safety specialists and quality managers: Include correct applying and pulling in the instruction, also because of the risk of injury from slipping. Spot-check whether the test equipment register, labels and records match.
Test equipment card for torque wrenches: template on request
The test equipment card for torque wrenches is a one-page card per wrench. It contains the fields test equipment number, type, range, calibration date, next calibration date, an estimate of load cycles since the last calibration and a field for a fall or anything unusual with date and action. It helps maintenance managers and workshop supervisors to keep track of every wrench. Request the template via our contact form – keyword “Test equipment card”.
Why Omega Mounting?
We are based in Rodgau near Frankfurt, can be reached by phone (Mon–Fri 9 am–3 pm) and via WhatsApp, and have our own workshop. The linked jobs show where bolting is everyday work for us: on switches of an overhead monorail system, on the flange connection of a silencer, on pins and hangers and on heavy-duty anchors. We work with calibrated torque wrenches, record tightening torques and mark tightened bolts. For you this means: a single point of contact for installation, servicing and maintenance – with bolted joints that can be proven.
Conclusion
Anyone who wants to use a torque wrench correctly does not start at the bolt, but with the choice of wrench. Choose the range so that the target value lies in the middle, set it cleanly and check the unit. Pull at the grip mark, at right angles, steadily and without pushing on – and allow for insert tools. Wind the wrench back after use, have it calibrated and document which wrench was used on which joint. If you have bolting work coming up that must demonstrably be right, send us your specifications – we will get back to you with an honest assessment.
Further reading: Which tightening torque applies to which bolt, how friction changes the value and how flanges and bolt locking are tightened correctly is shown in our torque table for bolts.
Planning a move-in, installation or maintenance in the Rhine-Main region?
Tell us briefly what you need – we'll come back with an honest assessment.
Free, no-obligation callback
You may also be interested in these guides

About the author
Tobias Schott
Managing director of Omega Mounting GmbH, Rodgau · more than 20 years of hands-on experience in installation and maintenance
A trained mechatronics technician, working in maintenance, servicing and industrial installation since 2004 – first alongside his father, and with Omega Mounting since 2012: from overhead conveyors in Frankfurt to the crane system in a new-build hall. He plans and leads lifting operations as an appointed person (AP) in data centers and on industrial sites in the Rhine-Main region, trains and examines operators of cranes, mobile elevating work platforms and telehandlers, and is a qualified occupational safety specialist. On jobs abroad he is known as the “German Troubleshooter” – the person you call when a site gets stuck. He learned what quality means from his father, not from a manual: Made in Germany as a standard for his own work, not a label. That is why quality comes first at Omega Mounting – ahead of speed and price. He writes these guides from that practice: what works on our sites is in them – what exists only on paper is not.
Frequently asked questions
Choose a wrench whose range has the target value well in the middle. Set the value on the main and fine scale, check the unit and lock it. Fit the tool fully, grip at the grip mark and pull evenly at right angles until the signal comes. Then stop immediately. After use, wind the wrench back to the lowest scale value.
At an angle of 90° to the handle and in the plane in which the bolt turns. An angled pull shortens the effective lever arm and distorts the torque. A pull out of the plane of rotation loads socket and square drive sideways. Pull towards your body where possible so that you do not slip when it clicks.
As a rule, no. The breakaway torque of a tight bolt is often well above the tightening torque and can overload the measuring system. Many click wrenches do not limit anything in the loosening direction anyway. Loosen with normal tools. Whether a particular wrench is approved for loosening is stated in the manufacturer's data.
According to DIN EN ISO 6789 after 12 months or 5,000 load cycles at the latest, whichever comes first. The manufacturer's data may differ, and a company can set shorter intervals. After a fall, an overload or a repair, the wrench is checked immediately. The permissible deviation for most wrenches is ±4 % in the range 10 to 1,000 Nm, for smaller ones often ±6 %.
An open-end torque wrench is a torque wrench with an open-end head as the insert tool. It is needed where no socket fits, for example on union nuts of pipe fittings on refrigeration and hydraulic lines. Because the head can change the lever dimension, the setting often has to be corrected. The dimension of the insert tool is stated by the manufacturer.
With click wrenches with a spring, yes. Wind it back to the lowest value on the scale so that the spring does not stay permanently loaded and fatigue. But do not turn below the start of the scale. Beam wrenches and many electronic wrenches have no preloaded spring – the manufacturer's data applies there.
A socket extension in the axis of the bolt does not change the torque. A pipe on the handle, however, does change it and overloads the wrench. Insert tools that lengthen or shorten the lever also change the torque at the bolt. Then the setting is corrected with the formula from effective lever length and offset.
The standard is not a law; there is no general legal calibration obligation for every torque wrench. Obligations arise from contracts, manufacturer specifications, quality management and the responsibility for safe joints. Anyone tightening safety-relevant joints should use a demonstrably calibrated tool. This guide is not legal advice.
Yes, handling the torque wrench is the same across industries. What differs are the specifications: in data centers and on refrigeration plants, flange and pipe fittings are often added; in conveyor technology, many identical joints in series. The target value is always specified by the manufacturer or designer.
With a short enquiry and three details: the plant concerned, the specifications from the drawing or installation instructions and the preferred date. We get back to you, clarify accessibility and tools on site if needed – from Rodgau, for example, in Frankfurt, Offenbach or Hanau – and send a written assessment. Your contact is Tobias Schott – reachable via our contact form.
 English
 German