
- Guide – Industrial installation
Reading installation instructions and planning the sequence: from the manufacturer's document to the workflow on site
By Tobias Schott · 20-minute read · As of November 2026
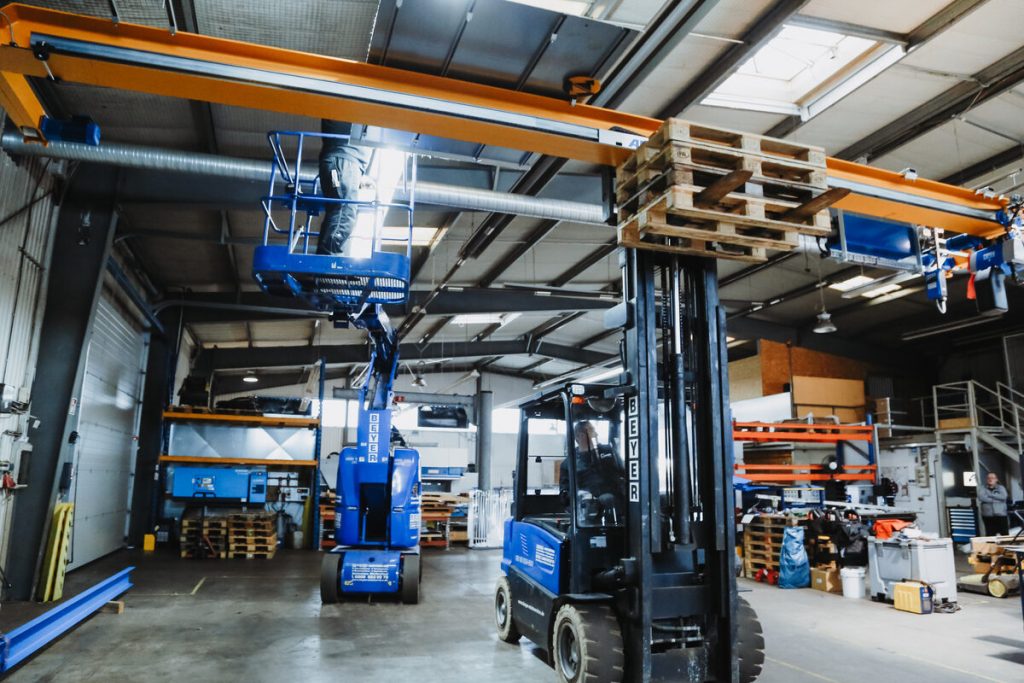
Reading installation instructions means working through the manufacturer's document completely before the first step, understanding safety notes, drawings, torques and test steps, recognising dependencies and waiting times and deriving a sequence that works on your own site. The instructions say what has to be done – the team has to plan the sequence on site itself.
Every machine, every crane system and every racking system comes with installation instructions. Some are thin leaflets, some are thick binders. Some are good, many are incomplete, a few are only available in a foreign language. Even so, the instructions are the most important document for any installation.
Anyone who only skims them discovers the traps on site: the component that should have been fitted first is at the very back of the container. The grout needs time that nobody has planned for. The bolts should have been tightened in stages. Anyone searching for “understanding installation instructions”, “planning the installation sequence” or “defining the installation workflow” wants to avoid exactly that.
This guide shows how to read installation instructions and plan the right sequence from them. It is written for fitters and foremen, construction and project managers, maintenance managers, planners, work preparation and safety specialists. How a rigging-in day runs from preparation to completion is described in the guide Moving a machine into a building: the process.
Key points at a glance
- Reading installation instructions means: working through them completely, understanding them, clarifying questions, deriving the sequence.
- Before, not during. The instructions are read before installation, not for the first time on site.
- Safety notes first. Warnings and hazards are transferred into the risk assessment.
- Valid version. Only the instructions for the version delivered count.
- Recognise dependencies. What has to be finished before the next step begins?
- Plan in waiting times. Curing, settling and tightening in stages take time.
- Clarify gaps. Anything missing is clarified with the manufacturer before installation.
- Write down the sequence. The instructions become a workflow for your own team.
What does reading installation instructions actually mean?
Reading installation instructions means working through the manufacturer's documents so that the team knows what has to be done, in what order, with what equipment and under what conditions – and which questions still need to be clarified before installation.
Installation instructions describe how a product is assembled and set up. They are part of the manufacturer's documentation, together with drawings, parts lists, operating instructions and test certificates.
Reading is more than leafing through
Reading means understanding every step: what is supposed to happen? Why in this order? Which preconditions apply? What happens if you do it differently?
Who reads
The instructions are read by the foreman or site manager responsible for the installation – and by the fitters who carry it out. Anyone who only receives orders without knowing the instructions cannot think ahead.
The instructions are not the plan
The instructions say how the product is installed. But they know nothing about the site, the route into the building or the other trades. How this becomes an installation plan for the whole site is described in the guide Creating an installation plan.
The right version: which instructions apply?
Before reading, it must be clear that these are the right instructions.
Matching the delivery
Manufacturers change products. The instructions must match the version delivered: type, year of manufacture, options. Instructions for the previous version are misleading.
Complete
Do drawings, parts lists or supplementary sheets belong to them? Are pages missing? Are there separate instructions for accessories or controls?
Language
The instructions must be available in a language the team understands. If there is no version in the required language, it is requested from the manufacturer. Translating on your own carries risks with technical terms.
Check the revision status
Many instructions carry a date or a revision number. If there is a newer version, it is requested. In new versions manufacturers often correct exactly the errors that fitters have stumbled over.
Additional documents
Structural calculations, foundation plans, electrical plans and project-specific drawings supplement the instructions. Where they contradict each other, the instructions do not automatically prevail – this is clarified.
The structure of installation instructions: where to find what
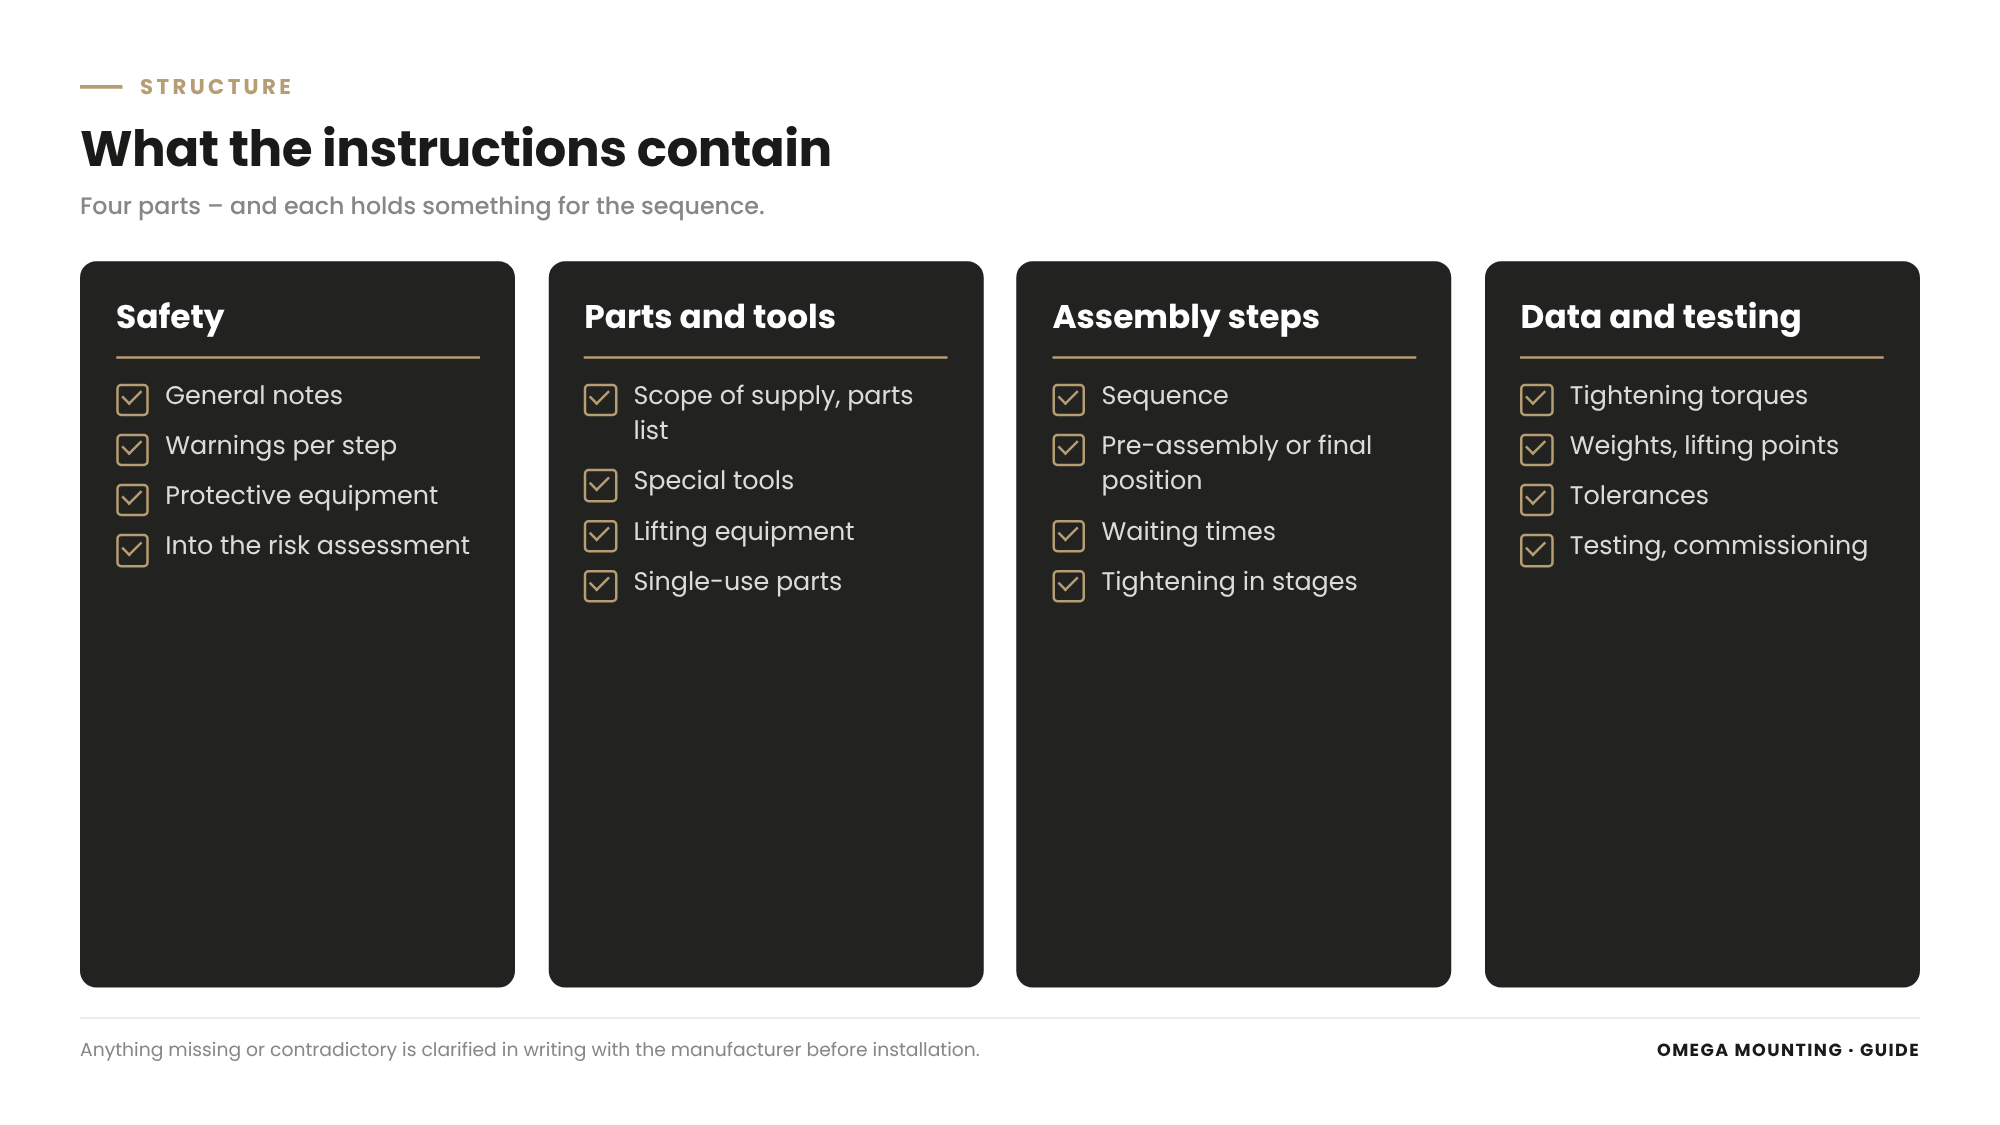
Installation instructions are structured differently, but usually have similar parts.
Safety notes
The general safety notes come at the beginning, and the warnings for individual steps follow in the text. Both are important.
Scope of delivery and parts list
What is included in the delivery, which parts, how many, with what designation? The parts list is the basis for the goods-in inspection.
Tools and aids
Which tools, lifting equipment and aids are needed? Some manufacturers require special tools.
Installation steps
The core of the instructions: step by step, often with pictures. The order of the steps is usually not random.
Maintenance and spare parts
Many instructions also contain maintenance notes and a spare parts list. They are secondary for installation but important for later operation. They belong in the handover to the operator.
Technical data
Torques, tolerances, weights, centres of gravity, lifting points, filling quantities. These data later belong in the test plan.
Inspection and commissioning
What is checked after installation, how is the plant commissioned, and who is allowed to do it?
Reading and adopting safety notes
The safety notes are not small print. They describe hazards that the manufacturer knows about.
Signal words
Danger, warning, caution – the signal words show how serious a hazard is. A note with the signal word danger describes a situation that can lead to serious injury or death.
Into the risk assessment
Every hazard from the instructions is transferred into the risk assessment for the installation, with suitable measures. This concerns, for example, suspended loads, crushing points, stored energy or work at height.
Personal protective equipment
Many instructions state the protective equipment required: gloves for sharp edges, safety glasses for drilling, hearing protection, fall protection. It is provided before work starts.
Instruction
The fitters are briefed on the hazards from the instructions before work starts. This is mandatory and must be documented.
Understanding drawings and symbols
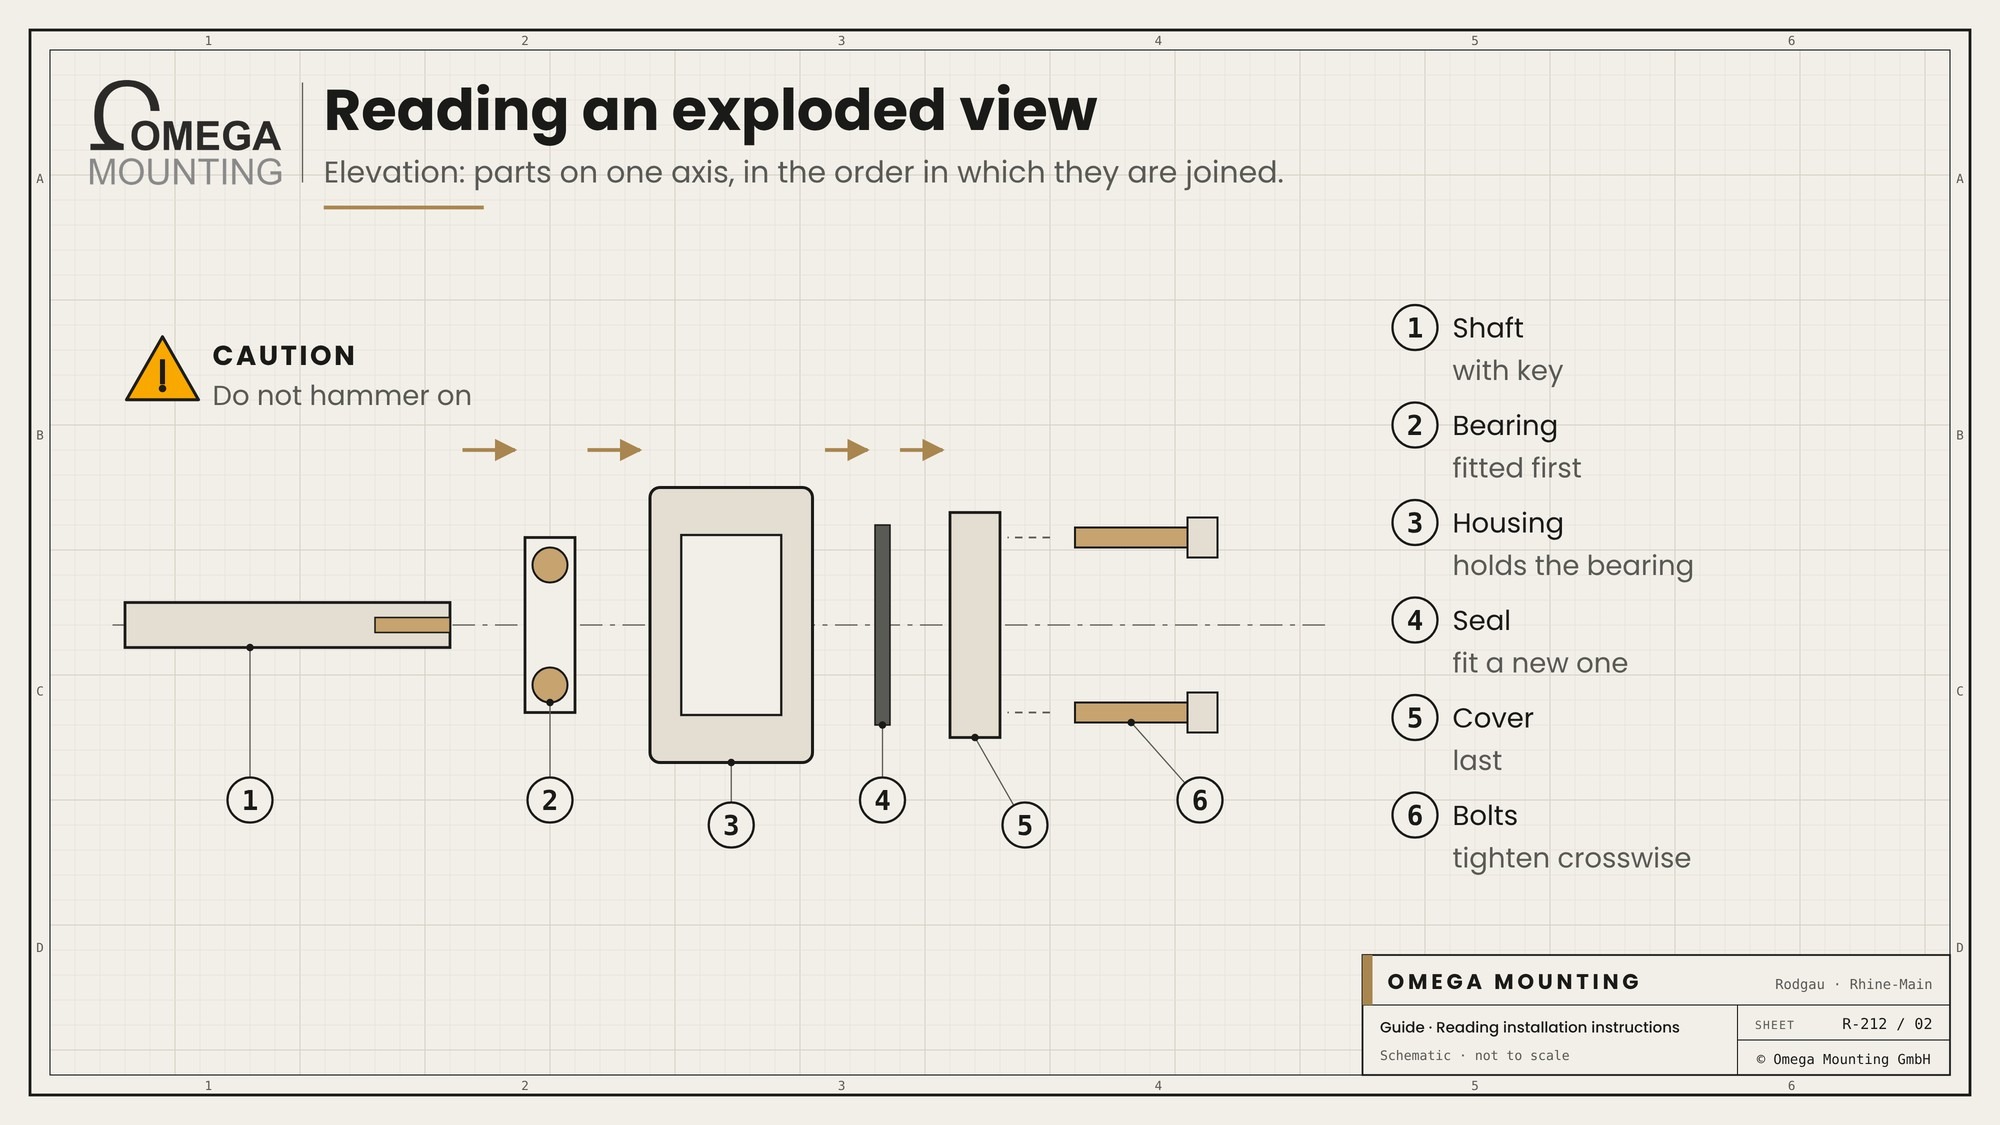
Many instructions work more with pictures than with text.
Exploded views
They show how parts belong together and in what order they are assembled. Item numbers refer to the parts list.
Symbols
Common symbols indicate torque, lubrication point, adhesive, visual inspection or “carry with two people”. The key is usually at the beginning.
Dimensions and tolerances
Dimensions in drawings are binding. Tolerances show how much deviation is permissible. If tolerances are missing, ask.
Detail views
Small circles or frames in the drawing refer to enlarged details. That is often where the most important information is: the position of a seal, the orientation of a component, the seat of a locking device.
Views
Plan view, side view and section show the same part from different sides. Anyone who does not think them through together installs a mirror image.
Recognising dependencies and waiting times
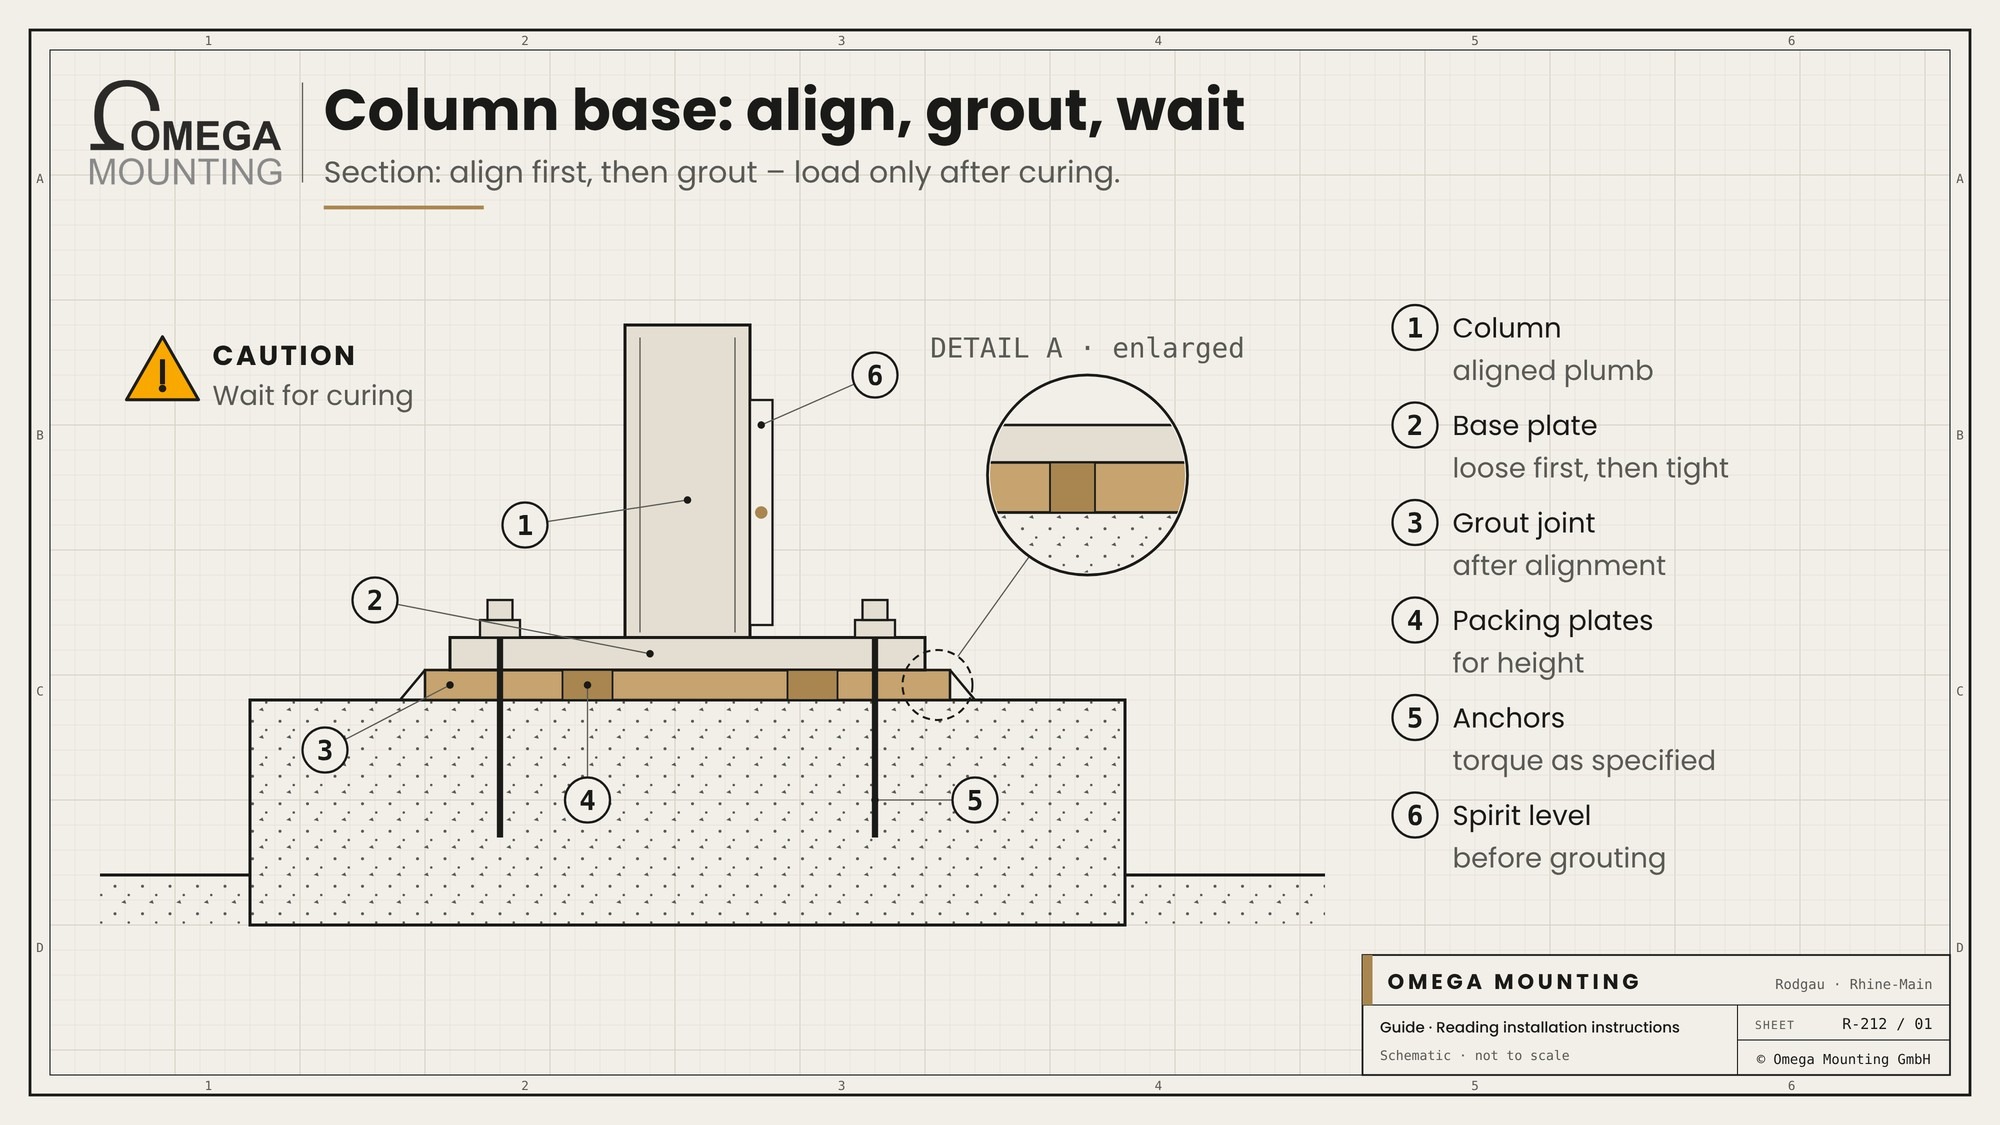
This is where it is decided whether the sequence works on site.
What has to be finished first
Many steps build on each other. The gantry must be standing and aligned before the crane bridge arrives. The foundation bolts must be in place before grouting.
Inspections as a precondition
Some steps may only begin after an inspection: the foundation after acceptance, the lifting equipment after its inspection, the electrics after release. These inspections are included in the sequence as separate steps.
Waiting times
Grout and concrete need time to cure before they may be loaded. So do adhesives and sealants. These times are given in the instructions or the data sheet – and belong in the schedule.
Tightening in stages
Large flange connections and foundation bolts are often tightened in several passes and in a defined order. Anyone who tightens everything at once distorts the component.
Align before tightening
Many components are first fitted loosely, then aligned and only then finally tightened. Anyone who tightens too early has to loosen again.
Dependencies on other trades
Some steps need work done by others first: power for the lifting equipment, a finished foundation, a clear hall. These dependencies are not in the instructions but belong in the planning.
Pre-assembly and final assembly: what happens where
One of the most important decisions is what is pre-assembled on the ground and what is installed in its final position.
Advantages of pre-assembly
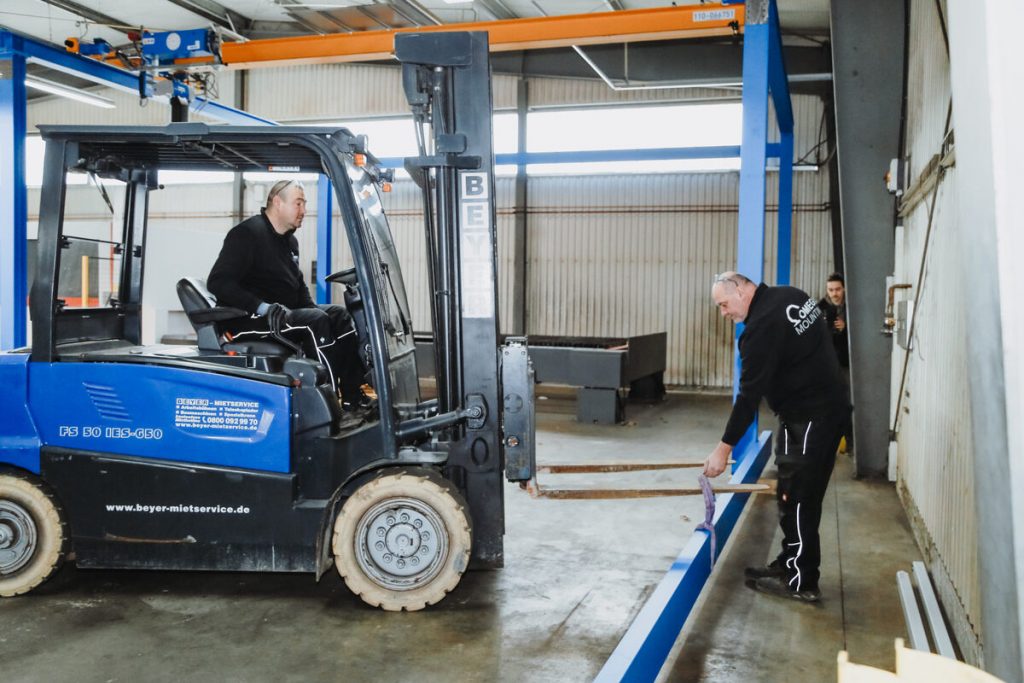
Working on the ground is safer, faster and more accurate than working at height. Hoists, cable trays and add-on parts are therefore often fitted beforehand.
Limits of pre-assembly
Every pre-assembled part makes the assembly heavier and larger. Does it still fit through the route into the building? Is the lifting equipment sufficient? Are the lifting points still in the right place?
Pre-assembly in the workshop
Sometimes it is worth pre-assembling assemblies in our own workshop and bringing them to site ready-made. This saves time on site, but requires transport and the route into the building to accommodate the larger assembly.
What the instructions specify
Some manufacturers specify which parts may only be fitted in the final position. This often has to do with structural stability or alignment and is complied with.
Your own decision
Where the instructions leave it open, the team decides on the basis of site, lifting equipment and space. This decision is recorded in the installation workflow.
Clarifying gaps and contradictions
No set of instructions is perfect. Anyone who finds gaps early can clarify them before they become apparent on site.
Typical gaps
Missing torques, unclear sequences, no information on lifting points, missing tolerances, steps that look different in the drawing than in the text.
List of questions
All open points are collected on a list and sent to the manufacturer before installation. Answers come in writing and are attached to the instructions.
Asking questions properly
Good questions are specific: page, figure, item number, what is unclear and which solution you propose. This gets you a usable answer faster than a general request for help.
Documenting deviations
If it is necessary to deviate from the instructions, for example because the site does not allow anything else, this is agreed with the manufacturer and documented. Unauthorised deviations can jeopardise warranty and safety.
The instructions become a workflow
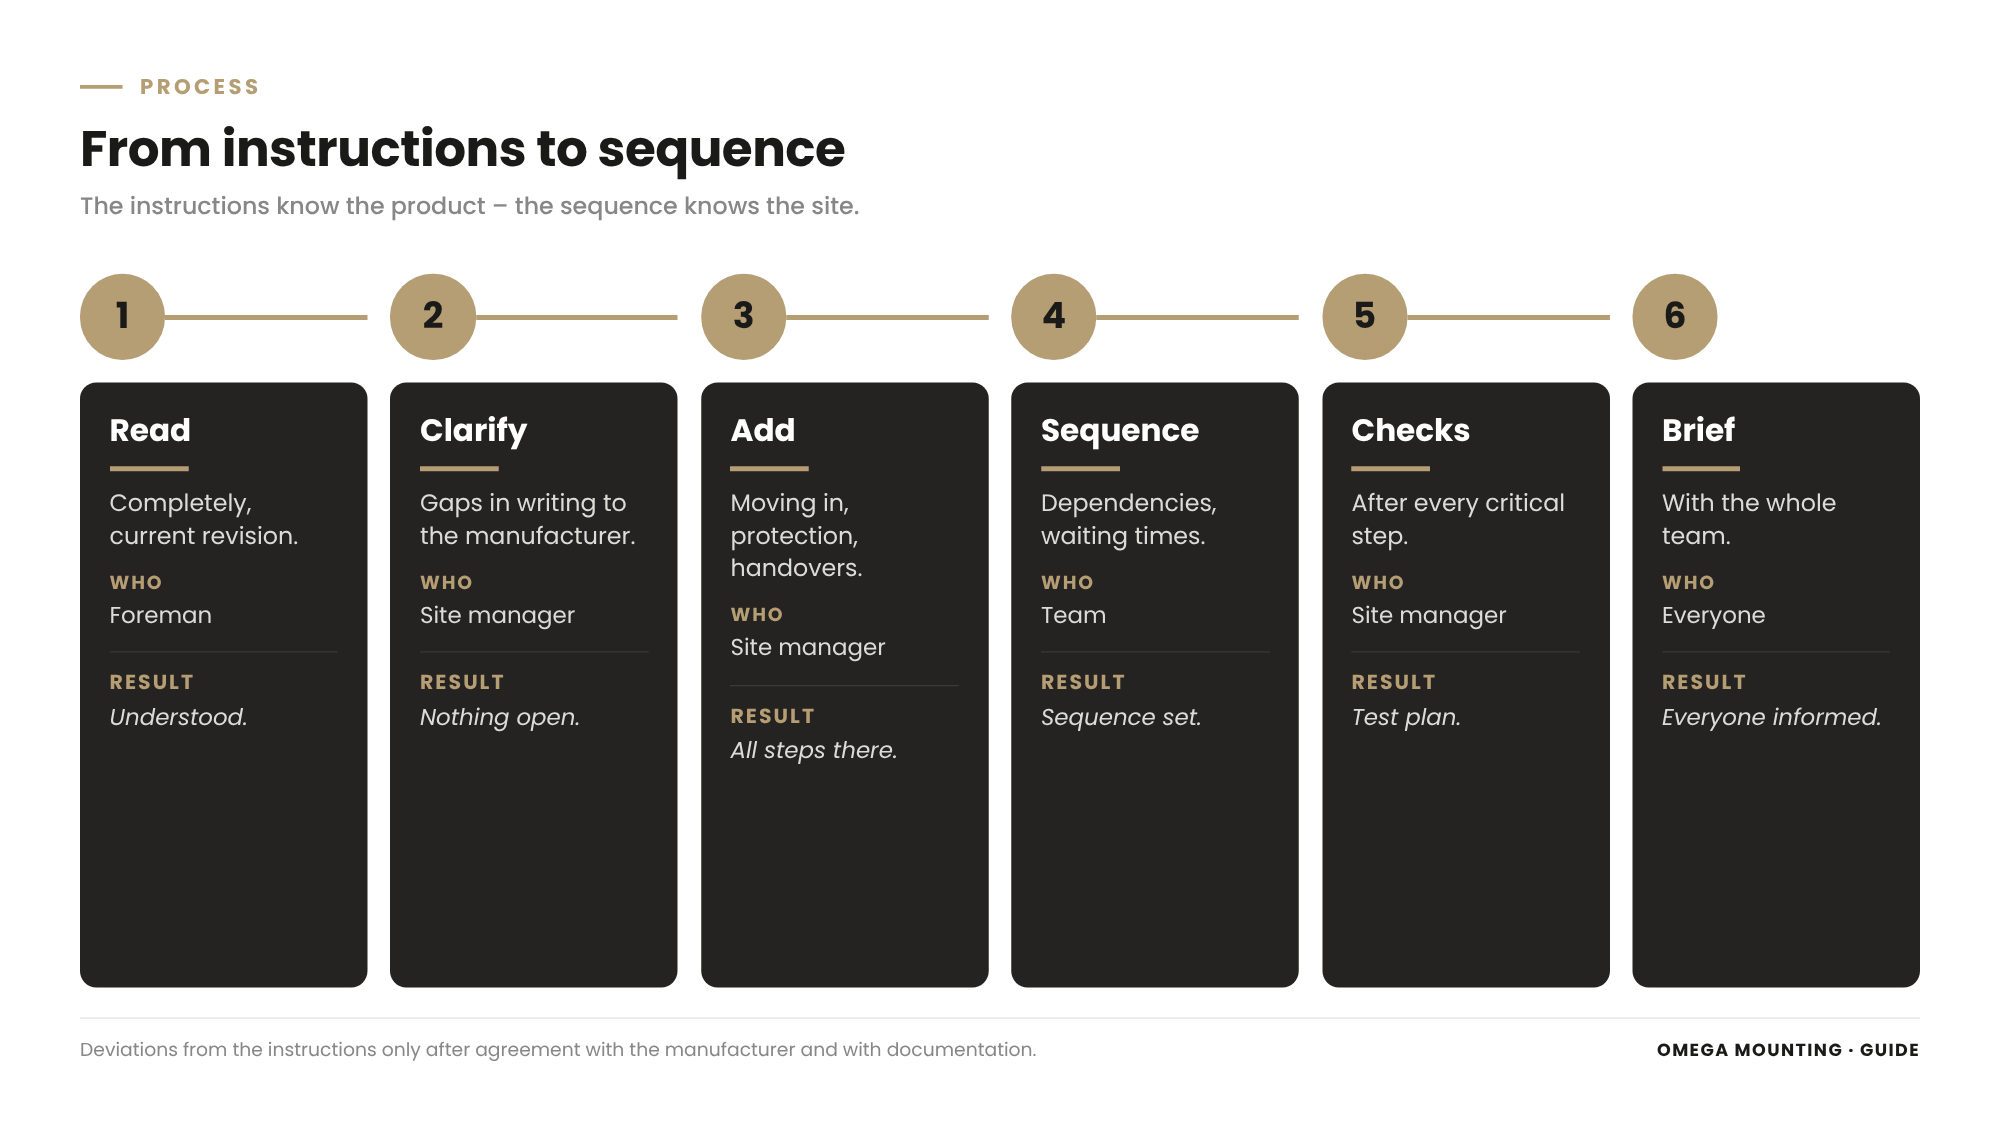
At the end of reading there is an installation workflow that suits your own site.
Listing the steps
The steps in the instructions are adopted and supplemented by the steps the instructions do not know about: moving in, protective measures, inspections, handovers.
Defining the sequence
The sequence takes account of dependencies, waiting times, pre-assembly and the site. Where it makes sense, steps run in parallel.
Building in test steps
Every critical step is followed by a test step. How to define checkpoints, hold points and witness points is described in the guide Inspection and test plan for installation.
Estimating the time for each step
For every step an estimate is made of how long it will take – from experience, from the manufacturer's information or from previous installations. This produces a realistic schedule instead of a wishful deadline.
Discussing it with the team
The workflow is gone through with the team before work starts. Everyone knows what they are doing and what comes next.
Installation inside the building: route into the building and time window
The instructions describe the installation as if the product were already in place. In practice it first has to get there.
Route
Does the assembly fit through the door, corridor or façade? That determines how far it can be pre-assembled. How to check the route is described in the guide Planning a move-in.
Time window
Often there is only a short time window: while the wall panels are open, while the crane is there, while production is at a standstill. The sequence is arranged so that everything the time window requires falls within that window.
Lifting equipment and space
Which lifting equipment fits in the room, what lifting height is possible, where can a forklift drive? The answers determine how large the pre-assembled assemblies may be and in what order they arrive.
Storage on site
Parts are stored so that they are to hand in the order of installation. What is needed first is at the front.
Interfaces: electrics, controls and commissioning
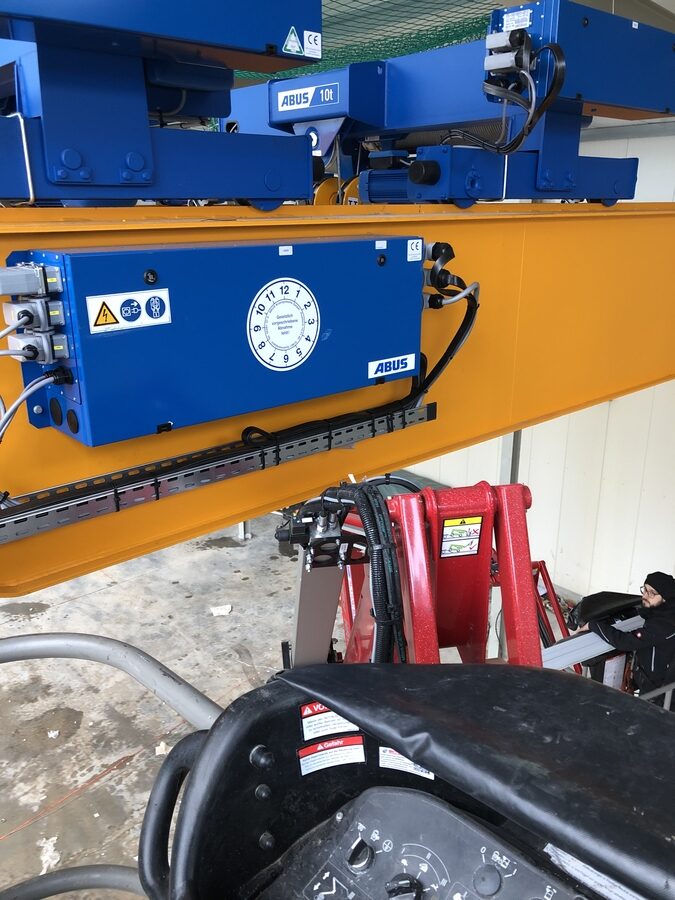
Many instructions end with the mechanical work. The electrics and commissioning have their own documents.
Electrical connection
The connection is made by our own electricians – on the plant side up to the main switch. From there, the operator's electrician takes over.
Controls and software
Controls, parameters and software lie with the manufacturer. Its documents and dates are planned into the workflow.
Commissioning
Commissioning follows installation, but often with different personnel. The handover in between is defined in the workflow. How commissioning and handover work is described in the guide commissioning and handover of a plant.
Goods-in inspection with the parts list
The parts list from the instructions is the tool for the goods-in inspection. Anyone who takes it seriously notices missing parts before they are missed.
Checking completeness
Every item is compared with the delivery: designation, quantity, version. If something is missing, it is reported immediately – not only when the fitter reaches for it.
Packaging as information
Crates and pallets often show weights, lifting points and storage instructions. They are photographed before unpacking, because after unpacking they are gone.
Checking condition
Transport damage to parts, packaging and corrosion protection is photographed and documented. Damaged parts are not installed until it has been clarified whether they may still be used.
Sorting small parts
Bolts, nuts, washers and seals are sorted by installation step. Anyone who has to search for the right bolt at the crucial moment loses time and, if in doubt, picks the wrong one.
Replacements for wear parts
Some parts may only be used once, for example self-locking nuts or certain seals. The instructions say which ones. Replacements are kept ready in case a step has to be repeated.
Applying torques and connections correctly
Many installation instructions contain tables of tightening torques. They are often overlooked.
Torque, sequence, passes
Every important connection has a tightening torque, a bolt sequence and a number of passes. Large flanges are tightened crosswise.
Lubricated or dry
Some torques apply to lubricated threads, others to dry threads. The difference is large. The instructions or the data sheet say which applies.
Marking
Tightened bolts are marked. This way everyone can see which connection is finished, and later you can tell whether a bolt has come loose. How to work correctly with a torque wrench is described in the guide Using a torque wrench correctly.
Lifting points and weights from the instructions
Every lift needs weight, centre of gravity and lifting points. The instructions provide them – if you read carefully.
Weights per assembly
The instructions often state the total weight, but not the weight of pre-assembled assemblies. Anyone who pre-assembles adds up the weight themselves or asks.
Centre of gravity
An off-centre centre of gravity makes the load tip when it is lifted. The instructions often show it with a symbol. The lifting gear is chosen accordingly.
Approved lifting points
Only the lifting points provided by the manufacturer are used. A frame that looks sturdy is not automatically intended for lifting. Who is responsible for the lift is described in the guide Appointed person for lifting operations.
When there are no instructions: installation in existing buildings and on old plant
There are not always instructions. With old plant, relocations or used machines they are often missing.
Asking the manufacturer
Many manufacturers have archived old documents and can supply them. The rating plate and serial number help with the search.
Documenting during removal
If a plant is dismantled and rebuilt elsewhere, the best instructions are your own documentation from the dismantling: photos, markings, sketches, sequence. What was released last during dismantling is installed first during reassembly.
Your own installation instruction
If there are no documents at all, your own installation instruction is drawn up before installation: steps, sequence, hazards, inspections. It is agreed with the operator.
Used machines
With used machines, parts are often missing or modifications have been made that are not in any instructions. Before reassembly, the actual condition is therefore compared with the documents available.
Recognising limits
For safety-relevant components such as cranes, pressure vessels or protective devices, experience alone is not enough. Manufacturer's information or an assessment by a competent person is needed here.
Discussing the instructions with the team
Instructions that only the site manager knows are of little help to the team.
Pre-start meeting
Before work starts, the team goes through the instructions together: sequence, hazards, critical steps, checkpoints. Questions are asked now, not at height.
Assigning tasks
Everyone knows who takes over which step, who attaches the load, who gives signals, who checks.
Short briefing in the morning
Every installation day the team starts with a short briefing: what is due today, which steps, which hazards, which inspections? This keeps the sequence in mind.
Instructions on site
The instructions are kept to hand on site, protected from dirt and rain. Important pages such as torques or sequences are displayed where they can be seen easily.
Recording lessons learned
After installation, a note is made of what went well and what did not: missing information, better sequences, useful aids. This helps enormously the next time the same product is installed.
Planning the installation sequence: three typical patterns
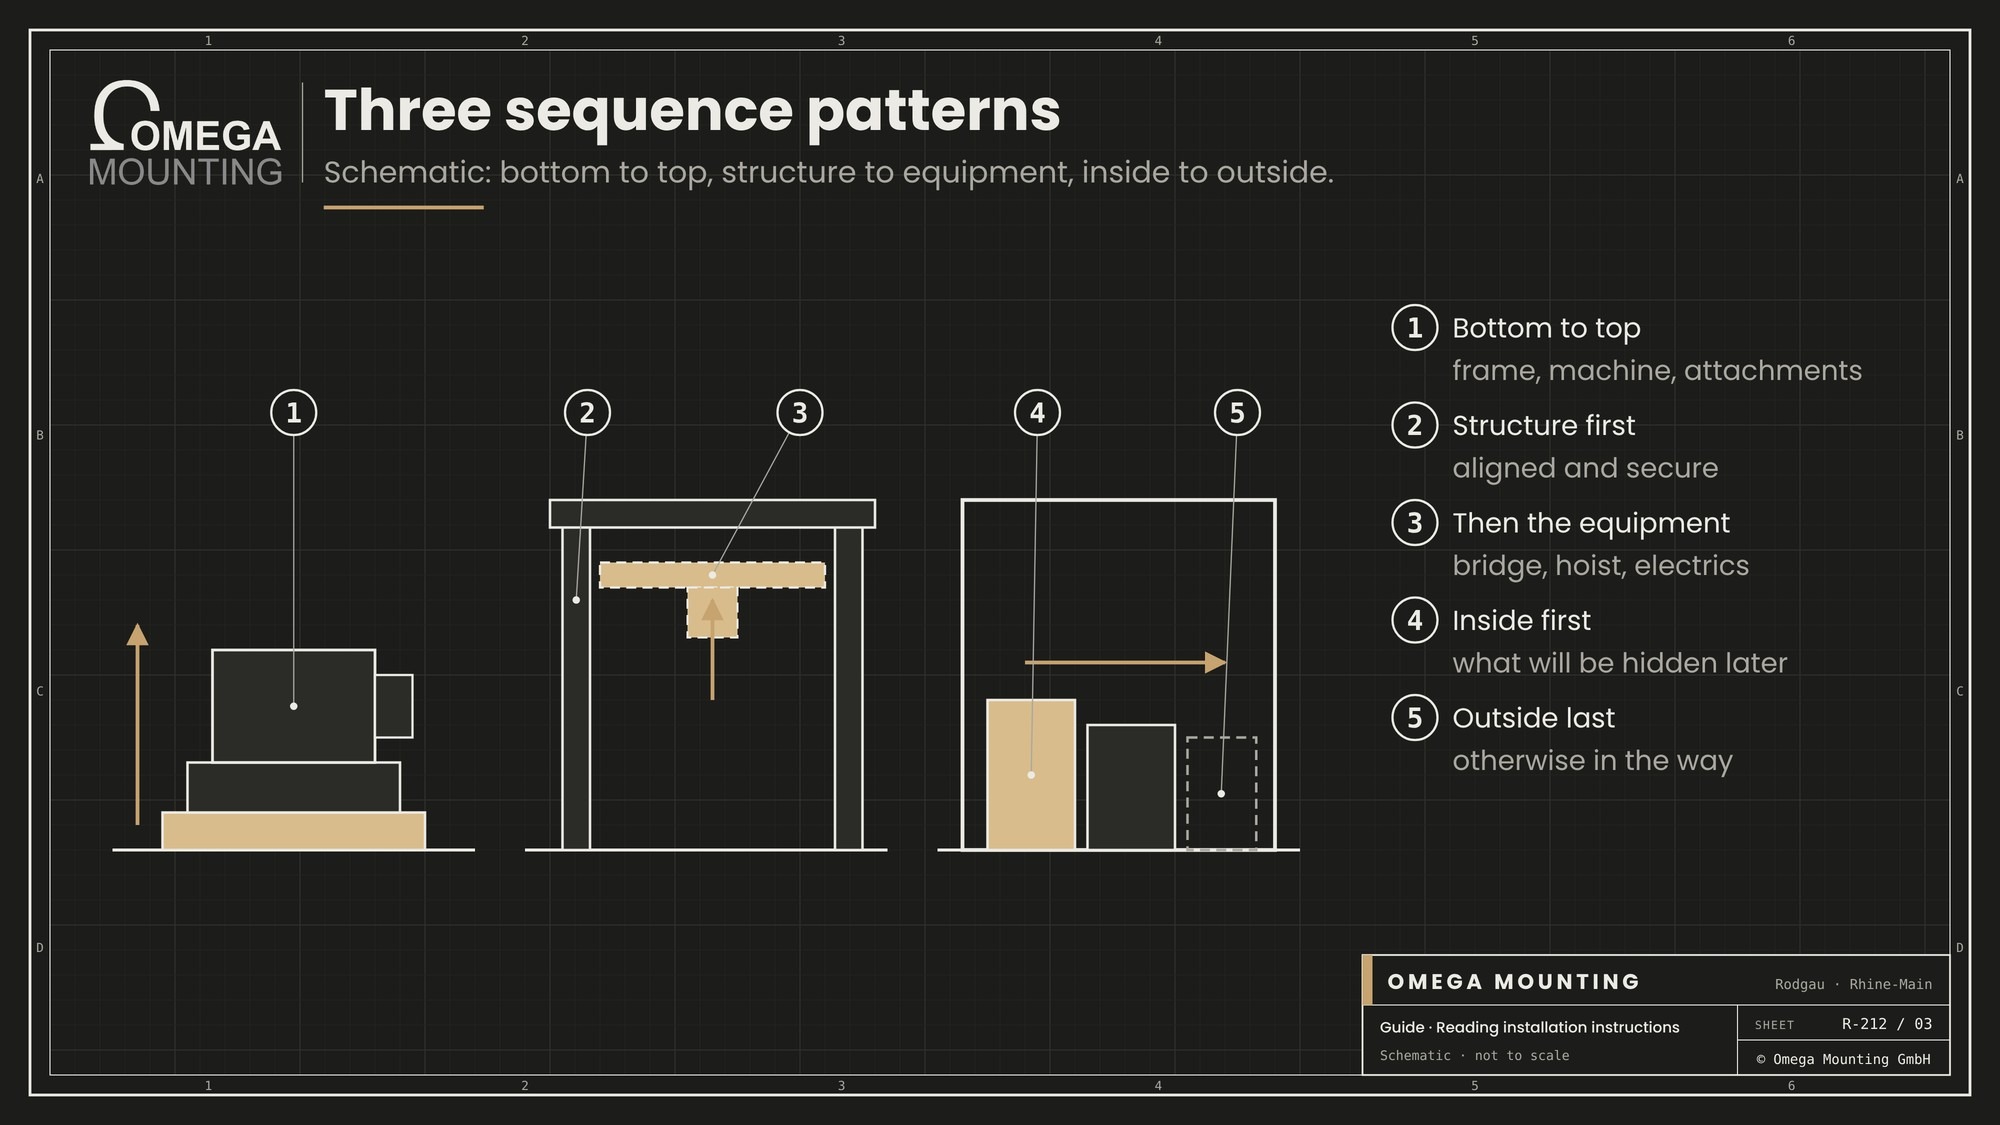
Many installations follow one of three patterns. Anyone who knows them finds the right sequence faster.
From the bottom up
Foundation, base frame, main assembly, add-on parts, covers. Typical for machines, generating sets and steel structures. Each level is checked before the next one comes.
From the structure to the equipment
First the load-bearing structure, then the technology: first the gantry or crane runway, then the bridge, then the hoist and the electrics. The structure must be aligned and secure before it is loaded.
From the inside out
For plant in confined spaces, what will later no longer be accessible is installed first, and what would be in the way is installed last. Typical for plant rooms, ventilation units and switchgear.
Mixed forms
In practice the patterns are mixed. What matters is that the sequence takes account of accessibility, structural stability and waiting times.
When the site changes
No plan survives the site unchanged. What matters is how you deal with changes.
Recognising deviations
If a part is missing, the foundation is not finished or the crane fails, a check is made of which steps are still possible without breaching the instructions.
Adjusting the sequence
Steps without dependencies can be brought forward. Steps with dependencies wait. The adjusted workflow is discussed with the team.
Do not improvise where it is critical
There is no improvising with lifting work, anchoring and safety-relevant connections. Better to wait an hour than to build in a mistake.
Safety rules for installation according to the instructions
Some rules always apply.
- Nobody installs without knowing the safety notes in the instructions.
- Lifting points and weights are taken from the instructions, not estimated.
- Components are only loaded once grout and connections are finished.
- Special tools are used where the instructions require them.
- Deviations from the instructions only after agreement with the manufacturer.
- Unclear steps are clarified, not tried out.
Typical mistakes when reading installation instructions
Read for the first time on site: Traps are recognised too late.
Wrong version: The instructions do not match the version delivered.
Waiting times overlooked: The grout is loaded too early.
Tightened too early: Alignment is no longer possible.
Too much pre-assembly: The assembly does not fit through the route.
Gaps not clarified: Guesswork on site.
The mistake behind the mistakes
Most mistakes happen because reading is seen as a waste of time. Yet every hour at the desk saves several hours on site.
Who does what when reading installation instructions?

Several parties contribute.
Manufacturer
It supplies complete, valid instructions and answers questions.
Designer
They provide project-specific plans and clarify contradictions with the instructions.
Operator
They provide access, time windows and preparatory work and make their electrician available for the handover.
Omega Mounting
We read the instructions before installation, collect questions, clarify them with the manufacturer, derive the sequence and implement it with our team – mechanical work and plant-side electrics from a single source.
Reading installation instructions: what it means for your planning
Four questions help with preparation.
Are the right instructions available?
Request the instructions for the version delivered at an early stage.
Who reads them?
Decide who works through the instructions and collects questions.
Have the waiting times been planned in?
Check the schedule for curing and settling times.
Are the interfaces clear?
Clarify who takes over electrics, controls and commissioning.
What belongs in the order when reading installation instructions
A good quotation names each of these points explicitly.
Service
Review of the manufacturer's documents, clarification of open questions, installation workflow, installation according to the instructions.
The frame
Provision of the documents by the client, deadlines for answers from the manufacturer, waiting times.
Record
Installation workflow, list of questions with answers, documented deviations.
Legal framework
Under product safety law and the Machinery Directive, manufacturers must supply instructions with their products. For installation, the risk assessment under the German Occupational Safety and Health Act and the Ordinance on Industrial Safety and Health apply. This guide is not legal advice – clarify which obligations apply in your case with your occupational safety specialist.
Reading installation instructions in the Rhine-Main region: how we do it
From Rodgau we quickly reach Frankfurt, Offenbach, Hanau, Darmstadt, Aschaffenburg and the industrial estates of the region – and our own teams work throughout Germany. Anyone who needs an installation according to manufacturer's instructions in Rhine-Main gets preparation and installation from a single source with us.
We install crane systems, machines, racking systems and technical plant. How we work in industrial installation is shown on the page on Industrial installation.
For you this means: a team that knows the instructions before it starts.
Project examples
Three jobs show how the sequence determines an installation.
installation of a gantry crane in Babenhausen,
At a steel fabrication company in Babenhausen we erected the gantry in one day, aligned it by laser and grouted the base plates. Only after curing overnight did the pre-assembled crane bridge go onto the runway on the second day, followed by the electrics. The job is described in the report gantry crane installation in Babenhausen.
Double-girder overhead crane near Aschaffenburg
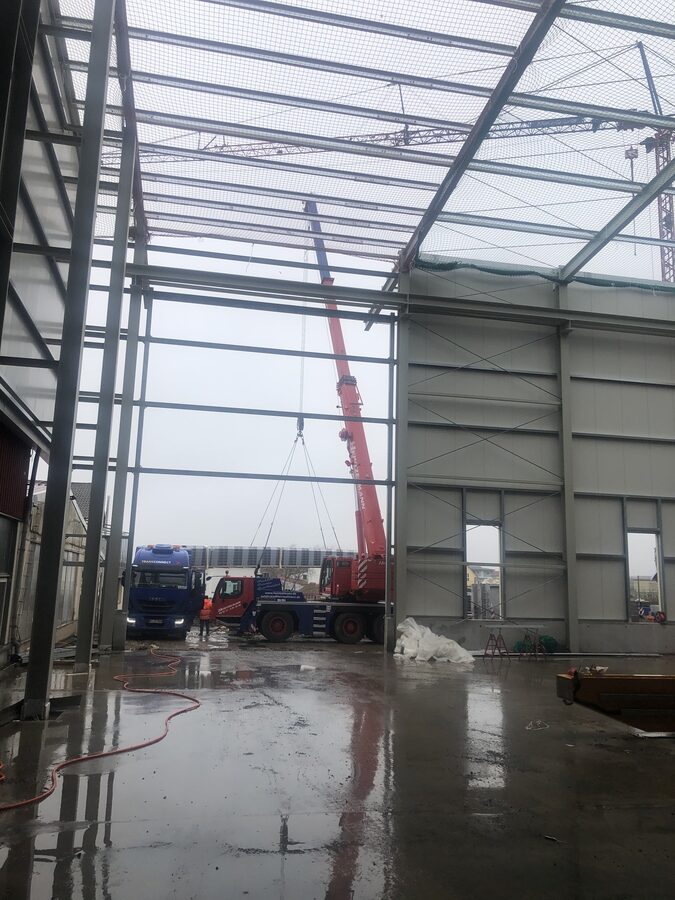
In a new hall near Aschaffenburg we pre-assembled a double-girder overhead crane on the ground, lifted it in with a mobile crane and turned it onto the crane runway using the diagonal dimension – while the wall panels were still open. Then came conductor rails, limit switches and controls up to the main switch. The job is described in the report Double-girder overhead crane installation near Aschaffenburg.
Generators in the data center
In a data center in the Frankfurt area, after the lift we set up the indoor solution with radiator, exhaust system and tanks in a defined order and completed it mechanically. The job is described in the report Standby generator installation in data centers.
Do you have an installation coming up?
Send us the installation instructions and a few photos of the installation site – we will tell you what the sequence could look like. Get in touch now.
What this means for your role
Fitters and foremen: Read the instructions before installation and write down what is unclear.
Site managers and project managers: Plan waiting times and time windows from the instructions into the schedule.
Maintenance managers: Keep installation instructions – at the next conversion or replacement they are worth their weight in gold.
Planners: Check whether your plans match the manufacturer's instructions.
Work preparation: Derive material, tool and personnel requirements from the instructions.
Occupational safety specialists: Transfer the safety notes into the risk assessment.
Installation instructions reading list: template on request
To help you prepare your installations, we have compiled the installation instructions reading list. It covers document version, safety notes, parts list, tools, lifting points, sequence, waiting times, torques, test steps, interfaces and open questions. Request the template via our contact form – keyword “Installation instructions reading list”.
Why Omega Mounting?
From more than twenty years of installation practice we know: the best installations are decided at the desk. That is why we read the instructions before we start, clarify gaps with the manufacturer and plan the sequence to suit the site. Mechanical work and plant-side electrics come from a single source. For you this means: an installation without surprises. Talk to us about your project – we will get back to you promptly.
Conclusion
Reading installation instructions means working through the manufacturer's document completely before installation, adopting the safety notes, understanding the drawings, recognising dependencies and waiting times and clarifying gaps. The result is a sequence that suits your own site.
Anyone who reads the instructions early and plans the sequence installs faster, more safely and without rework. If you need support with an installation, get in touch with us.
Planning a move-in, installation or maintenance in the Rhine-Main region?
Tell us briefly what you need – we'll come back with an honest assessment.
Free, no-obligation callback
You may also be interested in these guides

About the author
Tobias Schott
Managing director of Omega Mounting GmbH, Rodgau · more than 20 years of hands-on experience in installation and maintenance
A trained mechatronics technician, working in maintenance, servicing and industrial installation since 2004 – first alongside his father, and with Omega Mounting since 2012: from overhead conveyors in Frankfurt to the crane system in a new-build hall. He plans and leads lifting operations as an appointed person (AP) in data centers and on industrial sites in the Rhine-Main region, trains and examines operators of cranes, mobile elevating work platforms and telehandlers, and is a qualified occupational safety specialist. On jobs abroad he is known as the “German Troubleshooter” – the person you call when a site gets stuck. He learned what quality means from his father, not from a manual: Made in Germany as a standard for his own work, not a label. That is why quality comes first at Omega Mounting – ahead of speed and price. He writes these guides from that practice: what works on our sites is in them – what exists only on paper is not.
Frequently asked questions
Because only then do dependencies, waiting times and gaps become apparent in good time. On site it is often too late for clarification.
Collect open questions and clarify them in writing with the manufacturer before installation. The answers are attached to the instructions.
Only after agreement with the manufacturer and with documentation. Unauthorised deviations can jeopardise safety and warranty.
In pre-assembly, parts are put together into assemblies on the ground; in final assembly, at their final position. Pre-assembly is safer but makes the assembly larger and heavier.
Above all, curing times for grout, concrete, adhesive and sealant, as well as time for tightening in stages. The information is given in the instructions and the data sheet.
Request a version in the required language from the manufacturer. Your own translations carry risks with technical terms.
Under product safety law and the Machinery Directive, manufacturers must supply instructions. For installation, the German Occupational Safety and Health Act and the Ordinance on Industrial Safety and Health apply.
Yes. From Rodgau we are quickly on site in the region, and we work throughout Germany with our own teams.
Send us the installation instructions and photos of the installation site. We will review the documents and come back to you with a proposal for the sequence. Go to the contact page.
 English
 German