
- Guide – Industrial installation
Installing heavy-duty anchors: planning, drilling, setting and checking anchors in existing concrete
By Tobias Schott · Reading time approx. 23 minutes · Updated: November 2026

Installing heavy-duty anchors means: selecting the anchor according to its approval and the specifications of the manufacturer and the structural engineer, marking out the hole pattern accurately, locating services and reinforcement, drilling with the right method, cleaning the drill hole thoroughly, setting the anchor, tightening it to the specified torque and documenting everything. What the anchor can carry is calculated by the structural engineer. Whether it really does carry it is decided by the care taken on site.
An impact guard at a hall column, a pillar jib crane at a workstation, a crane runway column, a machine, a steel platform: almost every industrial installation ends in the hall floor at some point. That is where heavy-duty anchors hold the structure in place. Once installed they are barely visible – a few nuts on a base plate. That is exactly why they are often underestimated.
Yet the load capacity of an anchor is decided almost entirely by things nobody can check later. Is the concrete as good as assumed? Is the drill hole in the right place? Is it free of drilling dust? Was the curing time observed? These are the questions you usually face when installing anchors – often in an existing building, often during live operation.
This guide shows how to install heavy-duty anchors that hold: from approval through hole pattern, locating and drilling to tightening, checking and documenting. It is written for project and site managers, maintenance managers, operators, structural engineers and designers, buyers and occupational safety specialists. How a machine is aligned and anchored on its foundation is covered in the guide Aligning and anchoring a machine.
Key points at a glance
- Installing heavy-duty anchors means: planning, locating, drilling, cleaning, setting, tightening, checking and documenting.
- Only to the approval. Anchor type, embedment depth, spacings and torque are given in the approval and the manufacturer's data.
- The structural engineer calculates. Design and verification are not the job of the installation crew.
- Locate first, then drill. Services and reinforcement are located before every drill hole.
- A clean drill hole. Drilling dust is the most common reason for weak anchors.
- Allow time. Bonded anchors are loaded only after the curing time.
- Torque as specified. With a calibrated torque wrench, not by feel.
- Record it. An anchor record shows later what is in the floor.
What actually has to be done when installing a heavy-duty anchor?
A heavy-duty anchor is a fastener for high loads in concrete. It transfers tension, shear and bending forces from a base plate through the drill hole into the substrate. How it does that depends on its design.
Three principles of action
The expansion anchor holds by friction: a sleeve is pressed against the wall of the drill hole as it is tightened. The undercut anchor holds by keying: it engages in an enlargement at the bottom of the hole. The bonded anchor holds by bond: a mortar glues anchor rod and concrete together over the full length. How the three types work in detail and where their limits lie is explained in the article Heavy-duty anchors and bonded anchors: what really holds in concrete.
Installation is half of the anchor
An anchor is only as good as its installation. The values in the approval apply only if all installation requirements are met: drilling method, drill diameter, drilling depth, cleaning, temperature, curing time, torque. Whoever cuts a corner at any point has an anchor of unknown load capacity.
Approval and specification: what must be fixed before the first drill hole

Before drilling, the documents must be complete. If something is missing, it is requested, not guessed.
The anchor's approval
Every heavy-duty anchor for load-bearing fixings needs proof of suitability: usually a European Technical Assessment or a German general building approval. It states the permitted substrates, the installation parameters and the conditions for installation. The approval belongs on site, not in a drawer.
The manufacturer's installation instructions
The manufacturer describes step by step how its anchor is set: drill bit, cleaning tool, mortar, working time, curing time, tool, torque. These instructions apply to exactly this system. An anchor from one manufacturer is not set with the mortar or accessories of another. How to read manufacturer documents systematically is covered in the guide Reading installation instructions and planning the sequence.
The structural engineer's specification
The structural engineer specifies anchor type, number, position, hole pattern, embedment depth and spacings and verifies that anchor and concrete carry the loads. These details are in an anchor layout drawing or in the structural calculation. Without this specification, no load-bearing fixing is installed.
What the installation crew checks
Does the delivered anchor match the specification? Do type, length and marking agree? Is the mortar still within its shelf life? Is the right drilling and cleaning tool to hand? This check takes a few minutes and prevents a wrong anchor ending up in the floor.
Assessing existing concrete: grade, cracks and member thickness
In new buildings the concrete is known. In existing buildings the work often starts with questions.
Concrete grade
The approval states for which concrete strengths the anchor is suitable. In existing buildings the grade is often not documented. The structural engineer then has to decide how it is determined – for example from old documents, tests or load tests. Guessing is not an option.
Cracked or uncracked concrete
Concrete cracks when it is in tension. Many anchors are therefore approved for cracked concrete, some only for uncracked concrete. The structural engineer assesses which case applies. For installation, this means: visible cracks near the hole pattern are reported, not drilled over.
Member thickness
An anchor needs enough concrete beneath it. If the slab is too thin, the concrete can break out downwards. The minimum thickness is in the approval. How thick the slab actually is is clarified before drilling, not afterwards.
Screed, coating and joints
Many hall floors have a screed or coating on the load-bearing concrete. Embedment depth counts in the load-bearing concrete, not in the screed. Joints, edges and openings weaken the substrate – how far an anchor must be from them is in the approval.
Prestressed concrete and precast elements
Prestressed concrete slabs, hollow-core slabs and some precast elements have their own rules. Under no circumstances may tendons be drilled into. Here drilling is done only with the express sign-off of the structural engineer and with anchors approved for the purpose.
Marking out the hole pattern and locating services: look first, then drill
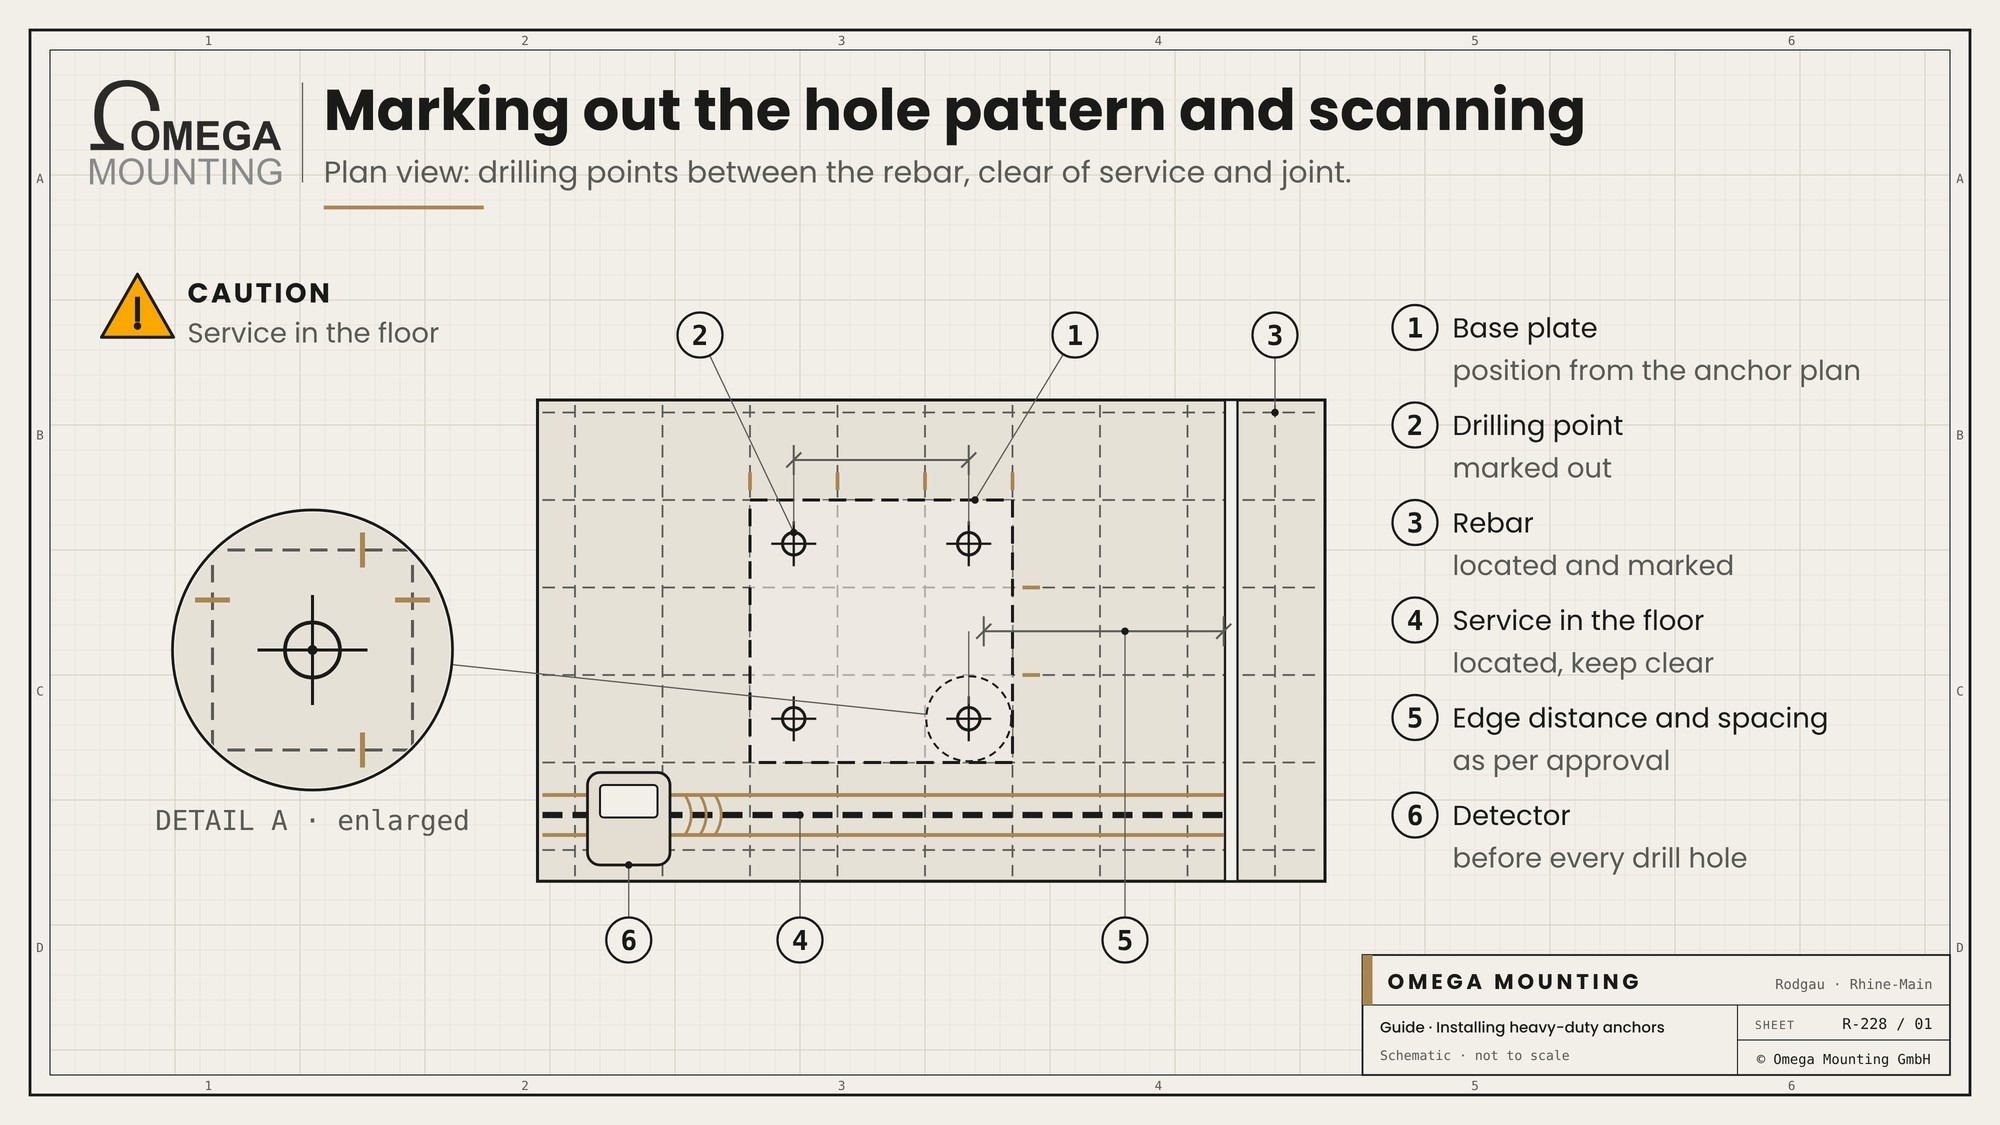
The hole pattern is the position of all holes of a base plate. It must be exactly right – and it must not hit anything in the floor.
Transferring the hole pattern
The hole pattern is transferred from the anchor layout drawing to the floor: with the base plate itself, a template or by measuring in axes and dimensions. Beforehand it is checked that the component really fits at this position – height, alignment, distance to walls, routes and other plant. Marking out a hole pattern cleanly, base plate by base plate, costs little time and saves drilling in the wrong place.
Edge distance and spacing
Every anchor needs a distance to the edge of the member and to the next anchor. If anchors sit too close together or too near an edge, their concrete cones overlap and the concrete carries less. The distances are in the approval and the anchor layout drawing. The installation crew keeps to them and reports if they do not fit on site.
Locating services before drilling
There may be cables, conduits, pipes or heating in the floor. A drilled-through service is expensive at best and fatal at worst. That is why services are located before drilling for every anchor hole: request as-built drawings from the operator, search with a detector, mark finds on the floor.
Locating reinforcement
Reinforcement is also searched for before drilling. Hitting it is not only a nuisance because the drill gets stuck – a severed reinforcing bar weakens the member. If you know its position, you can shift the hole pattern within the specifications before the first drill bit is applied.
When the device shows nothing clear
Detectors have limits, especially in thick or heavily reinforced slabs. If there is no clear result, you do not simply drill. We then clarify with the operator whether drawings can be supplied, whether a specialist firm should examine the floor more closely or whether the structural engineer approves another location.
Drilling: method, diameter and depth as per approval
Drilling is done the way the approval prescribes. That sounds obvious but is not always the case on site.
The right drilling method
Most heavy-duty anchors are set in hammer-drilled holes. Some approvals also allow hollow drill bits with extraction or diamond drilling, others do not. A diamond-drilled hole has a smooth wall – unsuitable for some anchors. Which method is permitted is in the approval. When core drilling is the right tool is covered in the guide Core drilling in industry.
Checking the drill bit
A worn drill bit drills a hole that is too small. A bit that is too big makes the hole too wide. Both change the load capacity. The bit is therefore checked for diameter and condition before use.
Perpendicular and to depth
The drill hole is perpendicular to the surface unless the instructions say otherwise. The drilling depth is kept with a depth stop or marking. Too shallow means too little embedment. Too deep can prevent expansion with some anchors or cost extra mortar.
Through the base plate or beforehand?
With through-fixing, the hole is drilled through the aligned base plate and the anchor is pushed through. With pre-positioned fixing, the hole is drilled and the anchor set first, then the base plate is placed on top. Which installation type is possible depends on the anchor and the member.
Drilling with extraction
Drilling into concrete produces quartz dust. It harms the lungs and spreads through the hall. That is why we drill with extraction directly at the machine. This protects the team and the surroundings and keeps the drill hole cleaner from the start.
Hitting reinforcement and misdrilled holes: what then?
Even with locating, the drill sometimes hits steel or a hole ends up in the wrong place. What matters is what happens next.
Hitting reinforcement
If the drill hits reinforcement, drilling does not continue to cut through the bar. The hole is not simply redone slightly to one side. When reinforcement is hit, the structural engineer decides how to proceed: shifting within tolerance, an additional anchor, a different hole pattern or another solution.
Misdrilled holes
A wrongly placed or abandoned hole is filled as specified by the manufacturer or the structural engineer. A new hole again needs the prescribed distance from the misdrilled one. Which distance applies and what it is filled with is in the approval or is set by the structural engineer.
Document instead of conceal
Every hit and every misdrilled hole is recorded with position, photo and decision. A concealed error in the floor is a risk nobody can see any more.
Cleaning the drill hole: the step that decides load capacity

No step is cut short as often as this one. And no step costs as much load capacity when it is missing.
Why drilling dust does so much harm
Drilling dust settles as a fine layer on the wall of the drill hole. A bonding mortar then sticks not to the concrete but to the dust. An expansion anchor presses against a layer of dust instead of solid concrete. In both cases load capacity drops significantly without anyone seeing it.
Blowing out and brushing out
Cleaning a drill hole means: blow out, brush out, blow out again – as often as the installation instructions prescribe. For this there are blow-out pumps, compressed air with oil-free air and brushes of the right diameter. The brush must give noticeable resistance at the hole wall, otherwise it is too small or worn.
Wet and damp drill holes
Water in the drill hole, for example after wet drilling or in a damp substrate, changes the conditions for the mortar. Whether and how setting in damp or water-filled holes is permitted is in the approval. What is not allowed there is not done.
Setting the anchor: bonded, expansion and undercut anchors
How the anchor gets into the hole differs by type. For all of them: exactly to the instructions, with the tool of the system.
Setting a bonded anchor with injection mortar
With an injection system, the mortar is pressed out of the cartridge with a mixer nozzle. The first strokes, which are not yet evenly mixed, are discarded. Then the drill hole is filled from the bottom without air bubbles until the prescribed quantity is reached. The anchor rod is inserted to the embedment depth with a slight turning motion. Excess mortar emerges at the top – a good sign that the hole is full.
Bonded anchor with mortar capsule
With capsule systems, the mortar is in a cartridge or glass capsule that is pushed into the hole. The anchor rod is turned in with the setting tool and breaks the capsule, resin and hardener mix. How fast and how far to turn is specified by the manufacturer.
Observe the working time
A mortar can only be worked for a certain time. After that it starts to set, and an anchor rod that is still moved now loses its bond. This time depends on temperature and is in the instructions.
Setting an expansion anchor
An expansion anchor is pushed or driven into the cleaned hole until the mark is reached. It expands only when it is tightened to the prescribed torque. If it is tightened too little, it does not expand fully. If it is overtightened, the concrete can crack.
Setting an undercut anchor
With the undercut anchor, an enlargement is created at the bottom of the drill hole with a special drill bit or by the anchor itself. The anchor engages in it by keying. The setting tool usually shows when the anchor is seated correctly.
Curing time and temperature: when loading is allowed
A bonded anchor may only be loaded once the mortar has cured. How long that takes depends mainly on temperature.
Temperature of concrete and mortar
What matters is the temperature of the substrate, not just the air. Cold concrete extends the curing time considerably. Below a certain temperature some mortars may not be used at all. The limits are in the instructions. In winter the concrete temperature is therefore measured and recorded in the record. The mortar is also stored at the right temperature and used before its shelf life expires.
Do not load too early
Whoever tightens, aligns or loads too early pulls the anchor out of the still soft mortar. The damage cannot be seen from outside. That is why the curing time is built into the installation plan and not cut short – not even when time is tight.
Tightening with torque as per approval

The tightening torque is not a guide value but part of the approval.
Value from the approval
The tightening torque of an anchor is in its approval and in the manufacturer's instructions. General torque tables for bolts do not apply to anchors. Tightening an anchor to the value of a bolt of the same size can overload it or under-preload it.
With a calibrated torque wrench
Tightening is done with a calibrated torque wrench, not with an impact wrench and not by feel. How to set and use a torque wrench correctly is covered in the guide Using a torque wrench correctly.
Sequence at the base plate
With several anchors on one base plate, tightening is done evenly so the plate is not distorted. Only when the component is aligned is final tightening done.
Check mark
After tightening, every nut gets a mark. At later inspections it is then immediately visible whether it has come loose.
Aligning, shimming and grouting the base plate
The base plate connects component and anchor. How it sits decides how forces go into the floor.
Aligning before tightening
No hall floor is perfectly level. The base plate is brought to height and plumb with levelling screws, wedges or shims. Only then is it tightened – so the component stands straight and the anchors are not loaded at an angle.
Shimming as specified
Shims belong close to the anchors and over the full area under the plate. A stack of shims at one corner is not a support. How high shimming may go is set by the manufacturer or the structural engineer.
Grouting
The gap under the base plate is often filled with a non-shrink grout. Otherwise the plate stands only on individual points and the anchors are loaded unevenly. The formwork is set tight so no mortar runs out, and the mixing ratio is kept exactly. Why every base plate needs grout beneath it is explained in the article Grouting.
Checking and documenting: the anchor record
What is in the concrete can no longer be seen. That is why it has to be written down.
Visual check
After setting, every anchor is checked: correct position, protrusion, clean seating of the base plate, washer and nut complete, check mark applied, no cracks in the concrete.
Torque check
The torque is re-checked on a sample basis or completely – as the specification or inspection plan requires. How inspection points and hold points are defined in advance is covered in the guide Inspection and test plan for installation.
Load test
If the substrate is unclear, the structural engineer can require load tests. Anchors are tested in tension with a defined load. Type, number and test load are determined by the structural engineer; the test is carried out to his specification, often together with the manufacturer or a testing body. The installation crew prepares the test anchors and assists.
The anchor record
An anchor record states: component, anchor type, approval, mortar and shelf life, drilling method, cleaning, concrete and air temperature, curing time, torque, deviations, sign-offs, photos, name and date. Some approvals expressly require that trained personnel install the anchors and that the installation is documented.
Where heavy-duty anchors are typically installed
We come across heavy-duty anchors on almost every installation where something has to stand firmly on the floor.
Impact protection and crash protection
An impact guard has to stay standing in an impact. The anchors then take a shock that can be much greater than the dead weight. Whether an impact guard holds or is torn out of the floor is decided by the anchoring. How a plastic impact guard is anchored correctly is covered in the guide Installing impact protection.
Pillar jib cranes
A pillar jib crane loads the floor on one side and with changing loads: what the jib lifts acts as a bending moment on column and base plate. That is why the anchoring decides everything. How a jib crane is set up and anchored is covered in the guide Installing a pillar jib crane.
Fixing in steel instead of concrete: when no anchor is needed
Not every fixing needs a heavy-duty anchor. If the substrate is steel, fixing is done differently.
Bolting instead of anchoring
On steel structures, ramps or platforms, holes are drilled, a thread is cut or bolts are put right through. A bolted connection then carries the load instead of an anchor. It has its own rules on property class, preload and locking.
Drilling in steel
In thick-walled steel, holes are drilled with the magnetic drilling machine and a core drill, cooled with cutting oil. The machine holds itself on the component with its magnet and drills exactly perpendicular.
Welding only with sign-off
Welding on is possible on steel but not always permitted. On load-bearing components, welding is done only as specified by the manufacturer or the structural engineer, with a qualified procedure and qualified personnel.
The sequence: installing heavy-duty anchors in six steps

This is how we install heavy-duty anchors on a typical installation.
Check the specifications
Approval, instructions, anchor layout drawing and loads are available. The delivered anchor matches the specification.
Mark out and locate
Transfer the hole pattern, locate services and reinforcement, mark finds, check distances.
Drilling
With an approved method, a checked drill bit, to depth and with extraction.
Cleaning
Blow out, brush out, blow out – as often as the instructions require.
Set and cure
Set the anchor as instructed, align, observe working and curing time.
Tighten, check, document
Tighten to the torque in the approval, apply a check mark, hand over record and photos.
Safety when drilling and setting
Installing anchors is not dangerous work – if you know the hazards.
Quartz dust
Drilling into concrete produces respirable quartz dust. Drilling is done with extraction; when blowing out, the team wears respiratory protection and safety glasses. The area is cordoned off so that nobody else gets the dust.
Noise and vibration
Hammer drilling is loud and strains hands and arms. Hearing protection is mandatory; longer drilling work is rotated within the team.
Pipework
A drilled-through power cable is life-threatening. That is why locating is done before every drill hole. If a cable is hit anyway, work stops immediately, the area is secured and an electrically skilled person is called.
Safety rules when installing heavy-duty anchors
- No anchor without approval and without the structural engineer's specification.
- Services and reinforcement are located before every drill hole.
- If reinforcement is hit or the concrete is unclear, the structural engineer decides.
- Drilling is done with extraction, respiratory protection and hearing protection.
- Drill holes are cleaned as instructed.
- Loading starts only after the curing time.
- Tightening is done with a calibrated torque wrench as per approval.
- Nobody works alone.
Typical mistakes when installing heavy-duty anchors
Anchor chosen by feel: Whatever is in the vehicle gets set, instead of what the specification requires.
Drill hole not cleaned: The mortar sticks to the dust, the anchor holds only a fraction.
No locating: A service is drilled into, a reinforcing bar is severed.
Loaded too early: The anchor is pulled out of the still soft mortar.
Wrong torque: The expansion anchor does not expand or the concrete cracks.
Distances ignored: Anchors too close to the edge or too close together.
Anchored in screed: The embedment depth does not reach the load-bearing concrete.
Nothing documented: Nobody knows later what is in the floor.
The mistake behind the mistakes
Most mistakes happen because anchor installation is seen as a side issue. If you treat it as a load-bearing part of the structure, you plan time, tools and checks from the start.
Who does what when installing heavy-duty anchors?
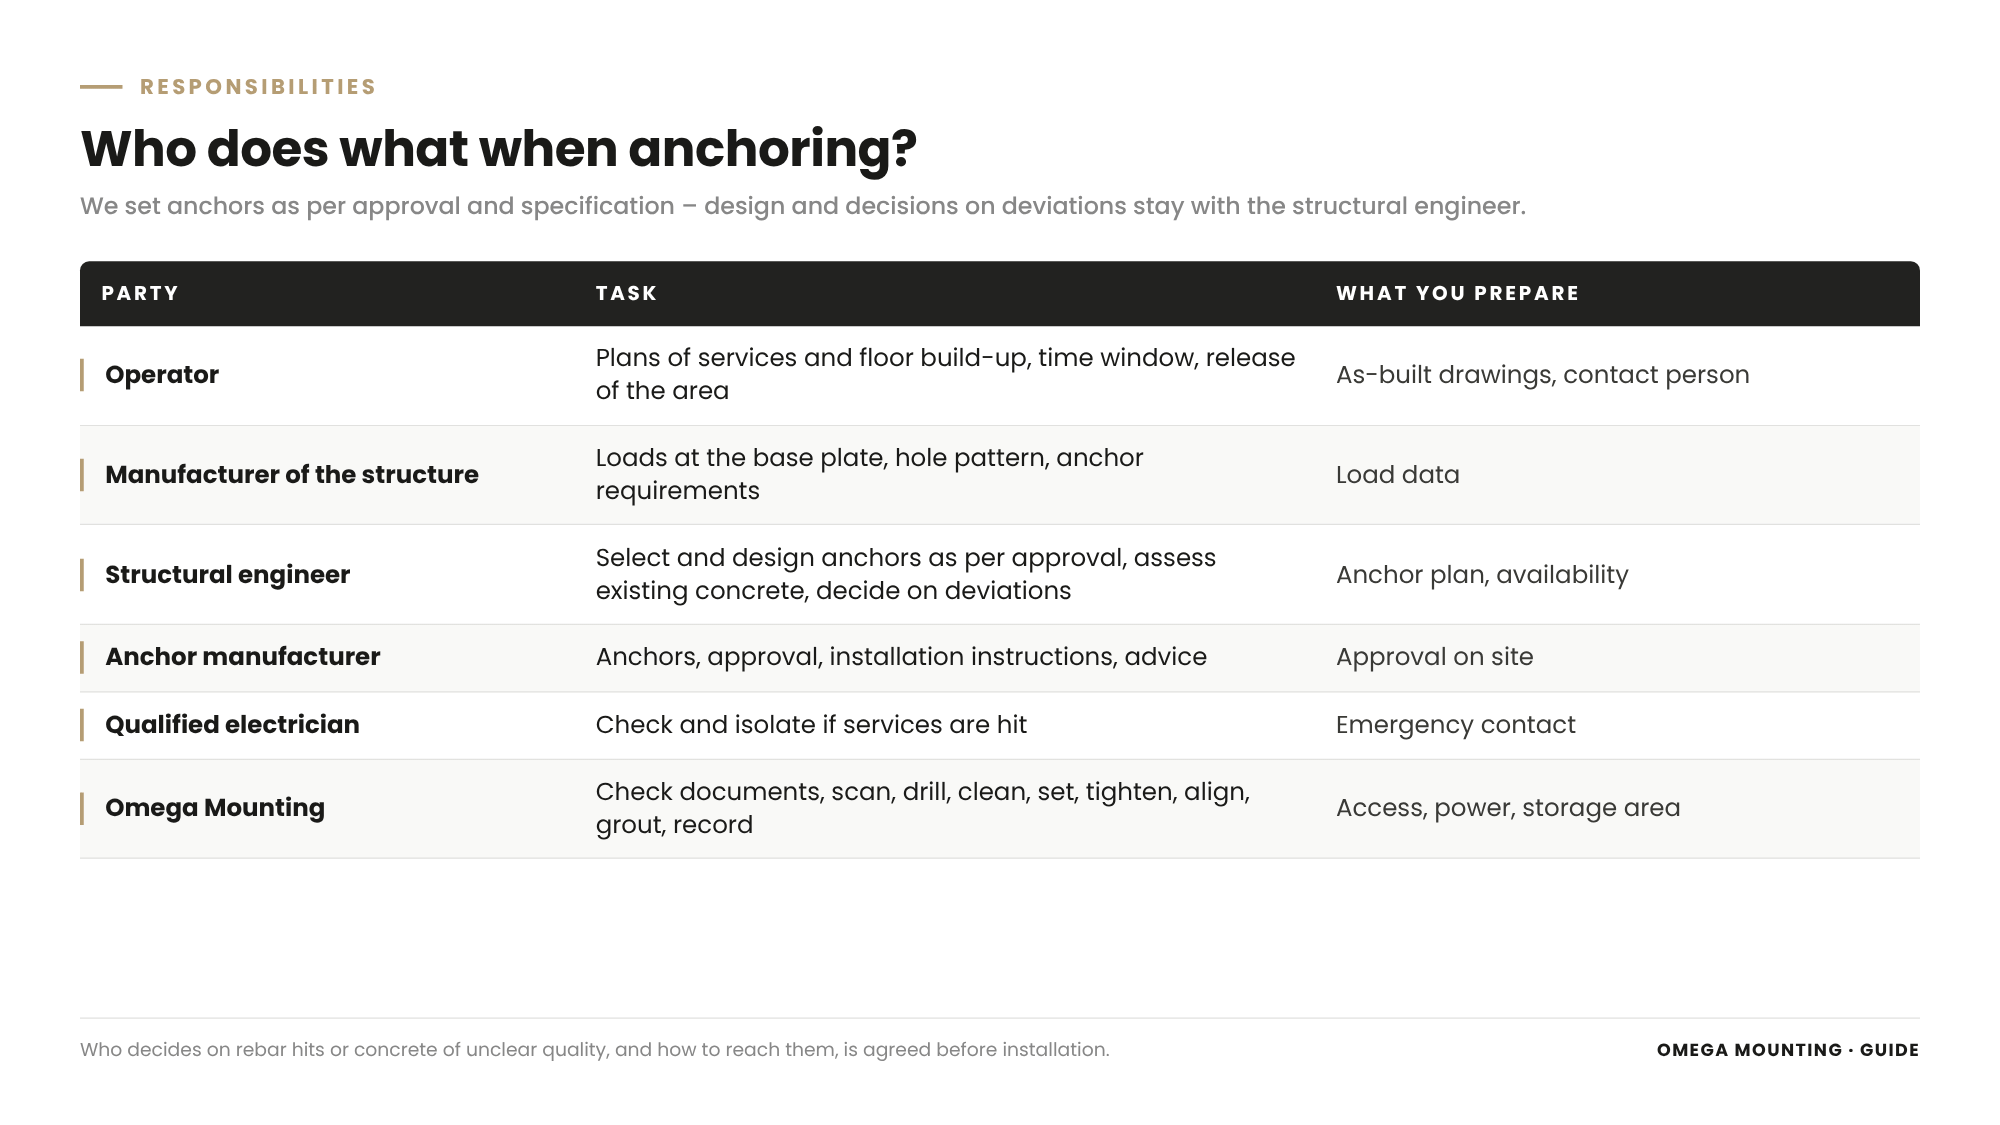
Operator
It provides as-built drawings of services and floor build-up, releases time window and work area and names a contact person.
Manufacturer of the structure
It supplies the loads at the base plate, the hole pattern and, where applicable, requirements for the anchor.
Structural engineer
He or she selects the anchor according to approval, designs it, fixes position, embedment depth and spacings, assesses the existing concrete and decides when reinforcement is hit and on deviations.
Anchor manufacturer
It supplies anchors, approval, installation instructions and technical advice.
Qualified electrician
They are called in when services are affected or have to be isolated. On plant that we install, our own electricians connect on the plant side up to the main isolator.
Omega Mounting
We check documents and delivered anchors, mark out the hole pattern, locate, drill with extraction, clean, set as per approval and manufacturer's specification, tighten to torque, align, grout and document.
Installing heavy-duty anchors: what this means for your planning
Are all specifications available?
Make sure approval, anchor layout drawing and loads are available before installation.
Is the substrate known?
Clarify concrete grade, member thickness, floor build-up and services before the date is fixed.
Who decides on deviations?
Make sure the structural engineer can be reached quickly if reinforcement is hit or cracks are found.
Is the curing time planned in?
Plan in waiting times and temperature, especially in winter.
What belongs in the order for anchor installation
Service
Checking the documents, marking out, locating, drilling, cleaning, setting, tightening, aligning, grouting, record.
The frame
Time window, work area, dust protection, floor protection, availability of the structural engineer, delivery of the anchors.
Record
Anchor record, photos, deviations with sign-off, manufacturer's documents.
Legal framework
For load-bearing fixings in concrete, the state building codes with their rules on the usability of construction products apply, among others, as does the approval of the respective anchor with its conditions for design and installation. For the work itself, the German Occupational Safety Act with the risk assessment and the Hazardous Substances Ordinance apply when handling quartz dust and mortars. This guide is not legal advice – what evidence is required in your case should be clarified with your structural engineer and your occupational safety specialist.
Installing heavy-duty anchors in the Rhine-Main region: how we work
From Rodgau we reach Frankfurt, Offenbach, Hanau, Darmstadt, Aschaffenburg and the industrial, logistics and data center locations of the region quickly – and we work nationwide with our own teams. If you want heavy-duty anchors installed, in the Rhine-Main region or beyond, we offer installation, anchoring and documentation from one contractor.
We anchor crane supports, jib cranes, impact protection, machines and steelwork in existing halls, often during live operation. How we approach industrial installation is shown on the page on Industrial installation.
In practice: anchors that are set as specified and traceably documented.
Project examples
Four projects show what matters in anchoring – from the bonded anchor in a finished hall floor to fixing in steel, where no anchor is needed at all.
Bonded anchors for two pillar jib cranes
In a nuclear area we set up two pillar jib cranes. The condition and thickness of the floor slab were clarified before drilling. Then the hole pattern of the base plate was marked out and drilled into the concrete floor with dust extraction directly at the drilling machine. Every drill hole was blown out and brushed out, the cartridges inserted and the anchor rods turned in. Only after the curing time did work continue, with alignment by shims. The project is described in the report Workshop equipment in a nuclear area: two pillar jib cranes.
Bonded dowels on a crane runway
When installing a crane runway for an overhead hall crane, we fixed the columns with dowels and levelling screws, checked positions and diagonal dimensions and brought all columns to the same height with a rotary laser. The base plates were fixed over dowels bonded in beforehand and then grouted. That takes trained personnel, the right mixing ratio and tightly set formwork. The project is described in the report Installing a crane runway for an overhead crane.
Base plates on a gantry crane in Babenhausen
In Babenhausen, two of our fitters set up a gantry crane in two days. The gantry was surveyed with the laser for height and diagonal dimension and only then finally tightened. The base plates were grouted with a high-strength, non-shrink grout – otherwise the plates would have stood only on individual points and the anchors would have been loaded unevenly. The grout cured overnight. The project is described in the report gantry crane installation in Babenhausen.
Steel impact protection at Frankfurt Airport
At a loading dock at Frankfurt Airport we installed an impact guard made of thick-walled square tube. The substrate here was steel, not concrete: tubes and dock were pre-drilled with the magnetic drilling machine, threads cut and the segments bolted so they can be replaced individually. The project is described in the report impact protection project for a loading dock at Frankfurt Airport. How a steel impact guard is fixed to the hall floor with heavy-duty anchors is shown in the report made-to-measure impact protection near Offenbach.
Is an anchoring job coming up?
Send us anchor layout drawing, approval and photos of the installation location – we review the documents and tell you how the installation can go. Get in touch now.
What this means for your role
Project and site managers: Insist on anchor layout drawing and approval before installation starts, and plan in curing times.
Maintenance managers: Keep anchor records and have check marks inspected during walk-rounds.
Operators and technical managers: Provide drawings of services and floor build-up and release areas in good time.
Structural engineers and designers: Specify anchor type, embedment depth, spacings and hole pattern clearly and be available for deviations.
Buyers: Ask whether locating, dust protection, grouting and record are included in the quotation.
Occupational safety specialists: Check dust protection, hearing protection, handling of mortars and the rules for finding services.
Anchor record: on request
We have put together an anchor record as a working document for your projects. It covers component, anchor type, approval, specifications, substrate, locating, hole pattern, drilling method, cleaning, mortar, temperature, curing time, torque, deviations and sign-offs. Request the record through our contact form – keyword “Anchor record”.
Why Omega Mounting?
From over 20 years of practice in installation and moving equipment in, we know: an anchor is only as good as its installation. That is why we install only to approval and specification, locate before every drill hole, clean every hole as instructed, keep curing times and document everything. Where the structural engineer has to decide, we stop and ask. On plant that we install, mechanics and plant-side electrics up to the main isolator come from one contractor, and we never send a single fitter alone. In practice: anchors you can rely on. Talk to us about your project – we will get back to you promptly.
Conclusion
Installing heavy-duty anchors means implementing the structural engineer's specification exactly to the anchor's approval: mark out the hole pattern, locate services and reinforcement, drill correctly, clean thoroughly, set as instructed, keep the curing time, tighten to the specified torque and document everything.
Load capacity is created at places you can no longer see later. If you work cleanly there and ask the structural engineer about deviations, you get an anchoring that holds. If you want to have heavy-duty anchors installed, get in touch with us.
Planning a move-in, installation or maintenance in the Rhine-Main region?
Tell us briefly what you need – we'll come back with an honest assessment.
Free, no-obligation callback
You may also be interested in these guides

About the author
Tobias Schott
Managing director of Omega Mounting GmbH, Rodgau · more than 20 years of hands-on experience in installation and maintenance
A trained mechatronics technician, working in maintenance, servicing and industrial installation since 2004 – first alongside his father, and with Omega Mounting since 2012: from overhead conveyors in Frankfurt to the crane system in a new-build hall. He plans and leads lifting operations as an appointed person (AP) in data centers and on industrial sites in the Rhine-Main region, trains and examines operators of cranes, mobile elevating work platforms and telehandlers, and is a qualified occupational safety specialist. On jobs abroad he is known as the “German Troubleshooter” – the person you call when a site gets stuck. He learned what quality means from his father, not from a manual: Made in Germany as a standard for his own work, not a label. That is why quality comes first at Omega Mounting – ahead of speed and price. He writes these guides from that practice: what works on our sites is in them – what exists only on paper is not.
Frequently asked questions
To the approval and the manufacturer's instructions: mark out the hole pattern, locate services and reinforcement, drill with the approved method, clean the drill hole, set the anchor, wait for the curing time, tighten to the specified torque and document.
The structural engineer. He selects the anchor according to the approval, designs it and fixes position, embedment depth and spacings. The installation crew implements this specification.
Because drilling dust weakens the connection between anchor and concrete. A bonding mortar otherwise sticks to the dust instead of the concrete, and an expansion anchor presses against a layer of dust.
Drilling does not continue. When reinforcement is hit, the structural engineer decides whether to shift, set an additional anchor or choose another solution. The misdrilled hole is filled as specified and documented.
The torque stated in the approval and in the manufacturer's instructions. General torque tables for bolts do not apply to anchors.
That depends on the mortar and above all on the temperature of the concrete. The curing time is in the manufacturer's instructions. Until then the anchor is not loaded.
Only if concrete grade, condition and member thickness are known or assessed by the structural engineer. If the existing concrete is unclear, he decides whether tests or load tests are needed.
Yes. From Rodgau we are quickly on site in the region, and we work throughout Germany with our own teams.
Send us anchor layout drawing, approval, loads and photos of the installation location. We review the documents and come back with a proposal. Go to the contact page.
 English
 German