
- Guide – Maintenance
Torque table for bolts: tightening torques, friction, flange
By Tobias Schott · Reading time approx. 26 minutes · As of: October 2026
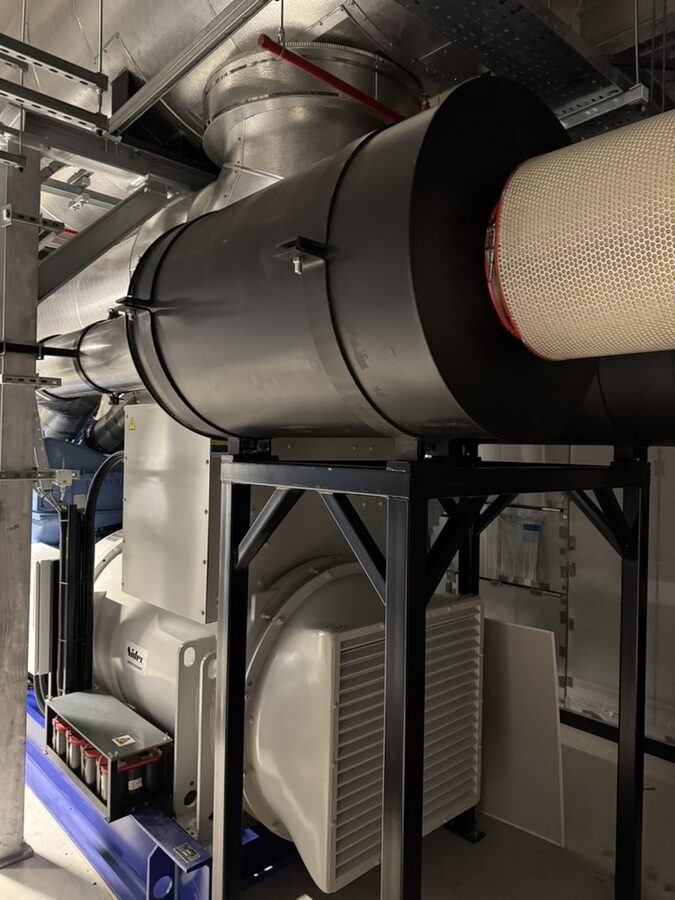
A torque table provides guide values for the tightening torque – but what holds a bolted joint is the preload, and that depends on property class, friction and tightening method.
Anyone looking for a torque table usually has a bolt in one hand and a wrench next to it. The question is simple: how tight? The answer is not quite. The same M12 bolt needs a different torque depending on property class, surface and lubrication. Anyone who takes the wrong value ends up with a joint that works loose – or a bolt that is already overstretched while being tightened.
This guide gives you both: the table and the understanding behind it. You will find tightening torques for bolts M4 to M30 for property classes 8.8, 10.9 and 12.9, for two friction coefficients. We also explain how to read the head marking, why lubrication changes the value, how to recognise an overstretched bolt and how to handle flanges and bolt locking correctly.
How to position, align and anchor a machine with anchors is described in our basic article Aligning and anchoring a machine. This one is about the bolted joint itself.
We write as an installation and maintenance contractor from Rodgau near Frankfurt. We tighten bolts ourselves, on machines, steel structures, pipework and refrigeration plants. But safety-relevant joints must be calculated by the designer and manufacturer – we say so clearly at the relevant points.
Key points at a glance
- The tightening torque is only the means – the joint holds through the preload with which the bolt presses the parts together.
- By far the largest part of the torque goes into friction in the thread and under the head, so any change in friction changes the preload.
- The property class is on the bolt head; the nut must match it.
- The values in the torque table are guide values – drawing, design specification and manufacturer's data are what count.
- Tightening a lubricated bolt with the table value for dry bolts overstretches it.
- An overstretched bolt is replaced, never “retightened once more”.
- Flanges are tightened crosswise in stages; the best bolt locking is sufficient preload, and a paint line only shows whether something has turned.
What is the tightening torque – and why does the preload really count?
The tightening torque is the torque with which a bolt or nut is tightened; it is stated in newton metres (Nm) and serves to create a specific preload in the bolt.
The preload is the force with which the stretched bolt presses the bolted parts together. A bolt acts like a very stiff spring. When tightened, it is stretched minimally and wants to return. This restoring force clamps the parts. Specialists speak of the assembly preload, symbol FM.
Where the torque goes
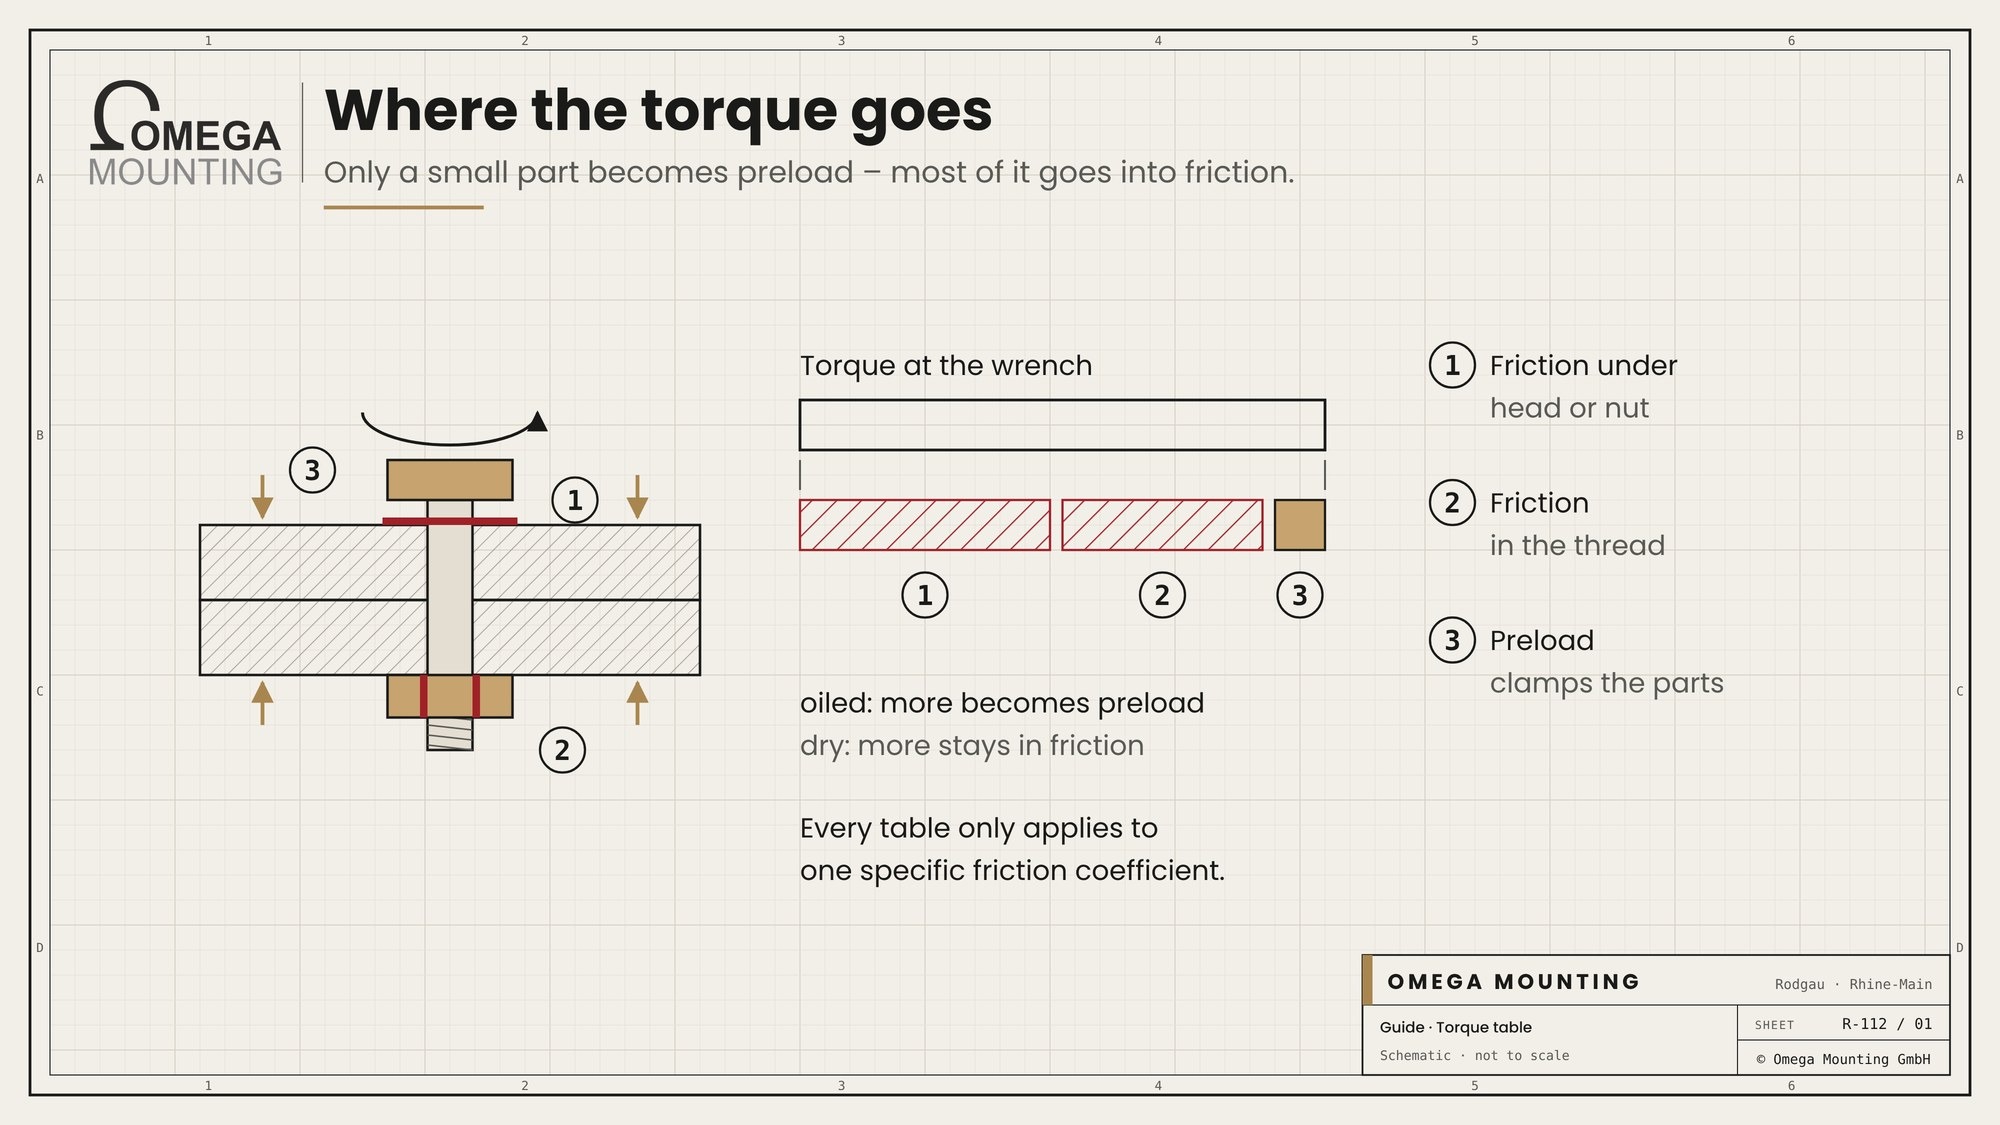
Of the torque you apply at the wrench, only a small part arrives as preload. By far the largest part goes into friction: in the thread and under the bolt head or nut. That is why the same bolt with the same torque can sit very differently. If the thread is oiled, more torque becomes preload. If it is dry or dirty, more stays in friction.
The total friction coefficient μtot combines both friction components into one number. Every torque table therefore only applies to one specific friction coefficient. Anyone who overlooks this reads the right row and still takes the wrong value.
Why the preload holds the joint
A well-preloaded joint behaves like a single part. The parts are pressed together so firmly that they do not slide against each other under operating load and the joint does not open. The bolt itself then only feels a small part of the alternating load.
If preload is missing, this changes. The parts move against each other, the bolt takes every load fluctuation in full and can work loose or break. That is why the tightening torque is a means to an end. The goal is always the right preload.
Reading property classes: what 8.8, 10.9 and 12.9 mean
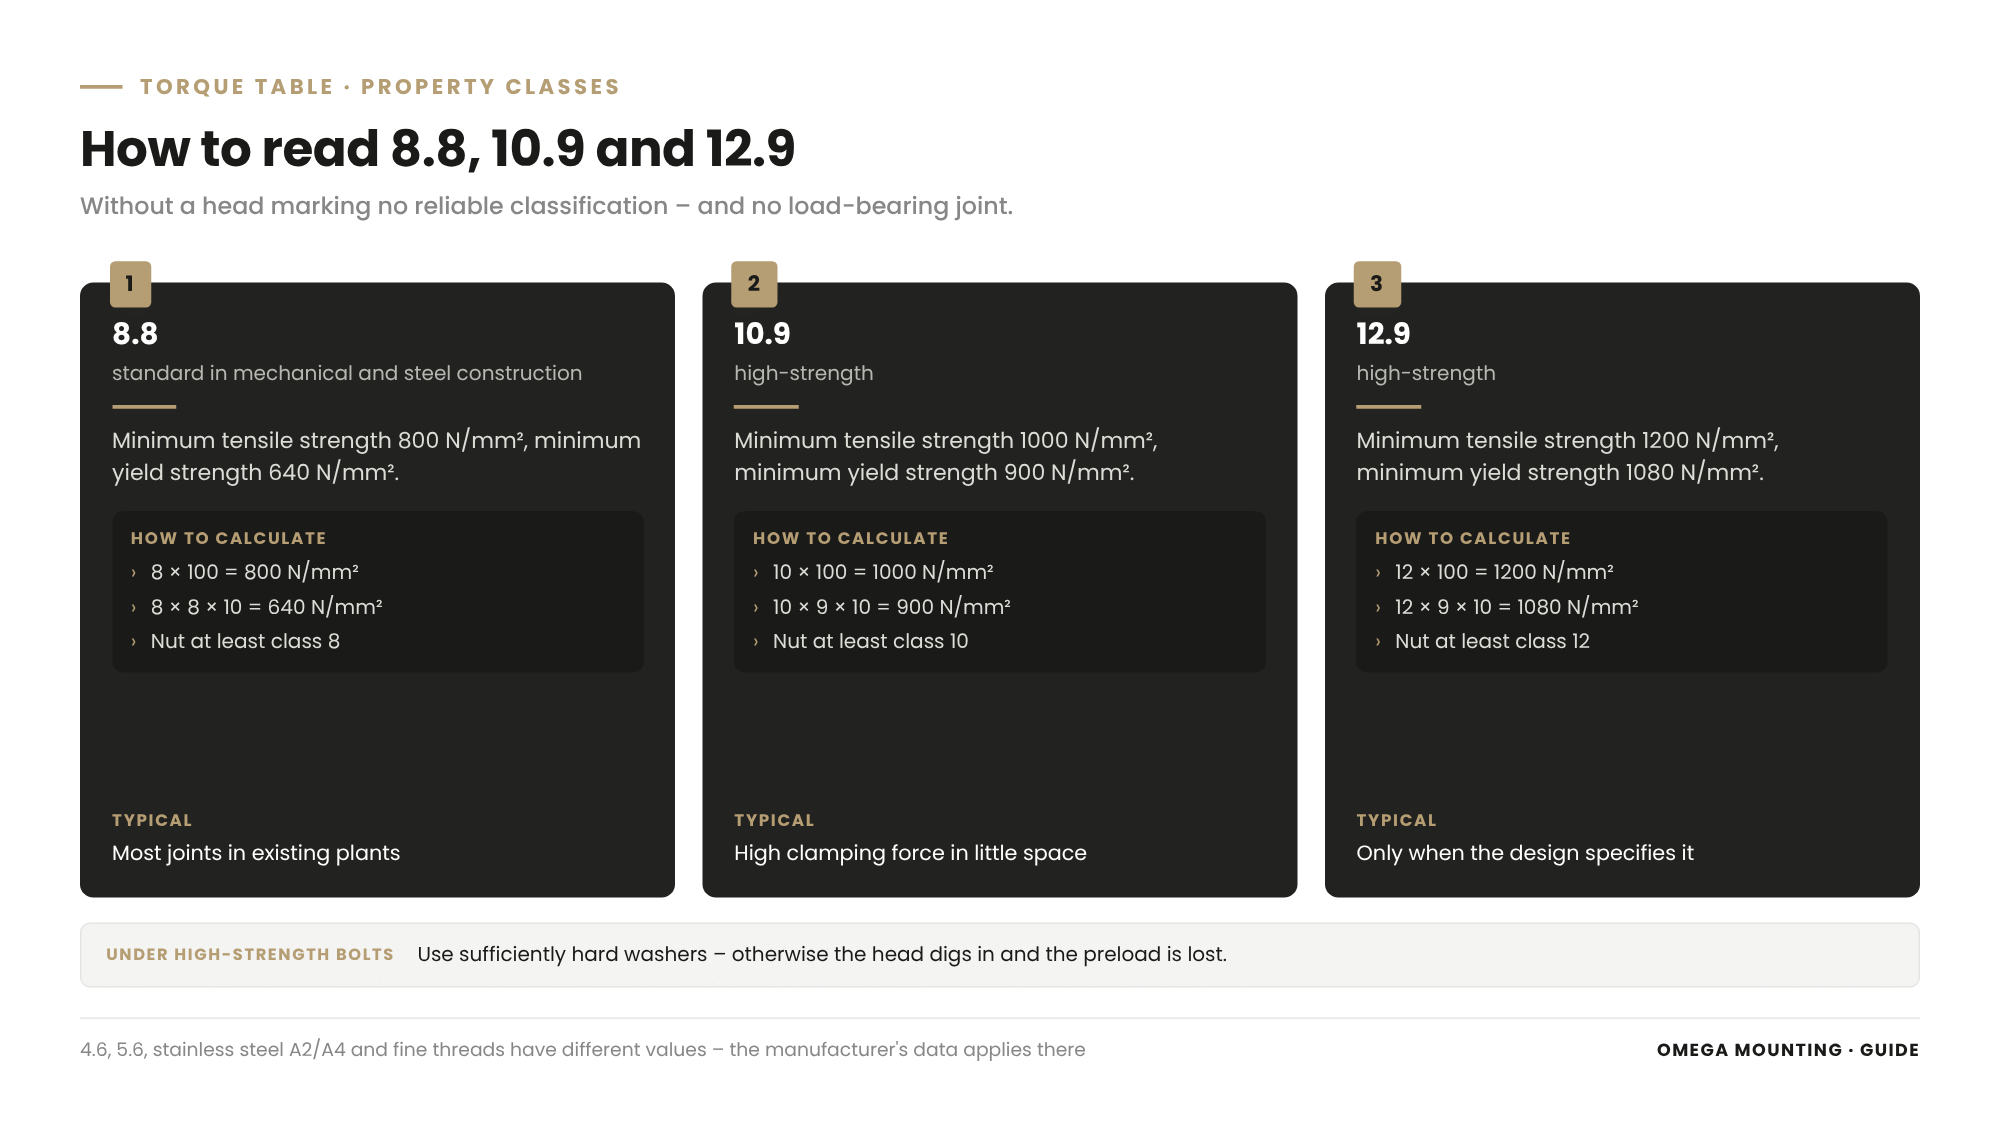
The property class of a steel bolt is shown as a pair of numbers on the head and, according to DIN EN ISO 898-1, states the minimum tensile strength and minimum yield strength of the material.
The rule is simple. The first number times 100 gives the minimum tensile strength in N/mm². The product of both numbers times 10 gives the minimum yield strength in N/mm². The yield strength is the stress from which the bolt deforms permanently.
| Property class | Minimum tensile strength | Minimum yield strength |
|---|---|---|
| 8.8 | 800 N/mm² | 640 N/mm² |
| 10.9 | 1000 N/mm² | 900 N/mm² |
| 12.9 | 1200 N/mm² | 1080 N/mm² |
Class 8.8 is the standard in mechanical and steel construction. Classes 10.9 and 12.9 are called high-strength; they are used where high clamping forces are needed in little space.
Finding the head marking
Hexagon head bolts and socket head cap screws carry the property class on the head, usually together with the manufacturer's mark. If the marking is missing, the bolt's property class cannot be reliably identified. Then the bolt does not belong in a load-bearing joint, and the table does not help.
The nut must match
The nut also has a property class, given as a single number. It must at least match the first number of the bolt class. A soft nut on a high-strength bolt strips the thread during tightening long before the bolt reaches its preload. The same applies to washers: under high-strength bolts, sufficiently hard washers are needed, otherwise the head digs in and the preload is lost.
What does not belong in the table
Bolts of property classes 4.6 or 5.6 and stainless steel bolts, such as A2 or A4, have different, lower values. For them the manufacturer's data or the standard value applies, not the table below. The same applies to fine threads, special bolts and bolts made of aluminium or titanium.
Torque table M4 to M30 for 8.8, 10.9 and 12.9
The torque table below gives guide values for the tightening torque of bolts with metric coarse thread in property classes 8.8, 10.9 and 12.9, at a total friction coefficient of 0.12 and in a second table of 0.14.
The values apply to VDI 2230 (2015 edition) for metric coarse thread, standard head and nut bearing area, medium hole, 90 % utilisation of the minimum yield strength and a total friction coefficient μtot of 0.12; we have cross-checked them against a second, independent table.
Main table: tightening torques in Nm at μtot 0.12
| Thread | 8.8 | 10.9 | 12.9 |
|---|---|---|---|
| M4 | 3.0 | 4.6 | 5.1 |
| M5 | 5.9 | 8.6 | 10.0 |
| M6 | 10.1 | 14.9 | 17.4 |
| M8 | 24.6 | 36.1 | 42.2 |
| M10 | 48 | 71 | 83 |
| M12 | 84 | 123 | 144 |
| M14 | 133 | 195 | 229 |
| M16 | 206 | 302 | 354 |
| M18 | 295 | 421 | 492 |
| M20 | 415 | 592 | 692 |
| M22 | 567 | 807 | 945 |
| M24 | 714 | 1017 | 1190 |
| M27 | 1050 | 1496 | 1750 |
| M30 | 1428 | 2033 | 2380 |
Guide values. Drawing, design specification and manufacturer's data are what count. Other friction coefficients, materials, coatings, washers or soft parts change the value. Safety-relevant joints are calculated to VDI 2230.
Allow for wrench tolerance. The tolerance of the torque wrench belongs in the calculation. Never set above the table value – the table already gives full utilisation. Anyone who wants to stay safely below it subtracts the wrench's permissible deviation from the table value or takes the target torque with tolerance from the design specification.
How to read the table
First look up the thread, then the property class on the head. Anyone looking for the M8 torque for a class 8.8 bolt reads 24.6 Nm. The M10 torque in the same class is 48 Nm, the M12 torque 84 Nm. For the 10.9 tightening torque, go to the middle column: an M12 of class 10.9 comes to 123 Nm. The 8.8 and 10.9 tightening torques are therefore clearly apart – mixing up the class is a common mistake.
Second table: tightening torques in Nm at μtot 0.14
The second bolt torque table applies, with otherwise the same assumptions, to a total friction coefficient of 0.14.
| Thread | 8.8 | 10.9 | 12.9 |
|---|---|---|---|
| M4 | 3.3 | 4.8 | 5.6 |
| M5 | 6.5 | 9.5 | 11.2 |
| M6 | 11.3 | 16.5 | 19.3 |
| M8 | 27.3 | 40.1 | 46.9 |
| M10 | 54 | 79 | 93 |
| M12 | 93 | 137 | 160 |
| M14 | 148 | 218 | 255 |
| M16 | 230 | 338 | 395 |
| M18 | 329 | 469 | 549 |
| M20 | 464 | 661 | 773 |
| M22 | 634 | 904 | 1057 |
| M24 | 798 | 1136 | 1329 |
| M27 | 1176 | 1674 | 1959 |
| M30 | 1597 | 2274 | 2662 |
Here too: guide values; drawing, design specification and manufacturer's data are what count. The higher values only apply if the friction really is that high. Anyone who applies them to a bolt with lower friction overstretches it.
What tolerance a torque wrench has
According to DIN EN ISO 6789, a torque wrench may deviate from the set value by ±4 % in the range of 10 to 1,000 Nm. ±6 % is common for smaller wrenches. Calibration is due after 12 months or 5,000 load cycles at the latest, whichever comes first – the manufacturer's data may differ. How to set, apply and look after the wrench is explained in our guide Using a torque wrench correctly. Just this much in advance: pull at right angles (90°) to the handle, evenly and without jerking, and stop immediately when it clicks.
Friction: lubricated, dry, coated
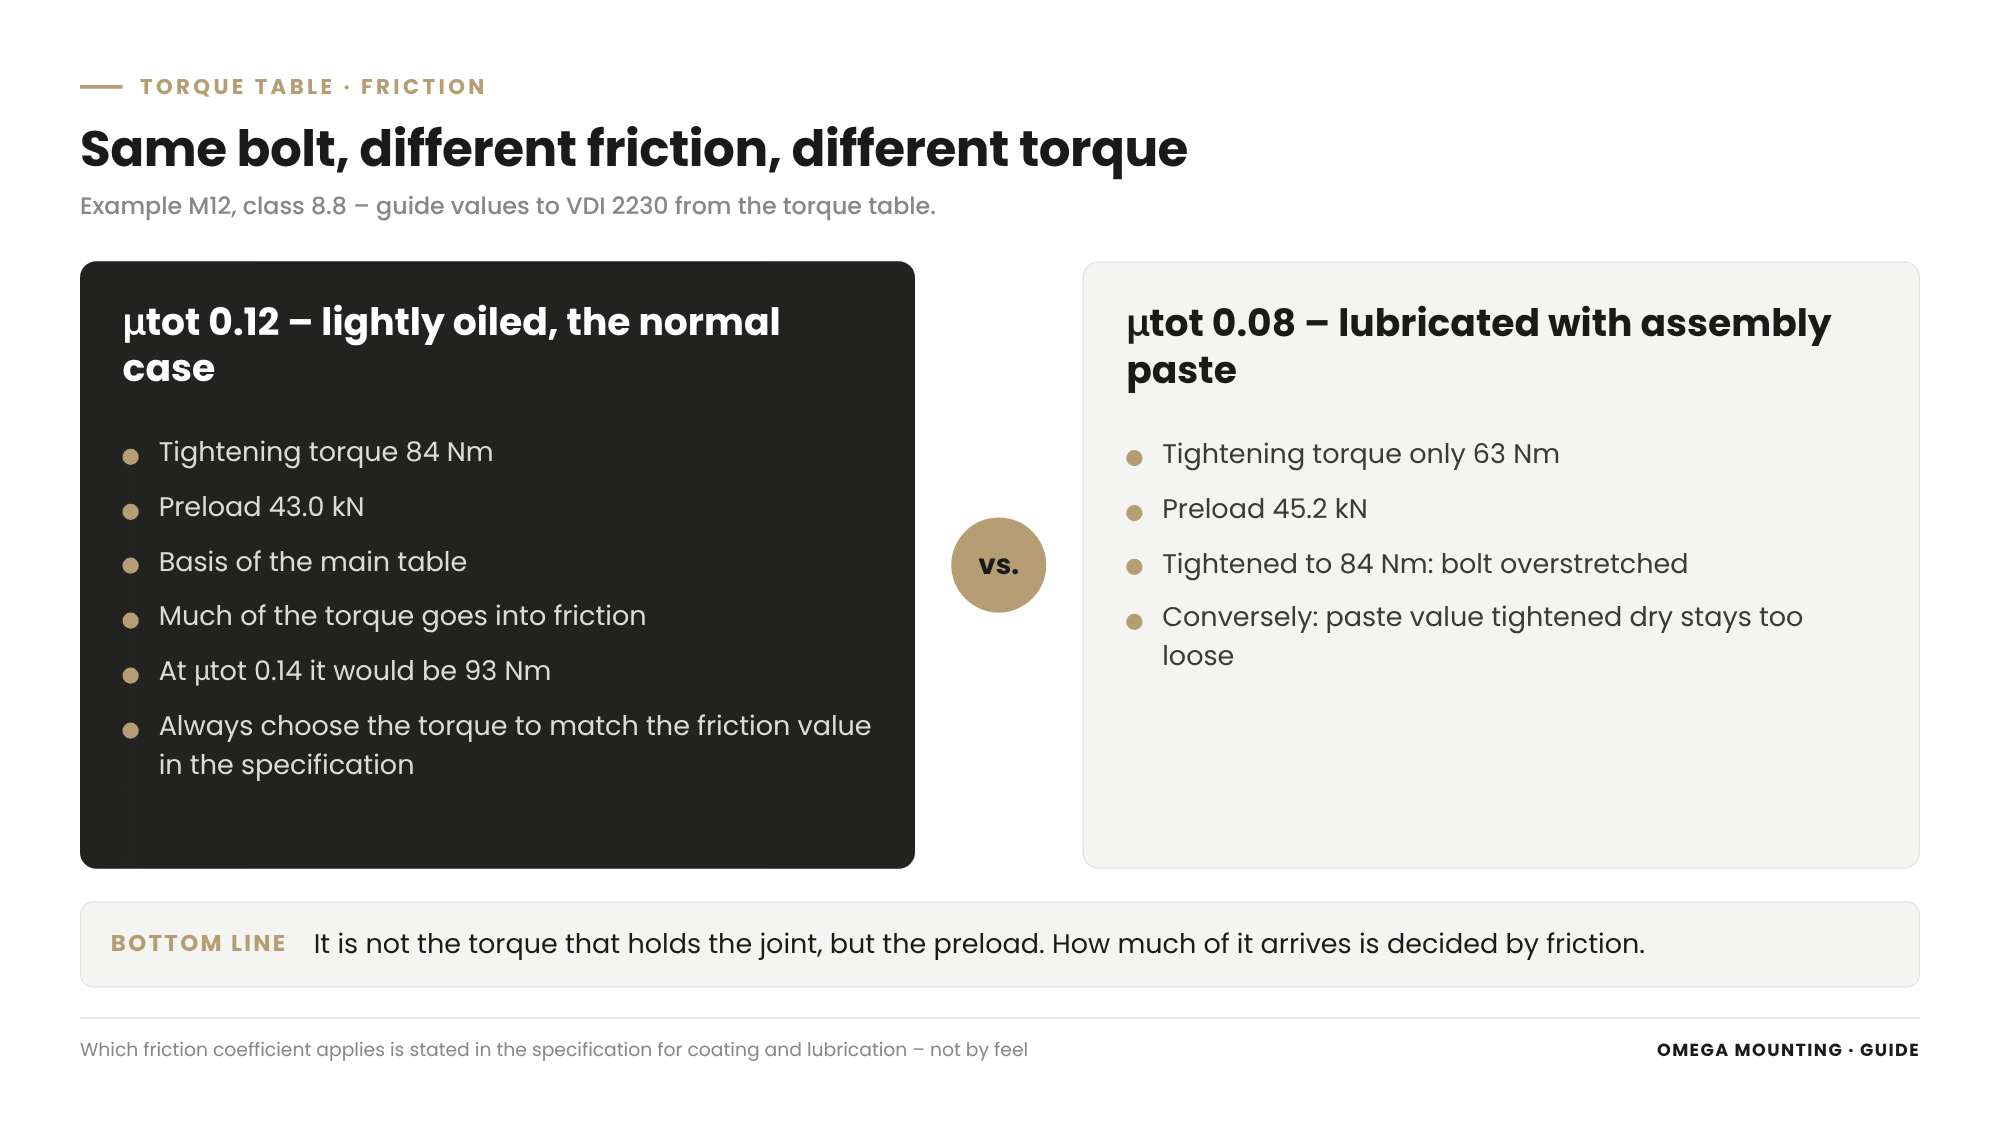
Friction decides how much preload results from a tightening torque: with low friction, the same torque creates much more preload; with high friction, much less.
The friction coefficient depends on many things. On the bolt surface, such as bright, blackened, phosphated, galvanised or with zinc flake coating. On the lubricant, such as oil, assembly paste or bonded coating. On the mating surface, i.e. painted, galvanised or bright parts. And on whether bolt and nut are new or have already been tightened once.
The example: same bolt, different friction
Take an M12 bolt of class 8.8. For μtot 0.12 the main table gives a tightening torque of 84 Nm. With it the bolt reaches an assembly preload of 43.0 kN – that is the full utilisation the table is calculated for.
Now the same bolt is lubricated with assembly paste. The friction coefficient can drop to 0.08 as a result; how far is stated in the lubricant's data sheet. For μtot 0.08 the reference gives only 63 Nm, at 45.2 kN preload. The bolt cannot take more at this friction.
Anyone who still tightens the lubricated bolt to 84 Nm pushes it beyond this limit. The torque that would otherwise have disappeared in friction now goes into elongation. The bolt is overstretched – and usually still looks completely normal.
| Thread and class | Torque at μtot 0.12 | Preload at μtot 0.12 | Torque at μtot 0.08 | Preload at μtot 0.08 |
|---|---|---|---|---|
| M8, 8.8 | 24.6 Nm | 18.6 kN | 18.5 Nm | 19.5 kN |
| M8, 10.9 | 36.1 Nm | 27.3 kN | 27.2 Nm | 28.7 kN |
| M12, 8.8 | 84 Nm | 43.0 kN | 63 Nm | 45.2 kN |
| M12, 10.9 | 123 Nm | 63.2 kN | 92 Nm | 66.3 kN |
| M16, 8.8 | 206 Nm | 80.9 kN | 153 Nm | 84.7 kN |
| M16, 10.9 | 302 Nm | 118.8 kN | 224 Nm | 124.4 kN |
Notably, at low friction the bolt may even carry slightly more preload, because there is less torsion in the shank. But the torque for it is much lower. For class 12.9, incidentally, the reference gives 108 Nm at μtot 0.08 for M12, compared with 144 Nm at μtot 0.12.
The reverse case: dry instead of lubricated
The mistake also goes the other way. If a specification prescribes a torque for lubricated bolts, for example 63 Nm for an M12 of class 8.8 at μtot 0.08, and the bolt is fitted dry, the preload stays far below the target. At μtot 0.12 the same bolt needs 84 Nm for 43.0 kN. With 63 Nm it stays well below and can come loose in operation.
Which friction coefficient applies?
Which friction coefficient applies to your bolt is stated in the design specification or by the manufacturer of the bolt, coating or lubricant. Coated bolts with built-in lubricant often have a defined friction coefficient in the data sheet. If there is no information at all, ask before you tighten.
On site a simple rule applies: if the specification says dry, do not lubricate. If lubricated is specified, then with the lubricant named, on the thread and the head or nut bearing area. And on one joint always treat all bolts the same – not half oiled and the other half dry.
When is too much torque? Recognising overstretching
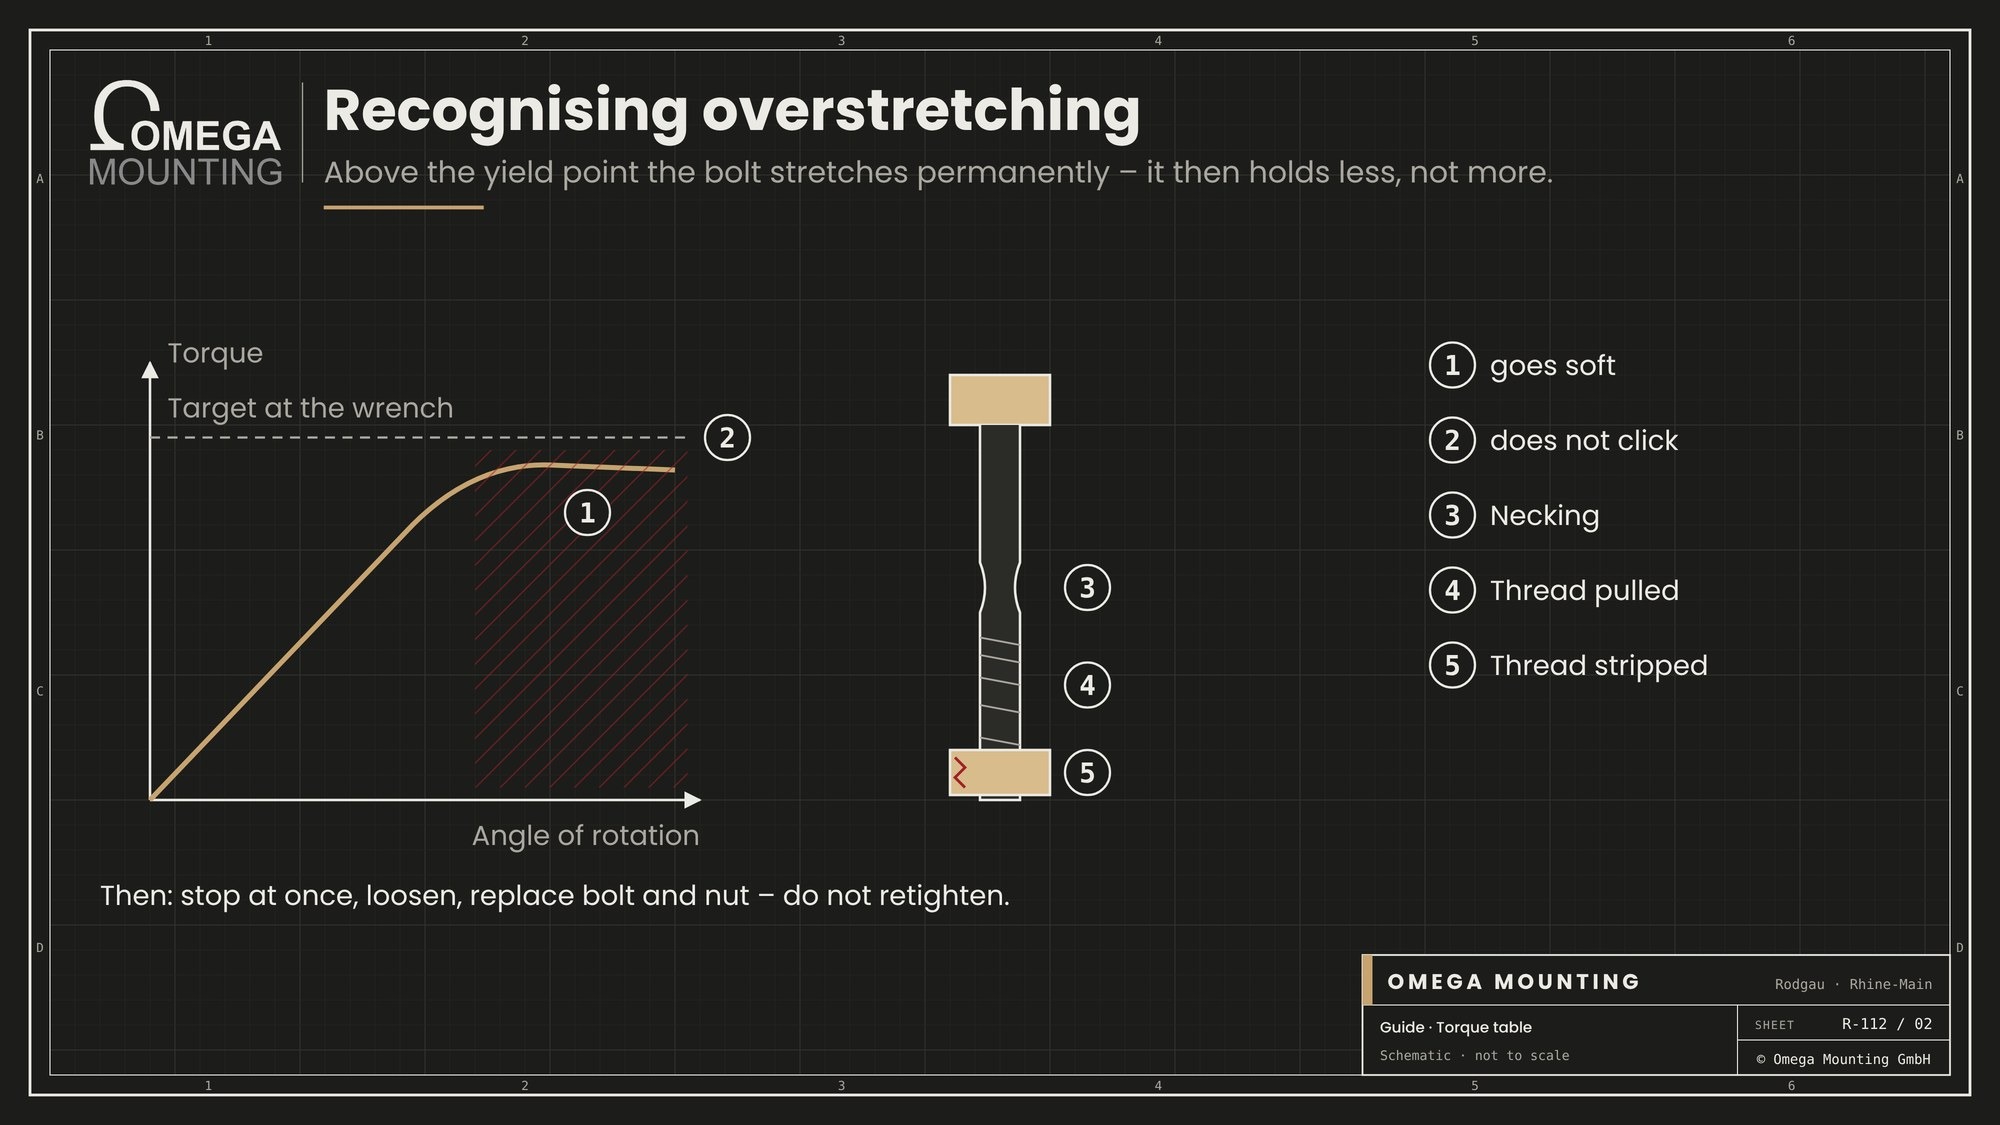
Too much torque is reached when the bolt is pulled beyond its yield point and stretches permanently – it then holds less, not more, and must be replaced.
During normal tightening the torque rises steadily the further you turn. Shortly before overstretching, the feel changes. Typical signs of a bolt being overtightened:
- The bolt “goes soft”. The resistance no longer rises even though you keep turning.
- The wrench does not click. A click wrench does not reach its value because the bolt gives way.
- Necking. A narrowing appears on the free thread or shank.
- Thread pulled. The nut runs stiffly when loosened, the pitch is stretched.
- Thread stripped. The nut spins, the thread is sheared off.
What to do then
Stop immediately. Loosen the joint and replace bolt and nut. A bolt that has once been overstretched has lost its full preload and breaks earlier under load. “Retightening once more” makes it worse, not better.
Then clarify the cause: wrong friction, wrong property class, wrong value, a defective wrench or a soft part. With threads directly in the part, the internal thread is also checked. Whether it may be re-cut or repaired with a thread insert is decided by the manufacturer or designer.
Stretch bolts and angle-tightened bolts
Stretch bolts have a deliberately thinner shank and are tightened specifically up to or into the range of permanent deformation. The same often applies to bolts tightened by angle. They are not reused unless the manufacturer expressly allows it.
Checking tightened bolts correctly
A tightened bolt cannot simply be “rechecked with the wrench”. Anyone who sets the wrench to the target torque and applies it again measures something else: the torque at which the bolt turns further. That can be above or below the tightening torque, because static friction and settling distort the value. If the bolt turns further, it has been retightened, not checked.
For everyday checks the paint line is the better tool. If it is interrupted, the joint is loosened, the cause clarified and it is retightened as specified. What a check with the wrench should look like is decided by the manufacturer if in doubt.
Too little torque is just as dangerous
Too little torque only shows later. After tightening, the roughness peaks in the joint faces flatten and the joint settles. Part of the preload is lost in the process – too much with bolts that are only just tight. Then the parts slide across each other under load and the bolt turns loose by itself. Or it takes every load fluctuation and eventually breaks as a fatigue fracture, often without warning.
Tightening methods: torque-controlled, angle-controlled, yield-controlled, hydraulic
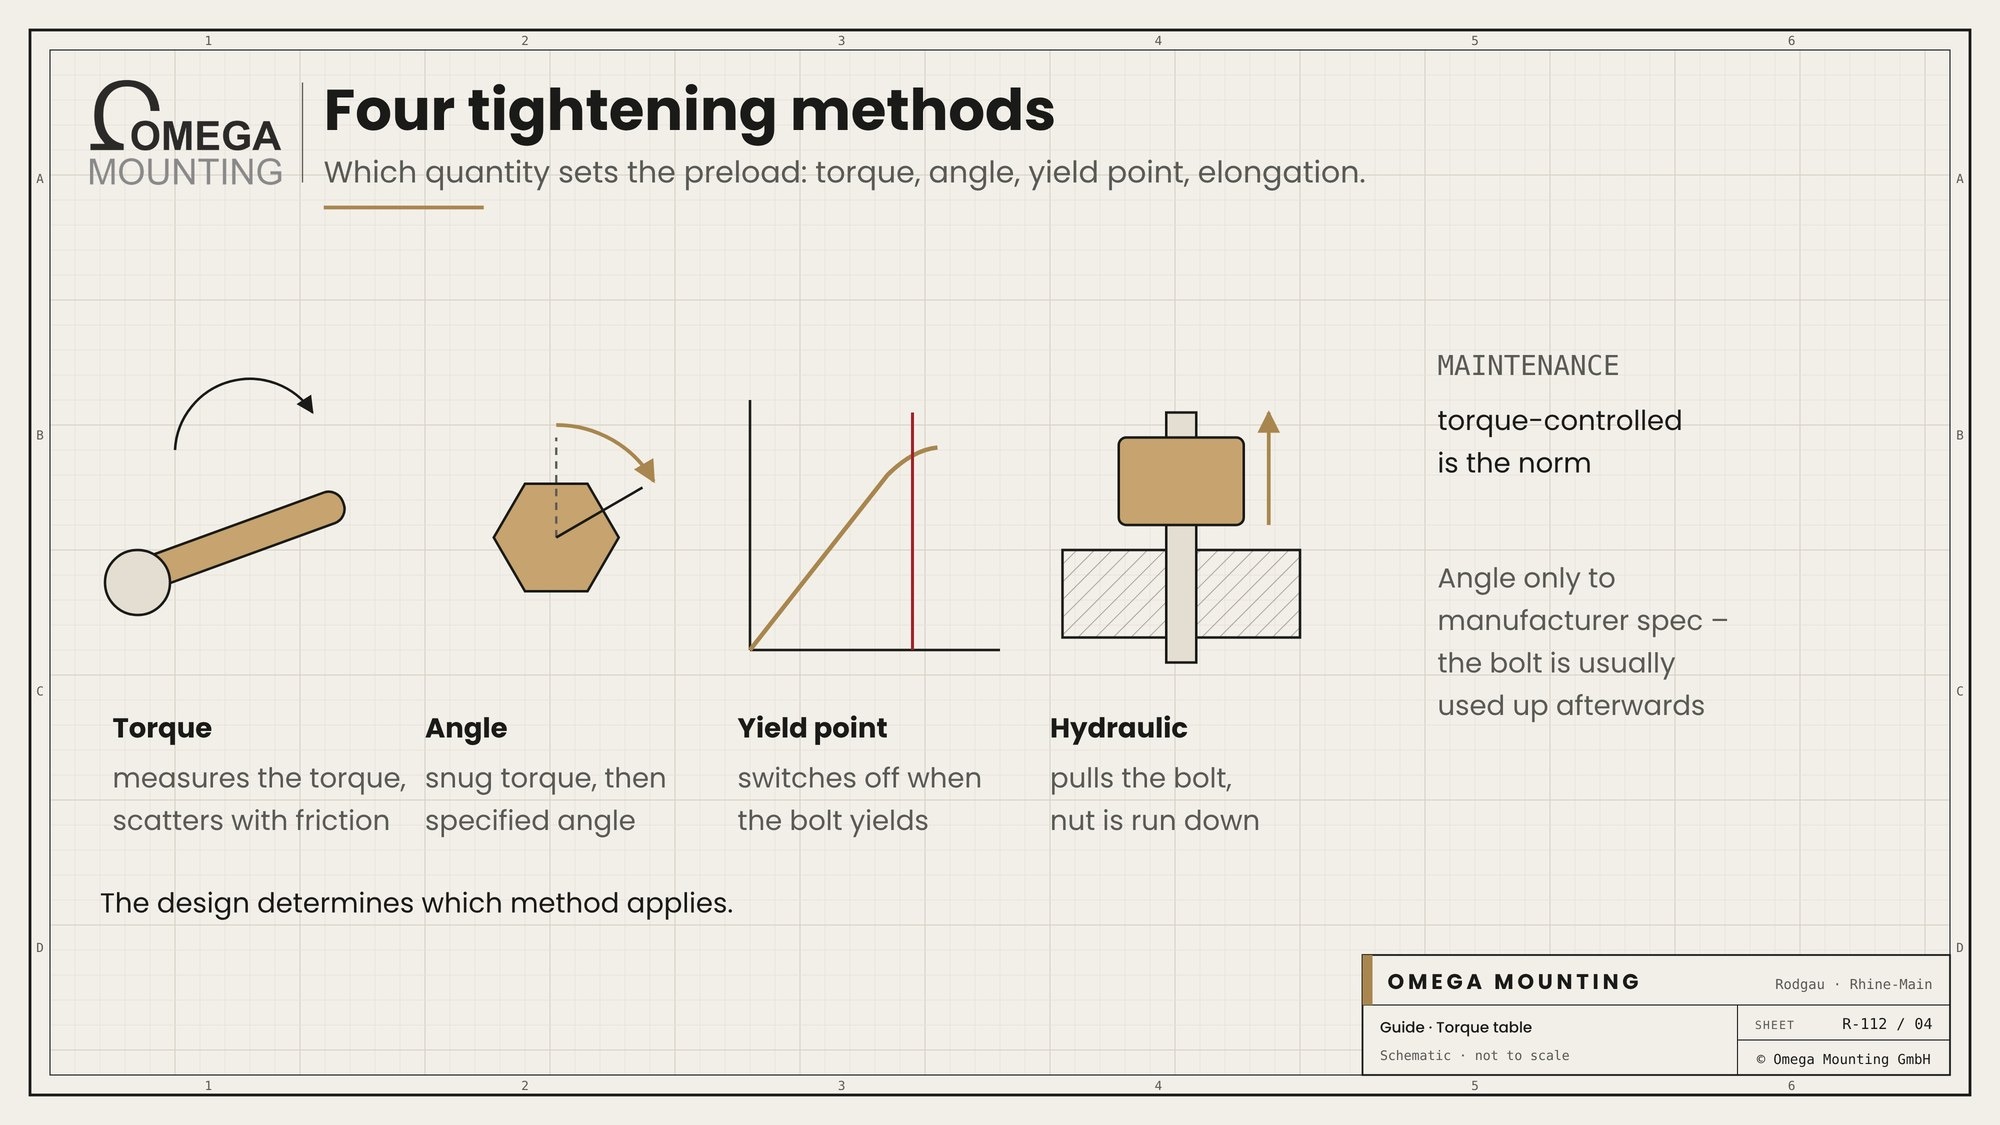
The tightening method sets which quantity determines the preload – the torque, an angle of rotation, the yield point or a hydraulically generated elongation.
Torque-controlled tightening
Torque-controlled tightening is the usual method in installation and maintenance. The wrench measures the torque, and the torque table or the specification gives the value. The method is simple and only needs a calibrated wrench. Its drawback: the preload scatters with friction, because the wrench only knows the torque.
Angle-controlled tightening
In angle-controlled tightening, the bolt is first seated with a snug torque and then turned further by a specified angle. The angle always comes from the manufacturer of the machine or part, never from a general table. Because the bolt is usually pulled into the range of permanent deformation, the preload scatters less. The bolt is then usually used up.
Yield-controlled tightening
In yield-controlled tightening, a nutrunner measures torque and angle at the same time. It switches off as soon as the bolt starts to yield, i.e. reaches the yield point. The method needs electronic control and is found mainly in series assembly.
Hydraulic tensioning for large bolts
For large bolts, for example on large flanges or heavy machine joints, hydraulic tensioning is used. A tensioning cylinder pulls the bolt lengthwise, and the nut is only run down. The bolt is stretched without torsion and without the influence of thread friction. For large torques there are also hydraulic torque wrenches and torque multipliers.
Several bolts: the sequence counts
Where several bolts hold a part, for example on bearing caps, base plates or gearbox housings, the sequence also matters. First all bolts are seated, then they are tightened crosswise or from the inside out, in several passes for large torques. That way the part seats evenly and does not distort. Anyone who tightens one bolt after another straight to full value distorts the part – and the bolts tightened first lose preload again. If the manufacturer specifies a tightening pattern, that applies.
Which method when?
The design determines which method applies. In maintenance, torque-controlled tightening is the norm. If the manufacturer specifies an angle, tightening is by angle. Hydraulic tensioning is used for large, critical joints if the manufacturer provides for it.
Flange connections: the gasket determines the torque
With a flange connection, the gasket determines the tightening torque – the flange torque comes from the gasket manufacturer's data or the pipework specification, not from the general bolt table.
A gasket needs a certain surface pressure to seal. Too little, and the medium finds a way through. Too much, and the gasket is crushed or flows away. The bolts are just the tool to apply this pressure evenly.
Preparation
Before tightening, the basics must be right. The flanges are aligned and parallel; offset pipework is not pulled together with the bolts. The sealing faces are clean and undamaged. The gasket is new – used gaskets are not reused.
Bolts, nuts and washers are the same on one flange. The bolt heads point to one side where possible; that makes tightening and checking easier. Thread and nut bearing area are lubricated thinly if the specification provides for it. No pastes or greases go on the gasket itself unless the gasket manufacturer requires it.
Tightening crosswise in stages
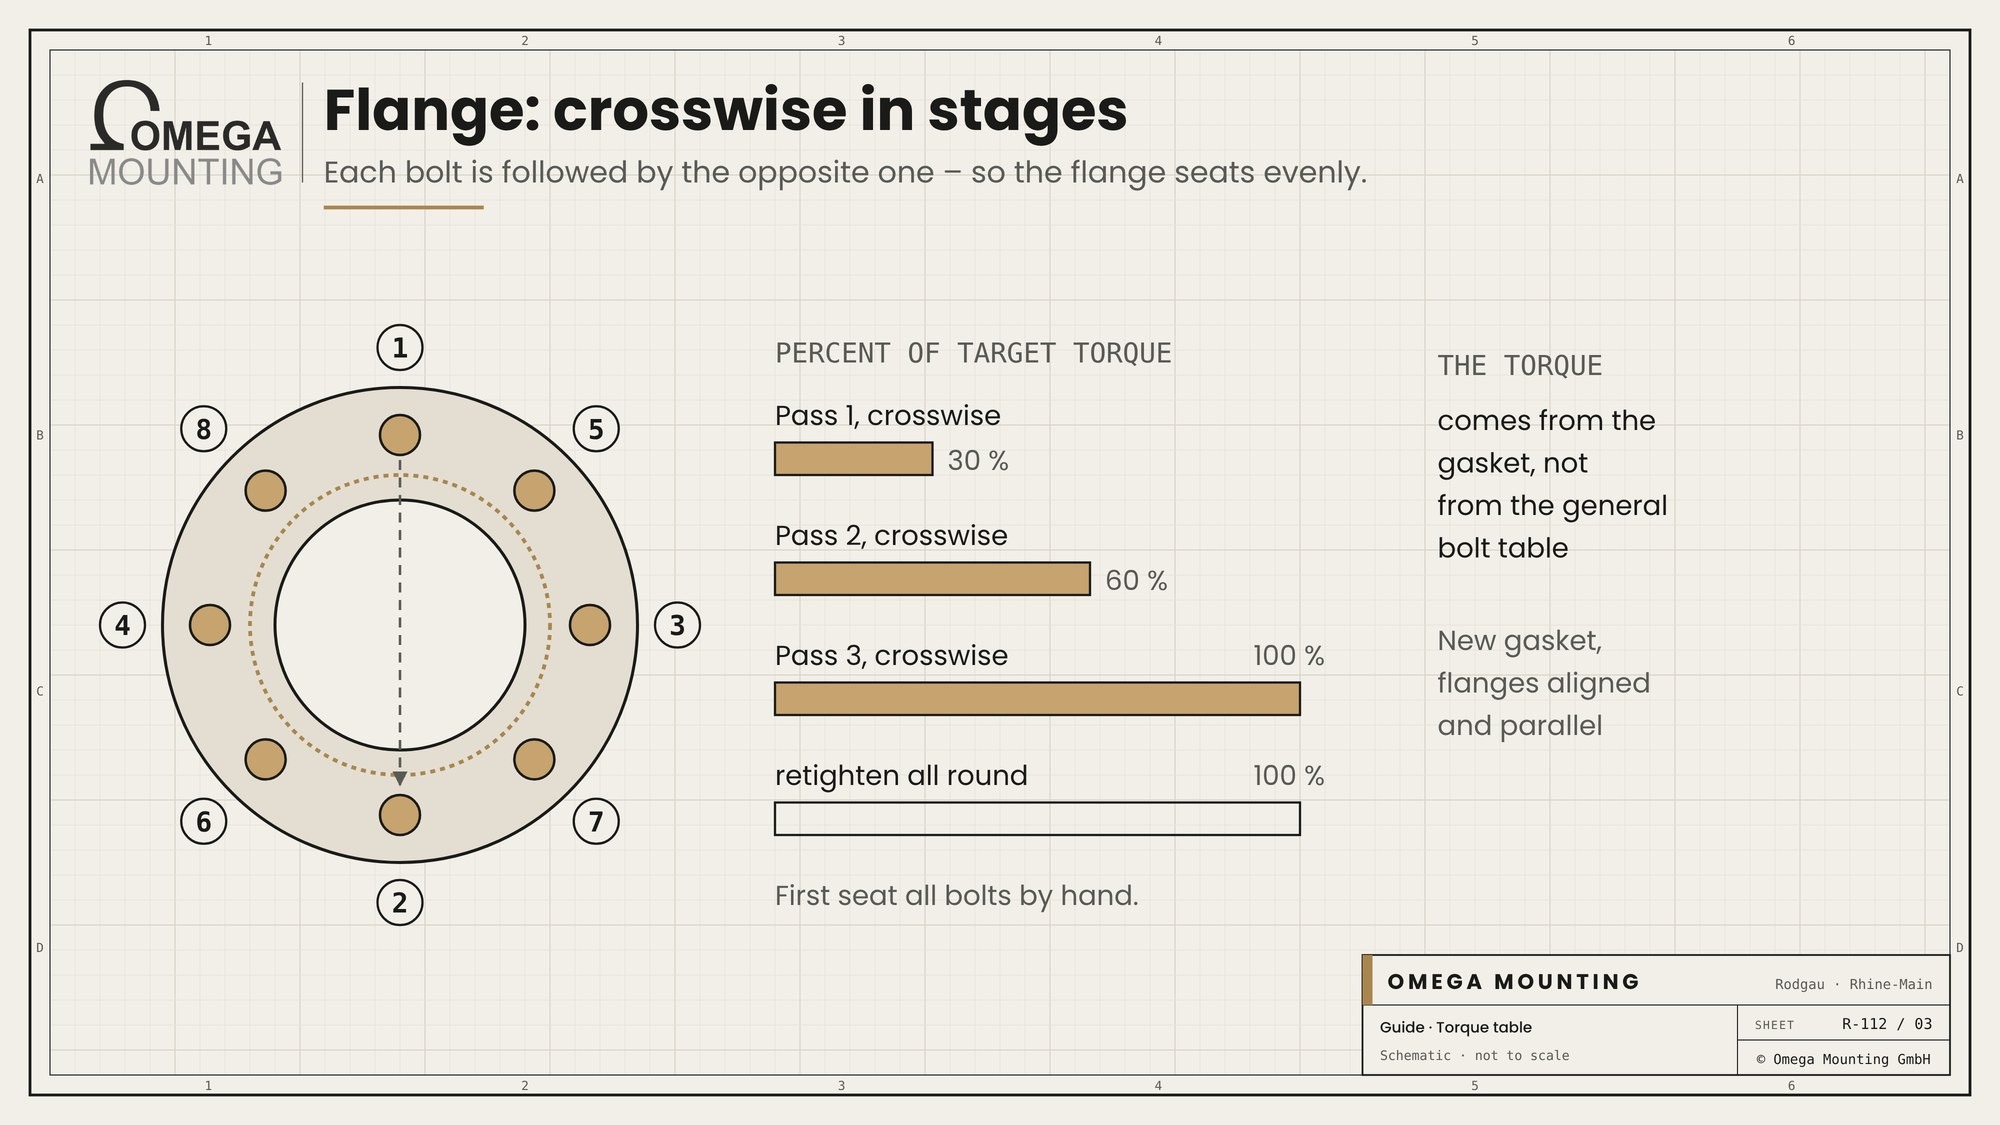
First all bolts are seated evenly by hand. Then they are tightened crosswise in stages. The chemical industry's guideline on assembling flange connections (March 2016 edition) gives this sequence:
- First pass crosswise at 30 % of the target torque.
- Second pass crosswise at 60 % of the target torque.
- Third pass crosswise at 100 % of the target torque.
- Retightening all round at 100 %, bolt by bolt in a circle, until no nut turns any further.
Crosswise means: each bolt is followed by the opposite one. That way the flange seats evenly instead of tilting to one side.
Check after settling
Gaskets settle after tightening and the preload drops. That is why the tightening torques of a flange connection are only checked after a waiting time, according to the guideline after 4 hours at the earliest. Whether and how retightening is done is set by the specification.
Qualification and inspection
For assembling bolted joints on pressurised plants, DIN EN 1591-4 describes the qualification of assembly staff. The VDI 2290 guideline covers characteristic values for tight flange connections. Whether your company requires such a qualification is stated in your specifications.
We bolt flange connections on pipework and refrigeration plants to the manufacturer's specification and document the torques. The pressure and leak test of a refrigeration plant or pressure equipment is carried out by the refrigeration contractor or the person qualified to carry out inspections. Which inspections you are responsible for as the operator is described in our guide to inspection obligations for operators. How refrigeration equipment is replaced in a live data center is shown in the guide to chiller replacement in data centers.
Using bolt locking correctly
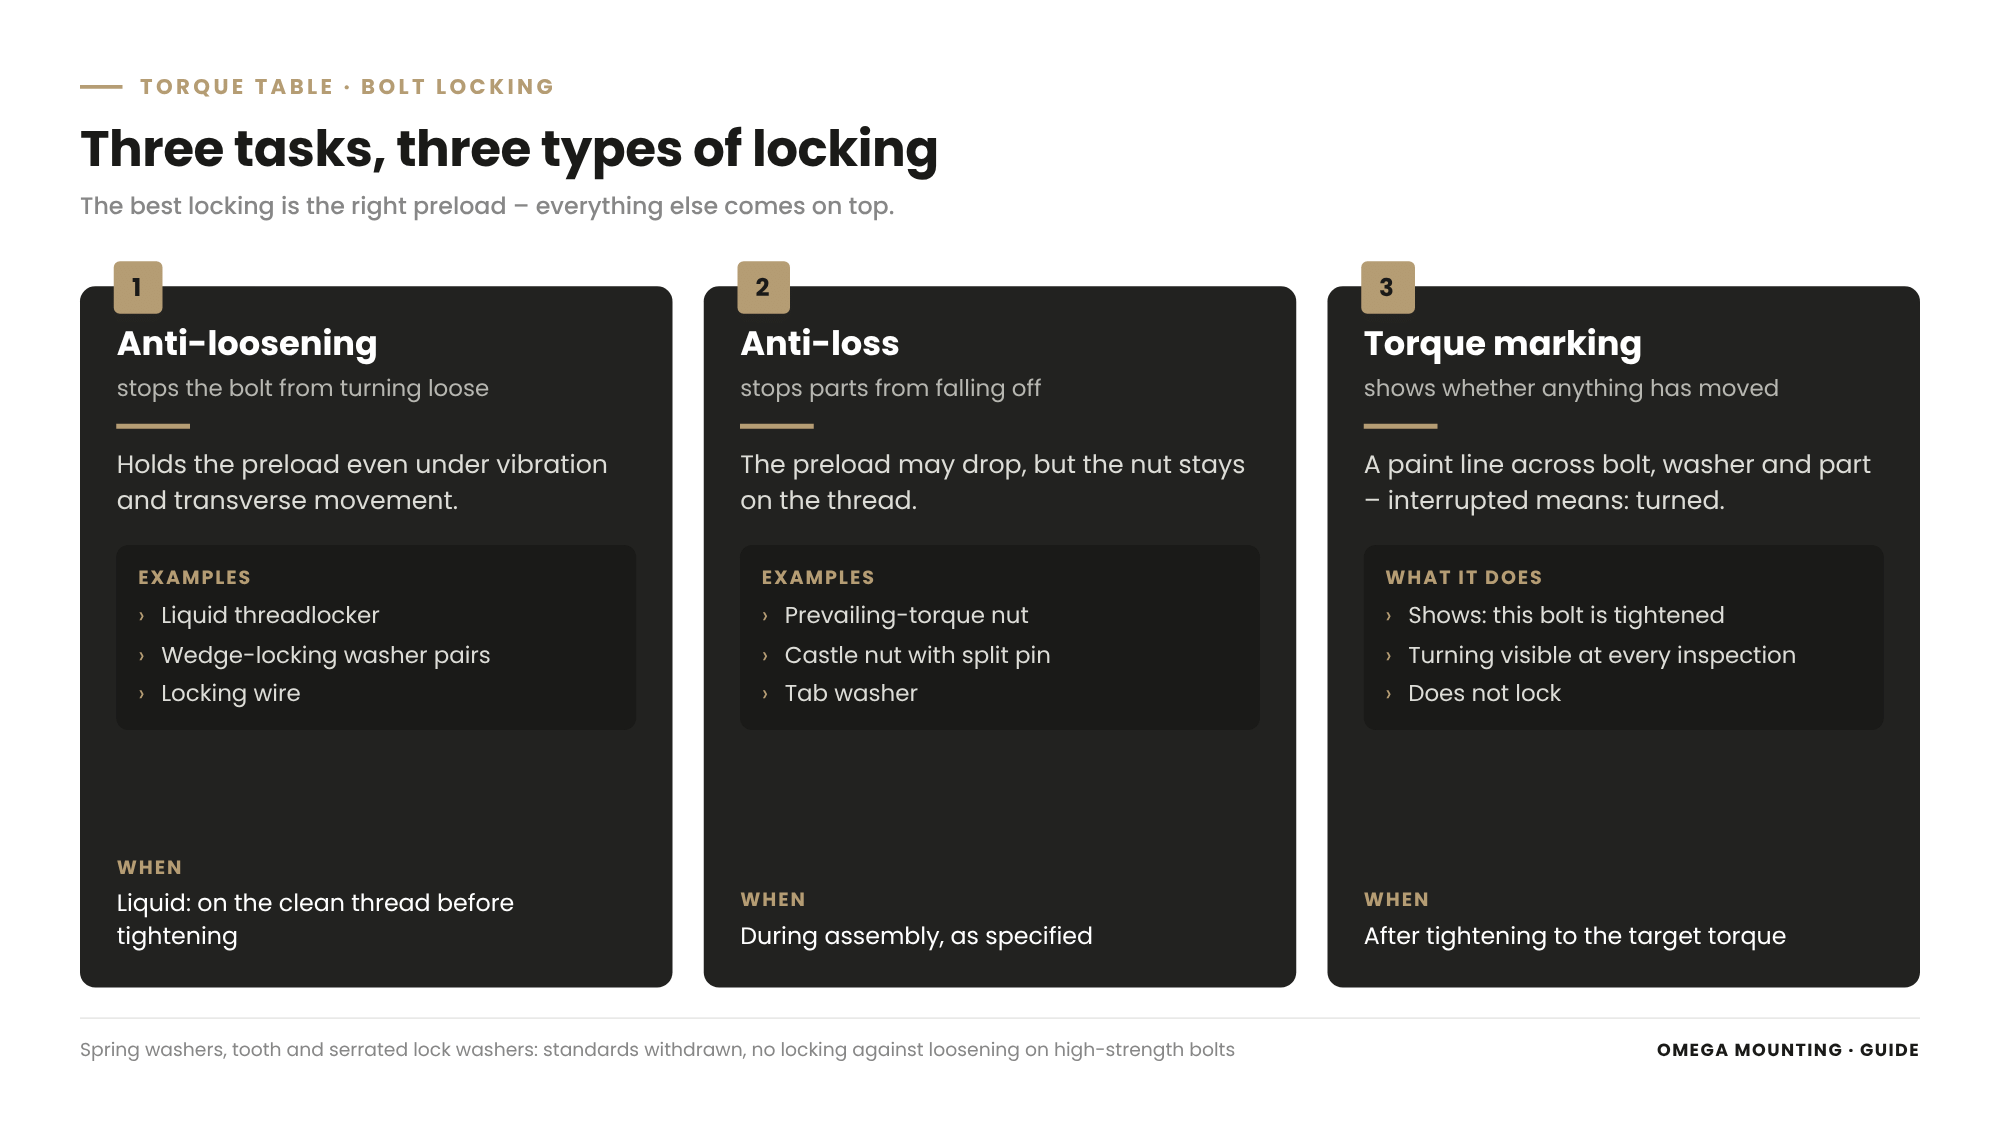
The best bolt locking is sufficient preload – additional locking means supplement it where transverse movement or vibration could still loosen the joint.
Anyone reaching for locking should distinguish two things. Anti-loosening locking prevents the bolt from turning loose at all. Anti-loss locking only prevents the bolt or nut from falling off once the joint has already loosened.
Liquid threadlocker
Liquid threadlocker is an adhesive that cures in the thread in the absence of air. It acts as anti-loosening locking. It is applied before tightening on the cleaned and degreased thread – not afterwards. Applied afterwards, it does not reach the thread.
Choose the strength by how easily the joint must come apart: low strength for joints that are loosened regularly, medium strength for the normal case, high strength for joints that should only come apart again with heat. The curing time is stated by the manufacturer; the joint is not loaded before then. Important: liquid locking also changes the friction. Which torque then applies is stated by the adhesive manufacturer or the design specification.
Mechanical locking
- Wedge-locking washer pairs consist of two washers with cam faces inside and ribs outside. They act as anti-loosening locking, even on high-strength bolts.
- Prevailing-torque nuts have a clamping ring or a deformed zone that grips in the thread. They act as anti-loss locking.
- Castle nut with split pin locks positively against loss, for example on pins and axles.
- Tab washer is bent over onto the bolt head or nut and locks against turning and loss.
- Locking wire connects several bolt heads so that none can turn loose on its own.
Spring washers, tooth and serrated lock washers
Spring washers, tooth lock washers and serrated lock washers are still found in many drawers. The associated DIN standards have been withdrawn. On high-strength bolts they do not act as anti-loosening locking. Replace them during repair with suitable locking as specified.
Paint as torque marking
A paint line is a torque marking, not a locking device. After tightening it is drawn as a continuous line across bolt or nut, washer and part. If something turns later, the line is interrupted – you can see that at a glance on every inspection round.
The line also shows that this bolt has been tightened. Especially with many identical joints, that prevents one from being missed. We mark tightened bolts with paint. But the joint is only held by its preload.
Typical mistakes when working with the torque table
The typical mistakes when working with the torque table are the wrong friction assumption, the wrong property class, values for anchors taken from the bolt table and unchecked wrenches.
- Lubricated with dry value. The bolt is overstretched without anyone seeing it.
- Class mixed up. The value for 10.9 ends up on an 8.8.
- Table instead of specification. Drawing and manufacturer's data are ignored.
- Anchors by bolt table. For anchors, the anchor manufacturer's installation instructions apply.
- Flange not crosswise. The gasket is pressed on one side and stays leaky.
- Locking after tightening. The liquid threadlocker does not reach the thread.
- Unchecked wrench. A wrench after a fall or without calibration shows a different value.
- No record. Later nobody knows what torque was used.
Why these mistakes are so common
Almost all mistakes happen because the table is read as the answer instead of as an aid. Anyone who asks three questions before tightening – which class, which friction, which specification? – avoids most of them.
Torque table in the Rhine-Main region: how we work
In the Rhine-Main region we tighten bolted joints on machines, steel structures, pipework and refrigeration plants with regularly calibrated torque wrenches and record the torques in the installation or maintenance record.
We use the torque table as a cross-check, not as a substitute for the specification. Before tightening we clarify drawing, manufacturer's data and friction assumption. We tighten flange connections crosswise in stages. We mark tightened bolts with a paint line so that you can see later whether anything has moved.
From our workshop in Rodgau, Frankfurt, Offenbach, Hanau, Darmstadt and Aschaffenburg are short trips. The scope of our industrial installation in existing buildings is set out on our service page.
We say beforehand what we do not take on. The calculation of a bolted joint to the guideline is done by the designer or manufacturer. Pressure and leak tests are done by the specialist contractor or the competent person, structural design by the structural engineer. We make sure the bolt is tightened as specified – and that this is documented traceably.

Project examples
Four jobs from our project diary show where bolted joints decide the result. To be honest up front: none of these reports gives bolt sizes or tightening torques. They show the points at which the bolted joint is the last and decisive task.
Data center in Offenbach: silencer and flange connection
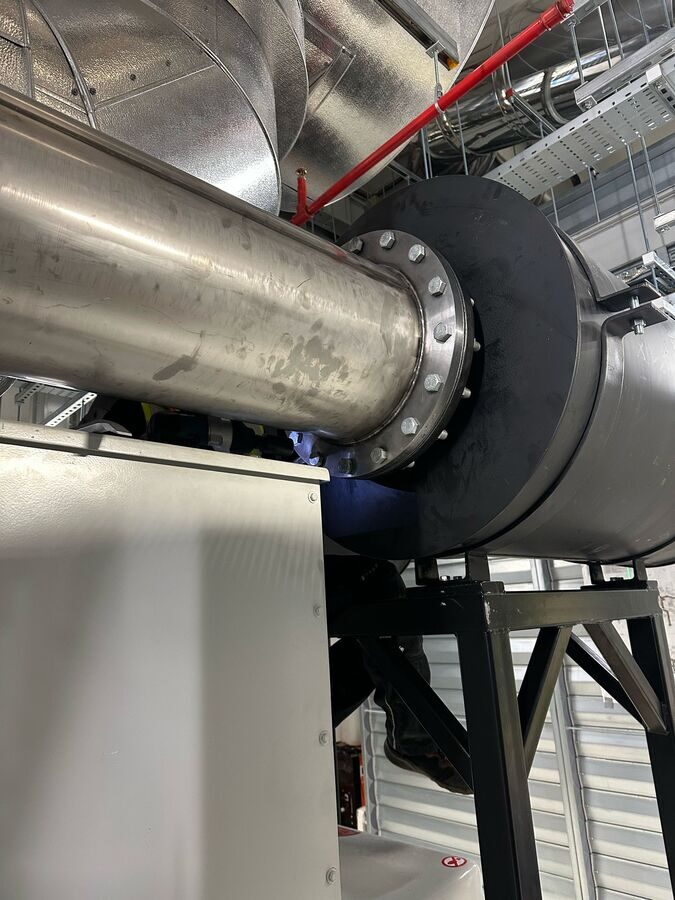
During the installation of turbo silencers in a data center in Offenbach we first installed base frames above the generators. The silencers were lifted onto them, aligned and firmly bolted. Then came intake filters, pipework and vibration isolation. The stainless steel pipework is connected to the silencer via a bolted flange connection, and rubber sleeves isolate the turbochargers mechanically. Finally the generators ran at full load in the performance test, with noise measurement.
For your joints this means: a flange connection on a vibrating plant needs even pressure – crosswise, in stages, as specified.
Production hall at Kassel Airport: bolting a steel platform
During the construction of a steel platform in a production hall at Kassel Airport the hall was first measured by laser. The columns of the first bay were standing before work continued, and the diagonal dimensions were right. When bolting the sections and beams, clean transitions and matching heights mattered so that the floor covering lies without large gaps. Railing brackets belong on load-bearing steel sections.
For your joints this means: in steel construction, alignment comes first, then final tightening. What to consider when planning a platform is described in our guide planning a steel platform.
Data center in Raunheim: bolted, then released
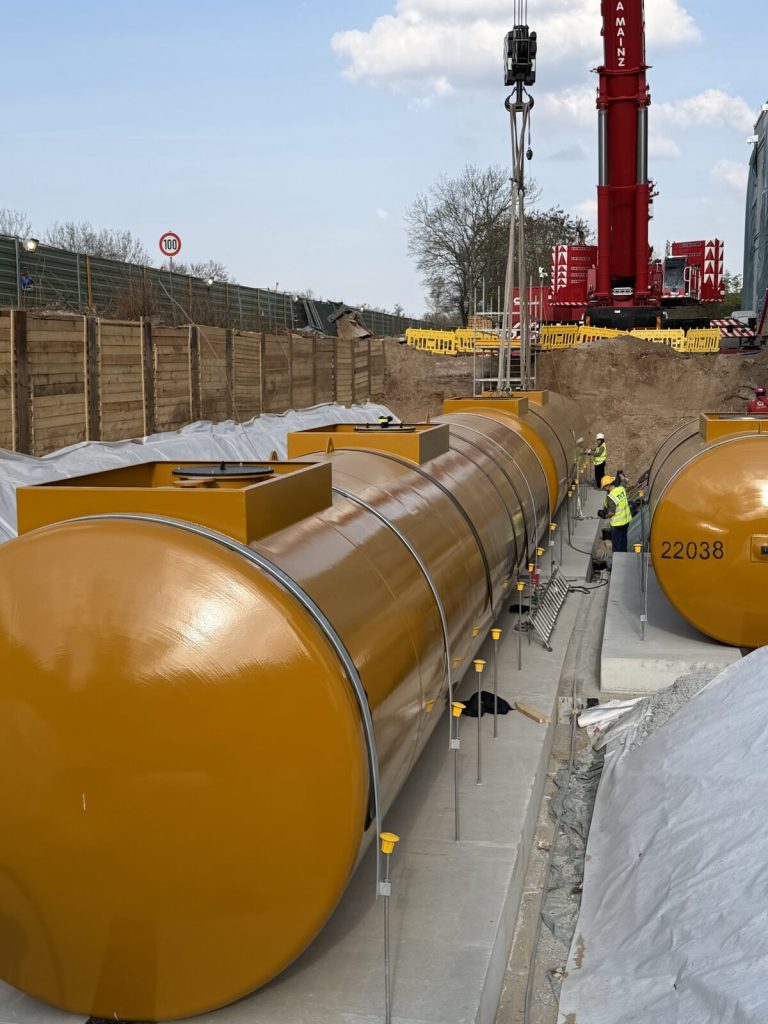
During the installation of diesel tanks for a data center in Raunheim each tank was lifted into the pit with the mobile crane, set down and aligned. At the end all tanks were correctly positioned, bolted and released for filling.
For your joints this means: bolting comes between alignment and release. Only when it is complete may the plant go into operation.
Production company near Offenbach: anchor instead of bolt
For a bespoke impact guard near Offenbach we welded the frame in our workshop in Rodgau and installed it on site on a floor rail anchored in the floor with heavy-duty anchors. It was then primed and painted in signal yellow.
For your joints this means: for anchors and heavy-duty anchors, the torque from the anchor manufacturer's installation instructions applies, not the bolt table.
Do you have bolted joints that need to be tightened as specified?
Then get in touch with us. Send us the drawing or manufacturer's data and a description of the joints. We clarify in advance which values apply and document every torque.
What this means for your role
For buyers: Order bolts, nuts and washers with property class, surface and, where applicable, friction coefficient, not just with thread and length. Ask the installation contractor for a tightening record and proof of calibrated wrenches. A quotation without a record is incomplete for load-bearing joints.
For designers: Write the target torque with tolerance, the friction assumption and the tightening method into the drawing or installation instructions. Without a friction value, every torque is a guess. Plan access for the wrench – more on this in our guide to maintenance-friendly installation.
For project managers and site managers: As a project manager, you decide which joints are recorded and who provides the specification. As a site manager, you check head marking, lubrication and wrench on site, accept the tightening record and look out for the paint line. The record belongs to the handover, as our guide to commissioning and handover describes.
For maintenance managers: Include the visual check of paint lines on critical joints in the maintenance plan. Record target torques per assembly and replace overstretched, reused or unmarked bolts. Manage your torque wrenches as test equipment with a calibration date.
For occupational safety specialists and HSE coordinators: Safety-relevant bolted joints – on hoists, platforms, pressure equipment – belong in the risk assessment. Make sure that torques come from the specification, wrenches are calibrated and every joint is documented traceably.
Tightening record for bolted joints: template on request
The tightening record for bolted joints is a one-page template for recording every tightened joint traceably. For each joint there is a row with joint or part, thread, property class, friction assumption or lubrication, target torque and source of the target torque. On top of that come wrench number with calibration date, technician, date and marking. Torques are deliberately not pre-printed – they come from your specification. Request the template via our contact form – keyword “Tightening record”.
Why Omega Mounting?
We are based in Rodgau near Frankfurt, can be reached by phone (Mon–Fri 9 am–3 pm) and via WhatsApp, and have our own workshop. We work with regularly calibrated torque wrenches, record tightening torques and mark tightened bolts with paint. The linked jobs show where bolted joints decide the result: on silencers and flanges in Offenbach, on a steel platform in Kassel, on tanks in Raunheim. For you this means: a single point of contact for installation, bolting and documentation – with short distances in the Rhine-Main region.
Conclusion
A torque table is a good tool if you know what it applies to. It gives guide values for one friction coefficient and one property class; drawing, design specification and manufacturer's data remain decisive. Check head marking and lubrication before tightening, allow for wrench tolerance and replace overstretched bolts. Tighten flanges crosswise in stages, apply threadlocker to the thread before tightening, and the paint line shows whether anything moves. If you want joints tightened and documented as specified, send us the drawing or manufacturer's data – we will get back to you with an honest assessment.
Further reading: Setting, applying and calibrating the wrench correctly: Using a torque wrench correctly.
Planning a move-in, installation or maintenance in the Rhine-Main region?
Tell us briefly what you need – we'll come back with an honest assessment.
Free, no-obligation callback
You may also be interested in these guides

About the author
Tobias Schott
Managing director of Omega Mounting GmbH, Rodgau · more than 20 years of hands-on experience in installation and maintenance
A trained mechatronics technician, working in maintenance, servicing and industrial installation since 2004 – first alongside his father, and with Omega Mounting since 2012: from overhead conveyors in Frankfurt to the crane system in a new-build hall. He plans and leads lifting operations as an appointed person (AP) in data centers and on industrial sites in the Rhine-Main region, trains and examines operators of cranes, mobile elevating work platforms and telehandlers, and is a qualified occupational safety specialist. On jobs abroad he is known as the “German Troubleshooter” – the person you call when a site gets stuck. He learned what quality means from his father, not from a manual: Made in Germany as a standard for his own work, not a label. That is why quality comes first at Omega Mounting – ahead of speed and price. He writes these guides from that practice: what works on our sites is in them – what exists only on paper is not.
Frequently asked questions
That depends on thread, property class and friction. The specification from the drawing or manufacturer's data comes first. If there is none, the torque table gives guide values: an M10 of class 8.8 comes to 48 Nm at μtot 0.12, an M12 of class 10.9 to 123 Nm. Safety-relevant joints are calculated, not taken from the table.
No. The table applies to steel bolts of property classes 8.8, 10.9 and 12.9. Stainless steel bolts, such as A2 or A4, have different, lower values. The same applies to classes 4.6 and 5.6. For them the manufacturer's data or the standard value applies.
It is overstretched. An M12 of class 8.8 can only take 63 Nm at μtot 0.08. With the 84 Nm from the main table for μtot 0.12 it is pulled beyond its limit. You usually cannot see this from outside – but the bolt holds less under load and must be replaced.
No. An overstretched bolt has stretched permanently and no longer reaches its preload. It is replaced together with the nut. Stretch bolts and angle-tightened bolts are not reused either, unless the manufacturer expressly allows it.
To the torque from the gasket manufacturer's data or the pipework specification – not from the general bolt table. Tightening is crosswise in stages at 30 %, 60 % and 100 % of the target torque, then retightened all round. The check is made after the gasket has settled, after 4 hours at the earliest.
Before tightening, on the cleaned and degreased thread. Applied afterwards, liquid threadlocker does not reach the thread. Choose the strength according to how easily the joint must come apart and observe the curing time. Because the locking changes the friction, the torque from the manufacturer's data applies.
It shows whether a joint has turned, and that it has been tightened. The line runs across bolt or nut, washer and part; if it is interrupted, something has moved. It is a torque marking, not a locking device – the preload has to do the holding.
For the mechanical part, installation and maintenance contractors from the region are the shortest route. From Rodgau we work in Frankfurt, Offenbach, Hanau, Darmstadt and Aschaffenburg with calibrated wrenches and tightening records. Calculation and pressure testing stay with the responsible partners.
Via a short enquiry with three details: which plant or assembly, which joints with thread and property class, and which specification – drawing, manufacturer's data or pipework specification. If needed, we look at the joints on site and send a written assessment with procedure and record format. Your contact is Tobias Schott – reachable via our contact form.
 English
 German