
- Guide – Lift & Shift
Installing switchgear: moving cabinets through doors and corridors, setting them up on the raised floor and aligning them
By Tobias Schott · Reading time approx. 21 minutes · As of: November 2026
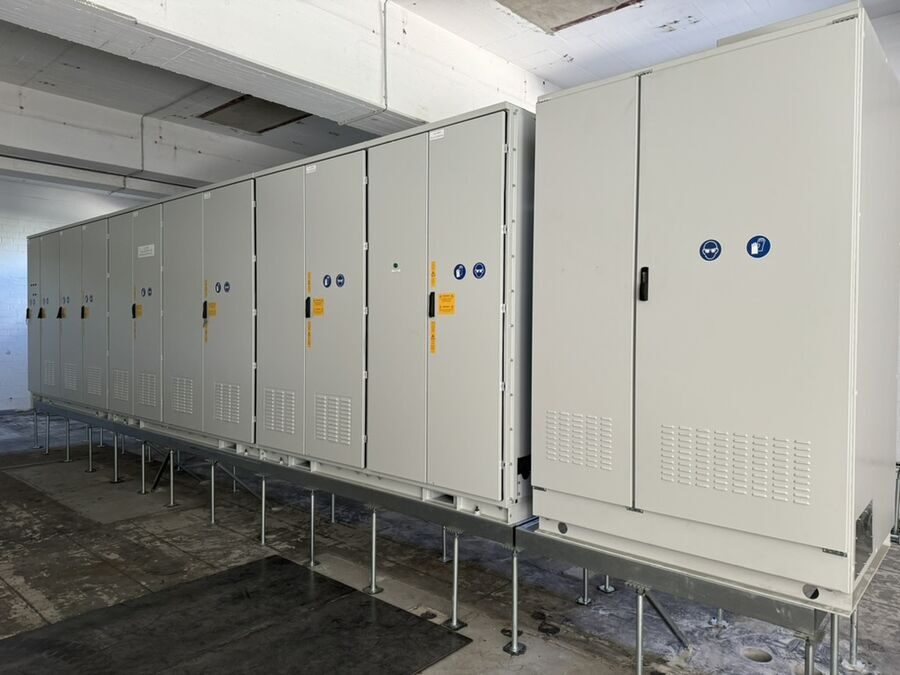
Installing switchgear means: surveying the route from the lorry to the installation point, lifting and moving each panel in transport condition without tipping, setting it down on a raised floor or base frame without impact, aligning the row and handing over cleanly to the manufacturer and the electrical team. Weight is rarely the problem. Centre of gravity, ceiling height and floor are.
Switchgear almost never goes where it is convenient. It stands in the basement of a data center, in the concrete building of a power station or in the plant room of a factory. In front of it lie a narrow door, a corridor, a finished raised floor and often very little headroom below the ceiling. Anyone having switchgear installed is moving custom-built equipment for which there is no off-the-shelf replacement.
The individual cabinets look compact. Inside are switching devices and copper busbars. That makes them heavy and top-heavy. A switchgear cabinet tips more easily than a machine of the same weight. Anyone searching for “moving in a switchgear cabinet”, “setting up switchgear” or “installing medium-voltage switchgear” usually faces exactly these questions: will the panel fit through, how is it lifted, and will the floor carry it?
This guide shows the process from survey to handover. It is written for project and site managers, energy engineering planners, maintenance managers, operators, occupational safety specialists and buyers. How a transformer gets into an existing building is shown in the guide replacing a transformer.
Key points at a glance
- Installing switchgear means: survey the route, lift without tipping, set down without impact, align the row, hand over.
- The centre of gravity is high. Switchgear cabinets are narrow and top-heavy. They are lifted only at the points the manufacturer specifies.
- Ceiling height decides the lifting gear. Where there is little headroom, low-profile lifting beams are needed instead of tall slings.
- The raised floor is sensitive. Its pedestals cannot take impacts or point loads.
- Packed until in place. The protective packaging stays on until the panel stands at its installation point.
- The room must be finished. Dry, clean and low in dust – otherwise the equipment suffers.
- Clear interfaces. Mechanical work, busbars and connection are split between installer, manufacturer and electrical team in advance.
- Slow is fast. Every lift is planned, guided and released.
What does installing switchgear actually involve?
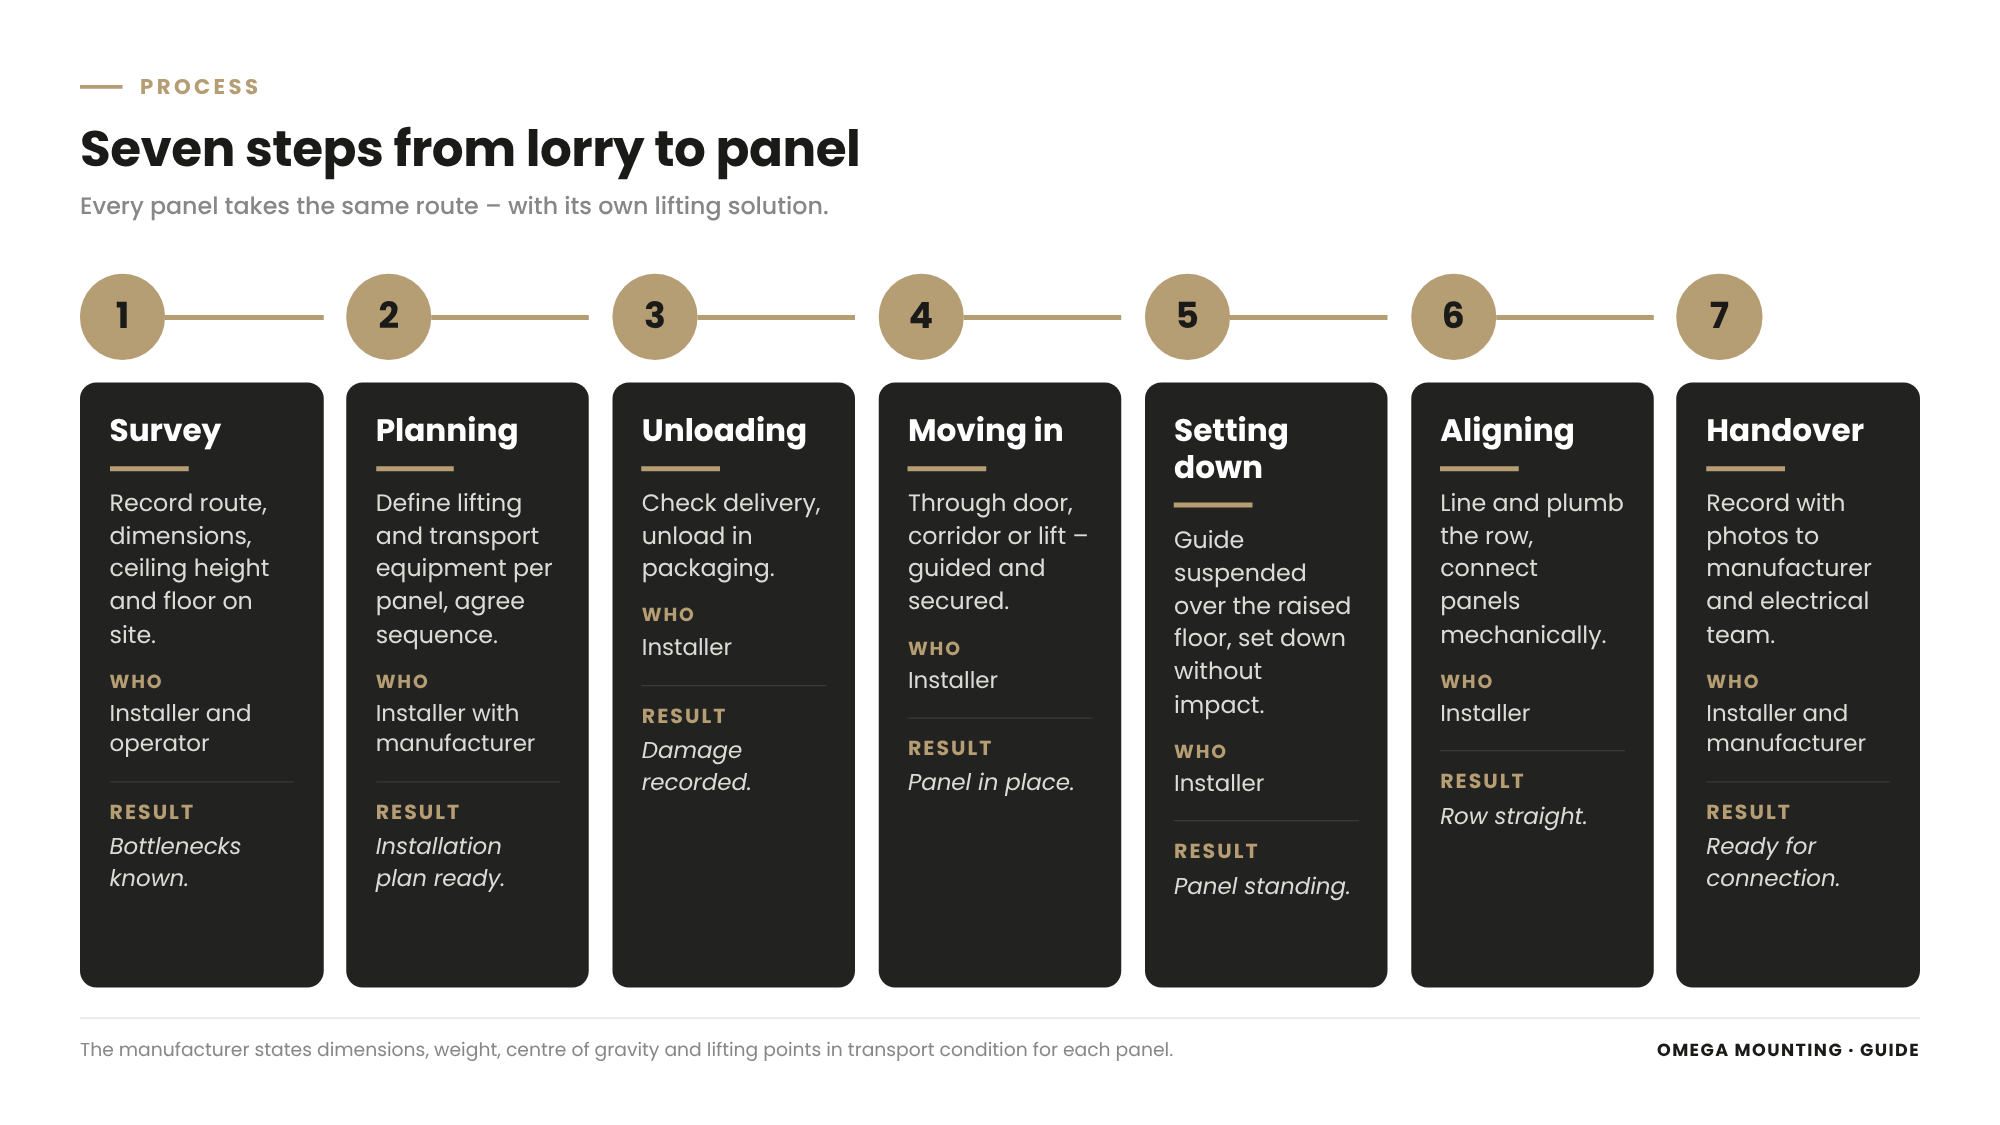
Installing switchgear covers everything between delivery and the fully set-up panel: unloading, moving through doors, corridors or lifts, lifting and setting down at the installation point, aligning, connecting the panels mechanically and handing over to the next trades.
Anyone having switchgear installed goes through seven steps. Site survey: route, dimensions, floor and ceiling height. Planning: lifting and transport equipment per panel. Delivery and unloading. Moving in through door and corridor. Lifting and setting down at the installation point. Aligning and connecting the panels. Handover with documentation.
What the installation is not
Installation is not electrical commissioning. On many switchgear assemblies, the busbars between the panels are connected by the manufacturer or an electrical contractor according to their own instructions. Connection to medium voltage and the grid is carried out by the electrical contractor and the network operator. We make sure every panel stands undamaged, in the right place and straight.
Why every switchgear is different
Switchgear is built for each project. Panels have different widths, depths and weights. An incoming panel is built differently from an outgoing panel. That is why one lifting plan for the whole switchgear is not enough. Often almost every panel needs its own solution.
What is switchgear – and why is it so heavy?
Switchgear distributes and switches electrical energy. In a power station it connects generation and grid, in a data center it feeds the distribution boards of the data halls, in a factory the machines. It consists of a row of individual cabinets, the panels. On site they are joined into one continuous assembly.
What is inside the cabinet
The panels contain circuit breakers, disconnectors, instrument transformers and protection equipment. The busbars run through the panels. These are thick copper conductors that carry the energy from panel to panel. Copper is heavy. A fully equipped panel therefore weighs much more than its sheet-metal housing suggests.
Medium voltage, low voltage, high voltage
Switchgear looks different depending on the voltage level. Low-voltage main distribution boards are usually a long row of narrow cabinets. Medium-voltage switchgear is often more compact, and some designs have gas-filled compartments. Switchgear for even higher voltages is larger and heavier. For installation the same applies to all of them: dimensions, weight, centre of gravity and lifting points in transport condition.
Custom-built with no replacement
Switchgear is not a catalogue item. If a panel is damaged during installation, there is no replacement in stock. Then the whole project waits. That is why the rule for installation is: better to plan one more day than to risk a scratch.
Centre of gravity and tipping risk
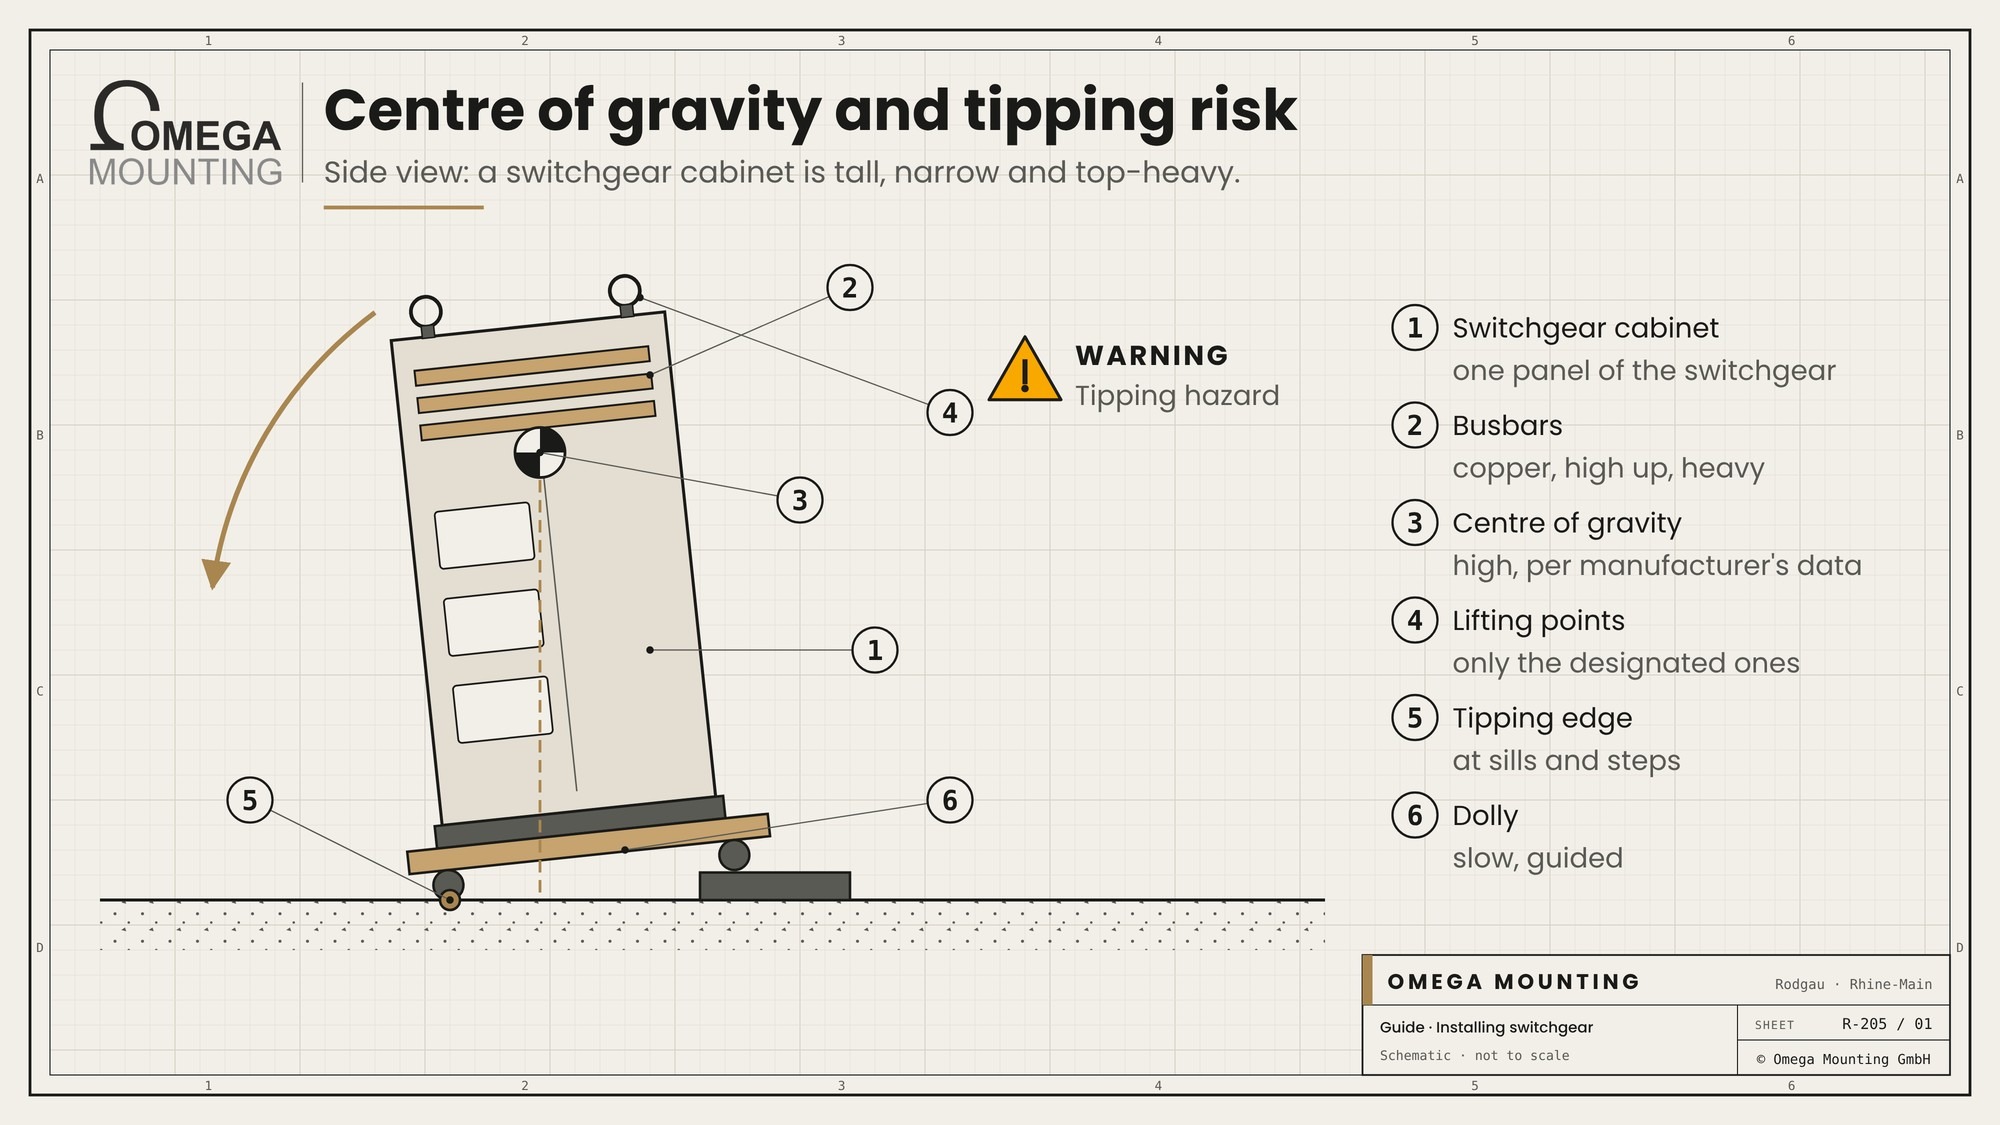
The most critical point when installing switchgear is not the load but its centre of gravity. A switchgear cabinet is tall and narrow. The heavy parts often sit high up or to one side.
Why switchgear cabinets tip
Even a small step, a sill or sudden braking can make a cabinet tip. The risk is greatest on rollers or on a pallet truck. The narrower the footprint and the higher the centre of gravity, the less forgiving the cabinet is.
Where the centre of gravity is
The manufacturer states weight and centre of gravity in transport condition. The centre of gravity is often marked on the packaging. This information is the basis for every lift. If it is missing, it is requested from the manufacturer – not estimated.
Lifting points as specified
Lifting is done only at the points the manufacturer provides: transport eyes, lifting rails or the base frame. Doors, panels and roof sheets are not lifting points. Anyone who attaches at the wrong point bends the housing or loses the load.
Securing during movement
When rolling and pushing, the cabinet is secured against tipping. That means guidance on both sides, slow travel and a clear, level route. Steep ramps and sills are bridged beforehand.
Site survey: route, dimensions, floor
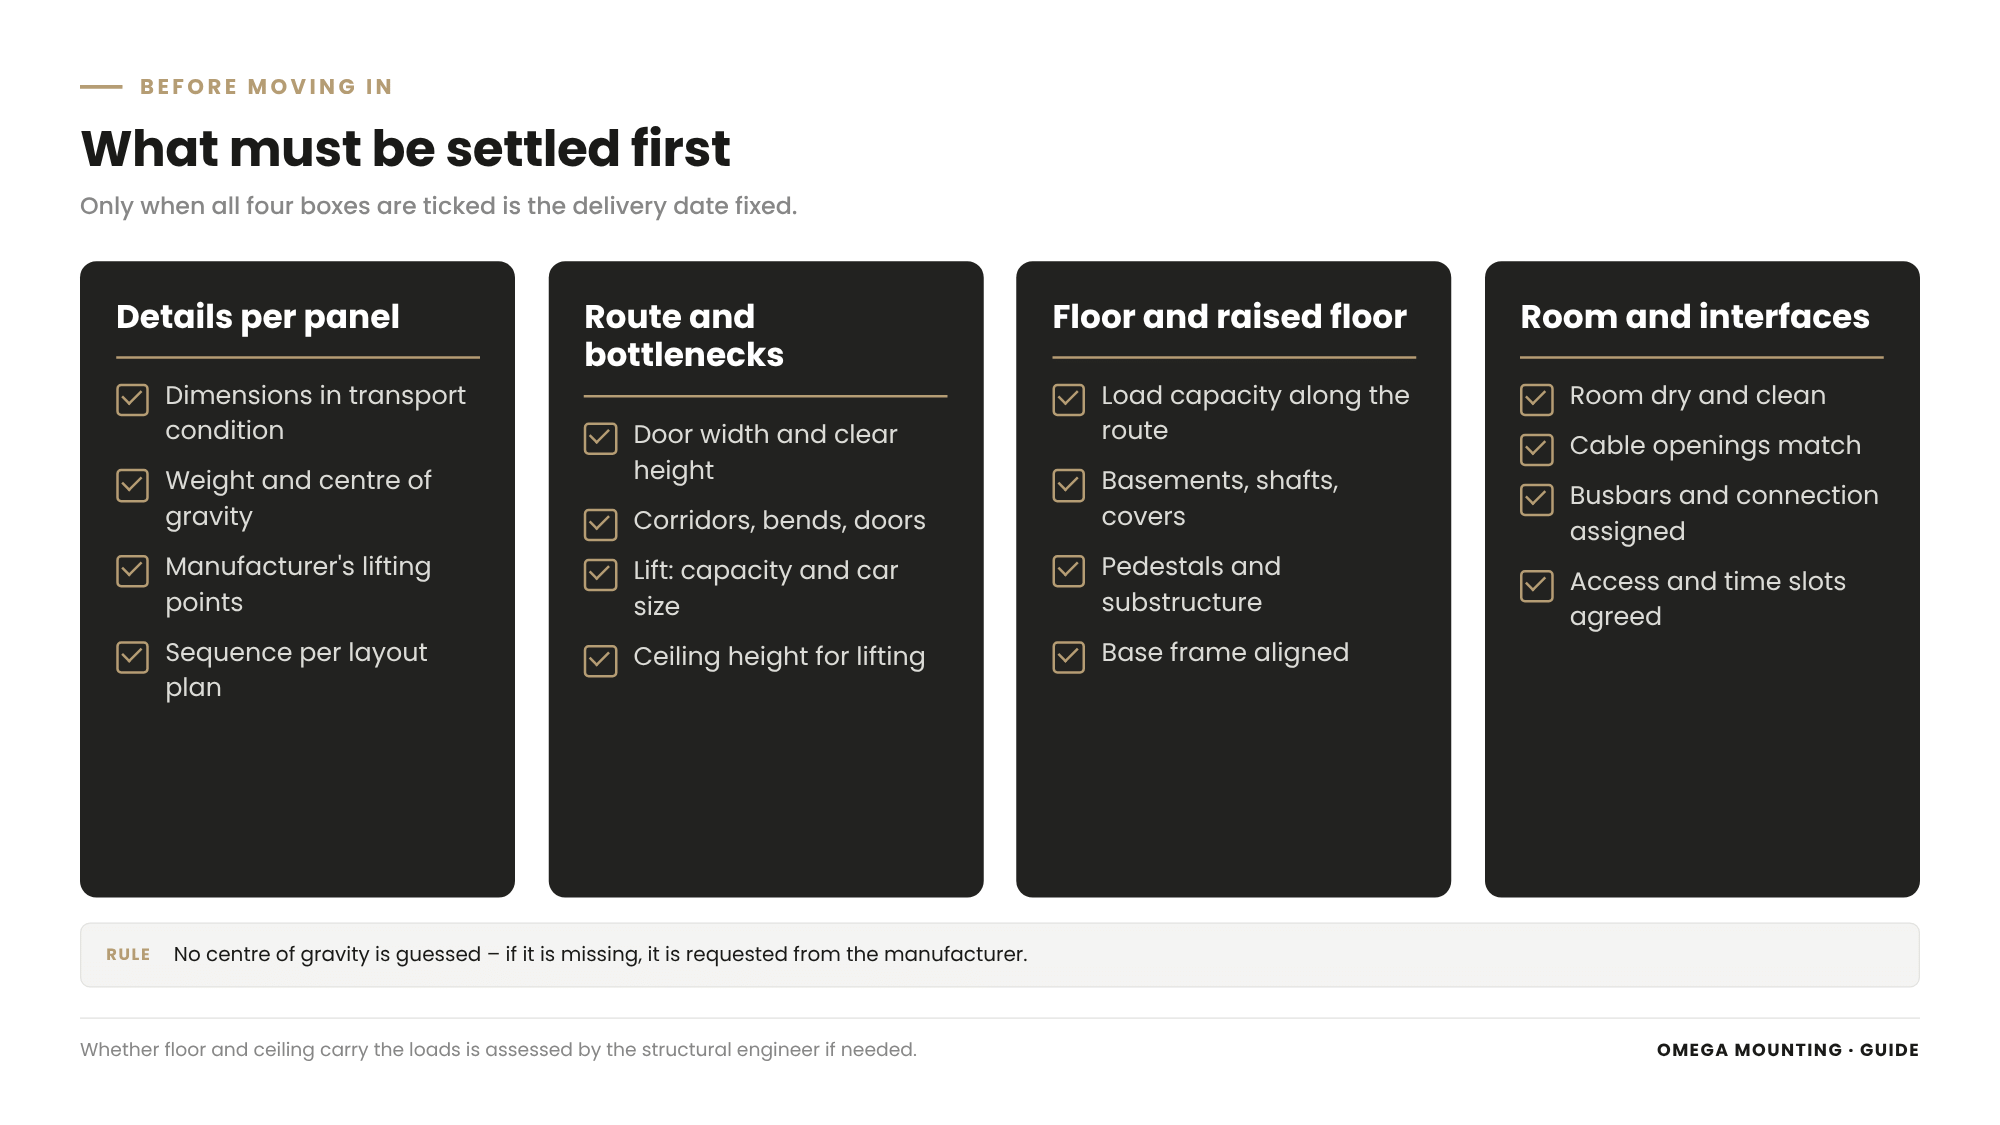
Before the first panel arrives, the entire route is surveyed. This survey decides which solution works.
The route from the lorry to the installation point
Where does the lorry stop? How is it unloaded – by forklift, loader crane or mobile crane? How does it continue: through a door, over a ramp, along a corridor, in a lift? Every bottleneck is checked against the largest panel in transport condition.
Dimensions and headroom
Door width, clear height, corridor widths, bends and doors are measured. Then there is the ceiling height at the installation point. It is not just about whether the panel fits through. The lifting gear has to fit through too – and above it there must still be room to lift.
Floor and loads
Does the floor along the route carry the load including lifting gear? Are there basements underneath, shafts, covers or ducts? If in doubt, the structural engineer assesses whether and how it may be loaded. How floors and routes are planned for heavy loads is described in the guide Planning a move-in.
Room and surroundings
What does the installation point look like? Is a raised floor already in place? Are there base frames or foundation rails? Where do cable trays, ventilation and lighting run? And: is the room dry and clean?
Planning: lifting and transport equipment per panel
The survey produces the installation plan. It sets out for each panel how it is unloaded, moved, lifted and set down.
Which equipment comes into question
Depending on weight and space, different equipment comes into question for switchgear cabinets: forklifts with lifting chains or lifting beams, pallet trucks and heavy-duty rollers, skates, gantries with chain hoists, mini cranes or lifting towers. Which rollers and running gear exist is shown in the article on machine skates and heavy-duty skates.
One solution per panel
Because the panels differ, each one is checked: where are the lifting points? How tall is the panel in transport condition? How much headroom remains? Panels can often be grouped. Some, however, need their own solution.
Defining the sequence
The panels are moved in in the order in which they are set up. Anyone who brings in the last panel first blocks their own route. The manufacturer agrees the sequence with the layout plan.
Lifting plan and release
For each lift it is clear who leads it, who attaches the load and who gives the release. How a lift is planned properly is shown in the guide Planning a crane lift.
Transport condition: packed until in place
Switchgear is delivered packed: in film, on wooden pallets or in crates. This packaging protects against impacts, dust and moisture.
Leave the packaging on
The panels stay packed until they stand at the installation point. Only there are they unpacked. That way neither dust from the route nor scratches from door frames reach the switchgear.
Delivery note and visual check
On delivery, each unit is checked against the delivery note. Damage to the packaging, tilt indicators or shock indicators are photographed and reported before unloading.
Accessories and small parts
Connecting bolts, busbar pieces, covers and installation instructions often arrive separately. They are collected and assigned to the installation point. If a part is missing later, the row stands still.
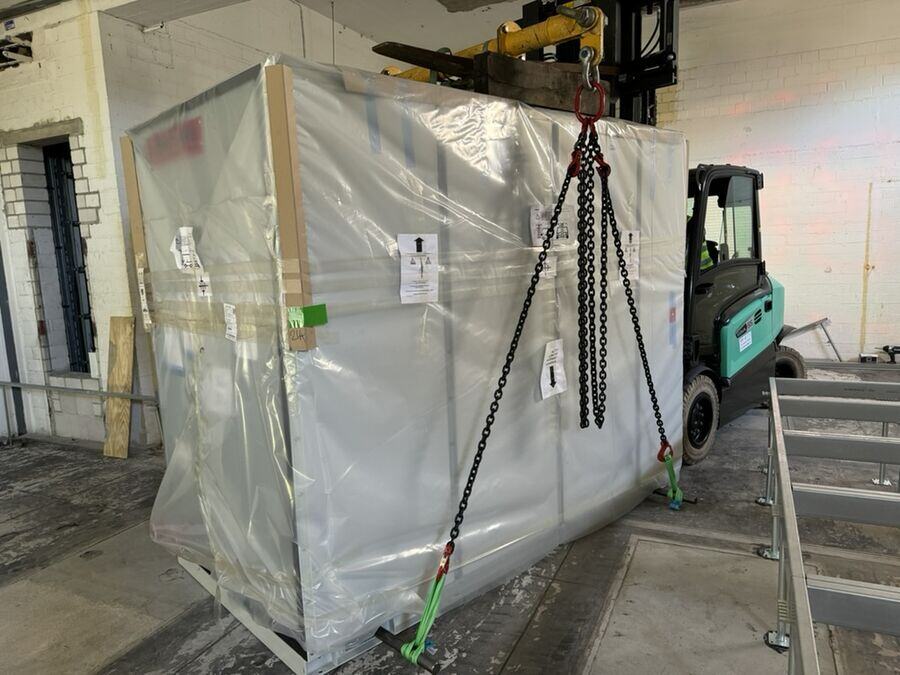
Through door and corridor: dimensions and headroom
The way into the building is usually the tightest point. An industrial door, a bend in a corridor or a doorway decides how the panel is lifted and moved.
When the door is tight
If the door is just wide enough, there is no room for error. Then the panel is moved slowly, with a banksman and clearance checks on both sides. Door frame and reveal are protected beforehand.
Bends and doors
In corridors, bend radii and door widths count. A long panel often only gets round a tight corner if it is turned or guided at an angle. This is checked beforehand on the plan and on site against the panel's dimensions.
Lifts
A goods lift can help if capacity and car size are sufficient. Both are clarified with the operator of the lift. If the lift is the bottleneck, installation must run in step with it.
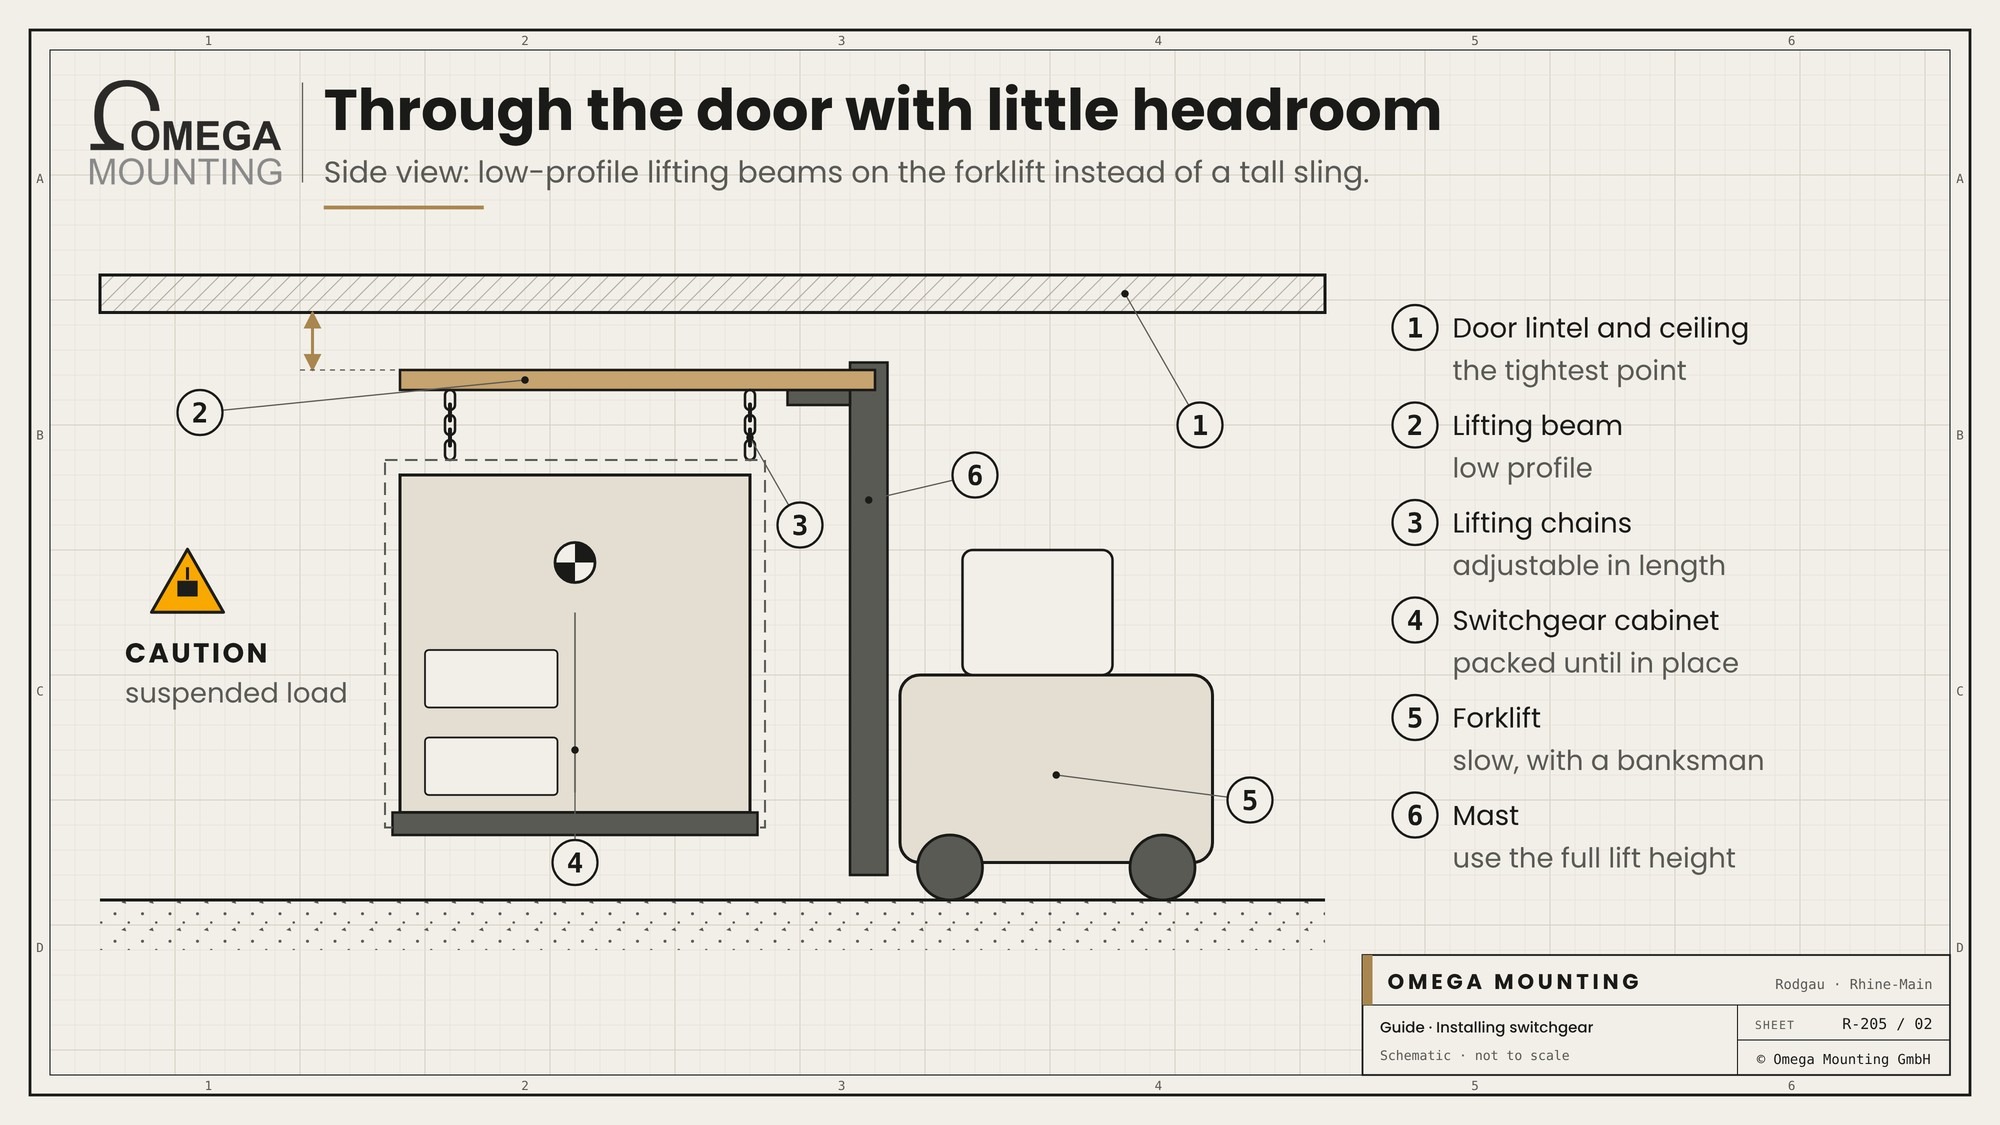
Attaching with little height: lifting beams instead of tall slings
Many plant rooms are low. A normal sling needs room above the cabinet for chains, hooks and lifting travel. That room often does not exist.
Low-profile lifting gear
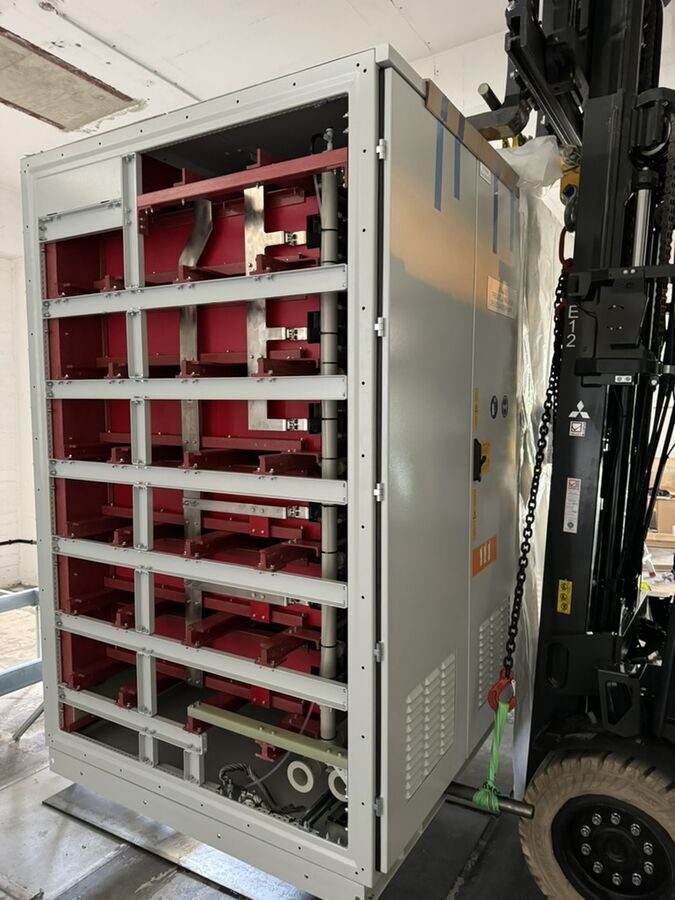
Where there is little headroom, lifting beams on the forklift help. They have a low profile and pick up the cabinet at its lifting points. Chains of adjustable length compensate for different panel widths. That way lifting is still possible right below the ceiling.
Carrying evenly
Every leg has to carry. A sling with one slack leg makes the cabinet hang crooked. With top-heavy panels that is dangerous. That is why, before the actual lift, the load is raised briefly, checked and adjusted.
Checking lifting accessories
Chains, round slings and shackles are checked for discard criteria before use. Which lifting accessory suits what is explained in the guide Lifting accessories for heavy loads.
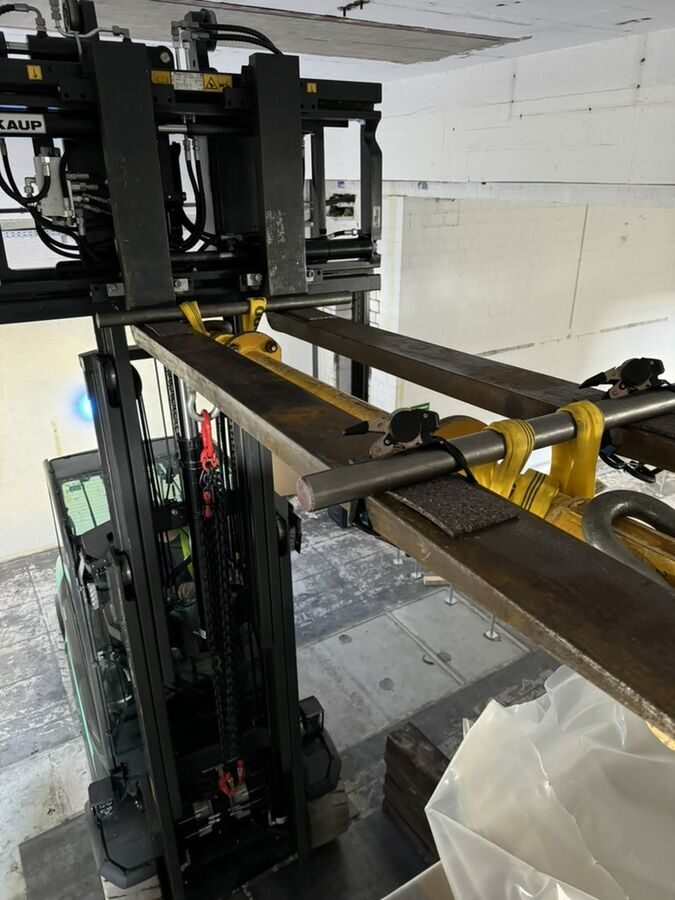
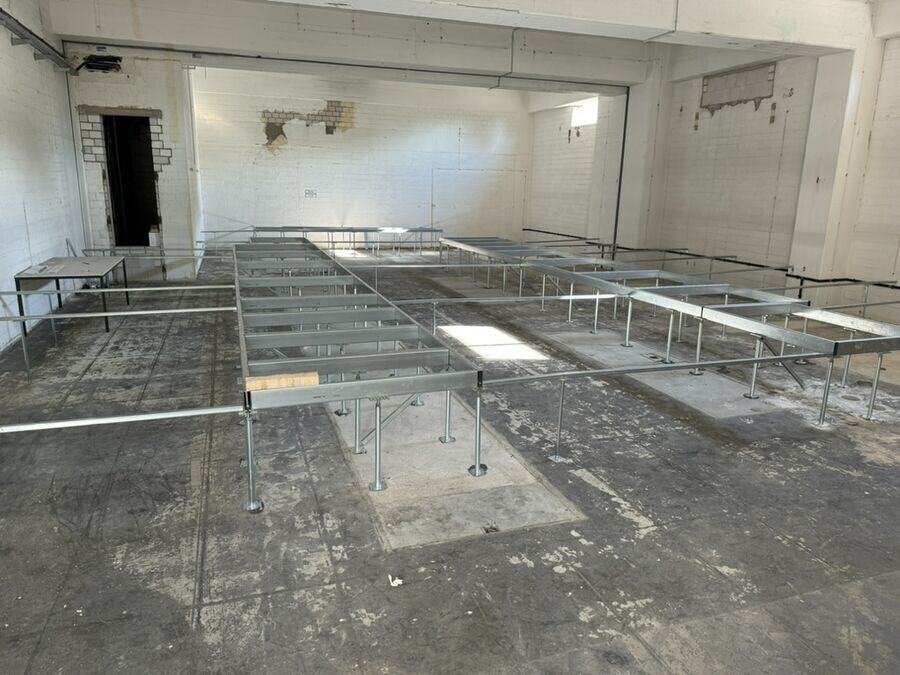
Setting up on the raised floor
Much switchgear stands on a raised floor. It later takes the cables. For installation it is both a blessing and a curse.
What the raised floor carries
The raised floor consists of panels on height-adjustable pedestals. It is designed for certain distributed and point loads. Under switchgear, frames or beams are often installed that carry the load directly into the structural slab. What a raised floor can and cannot do is described in the article on the Raised floor.
Protecting the pedestals
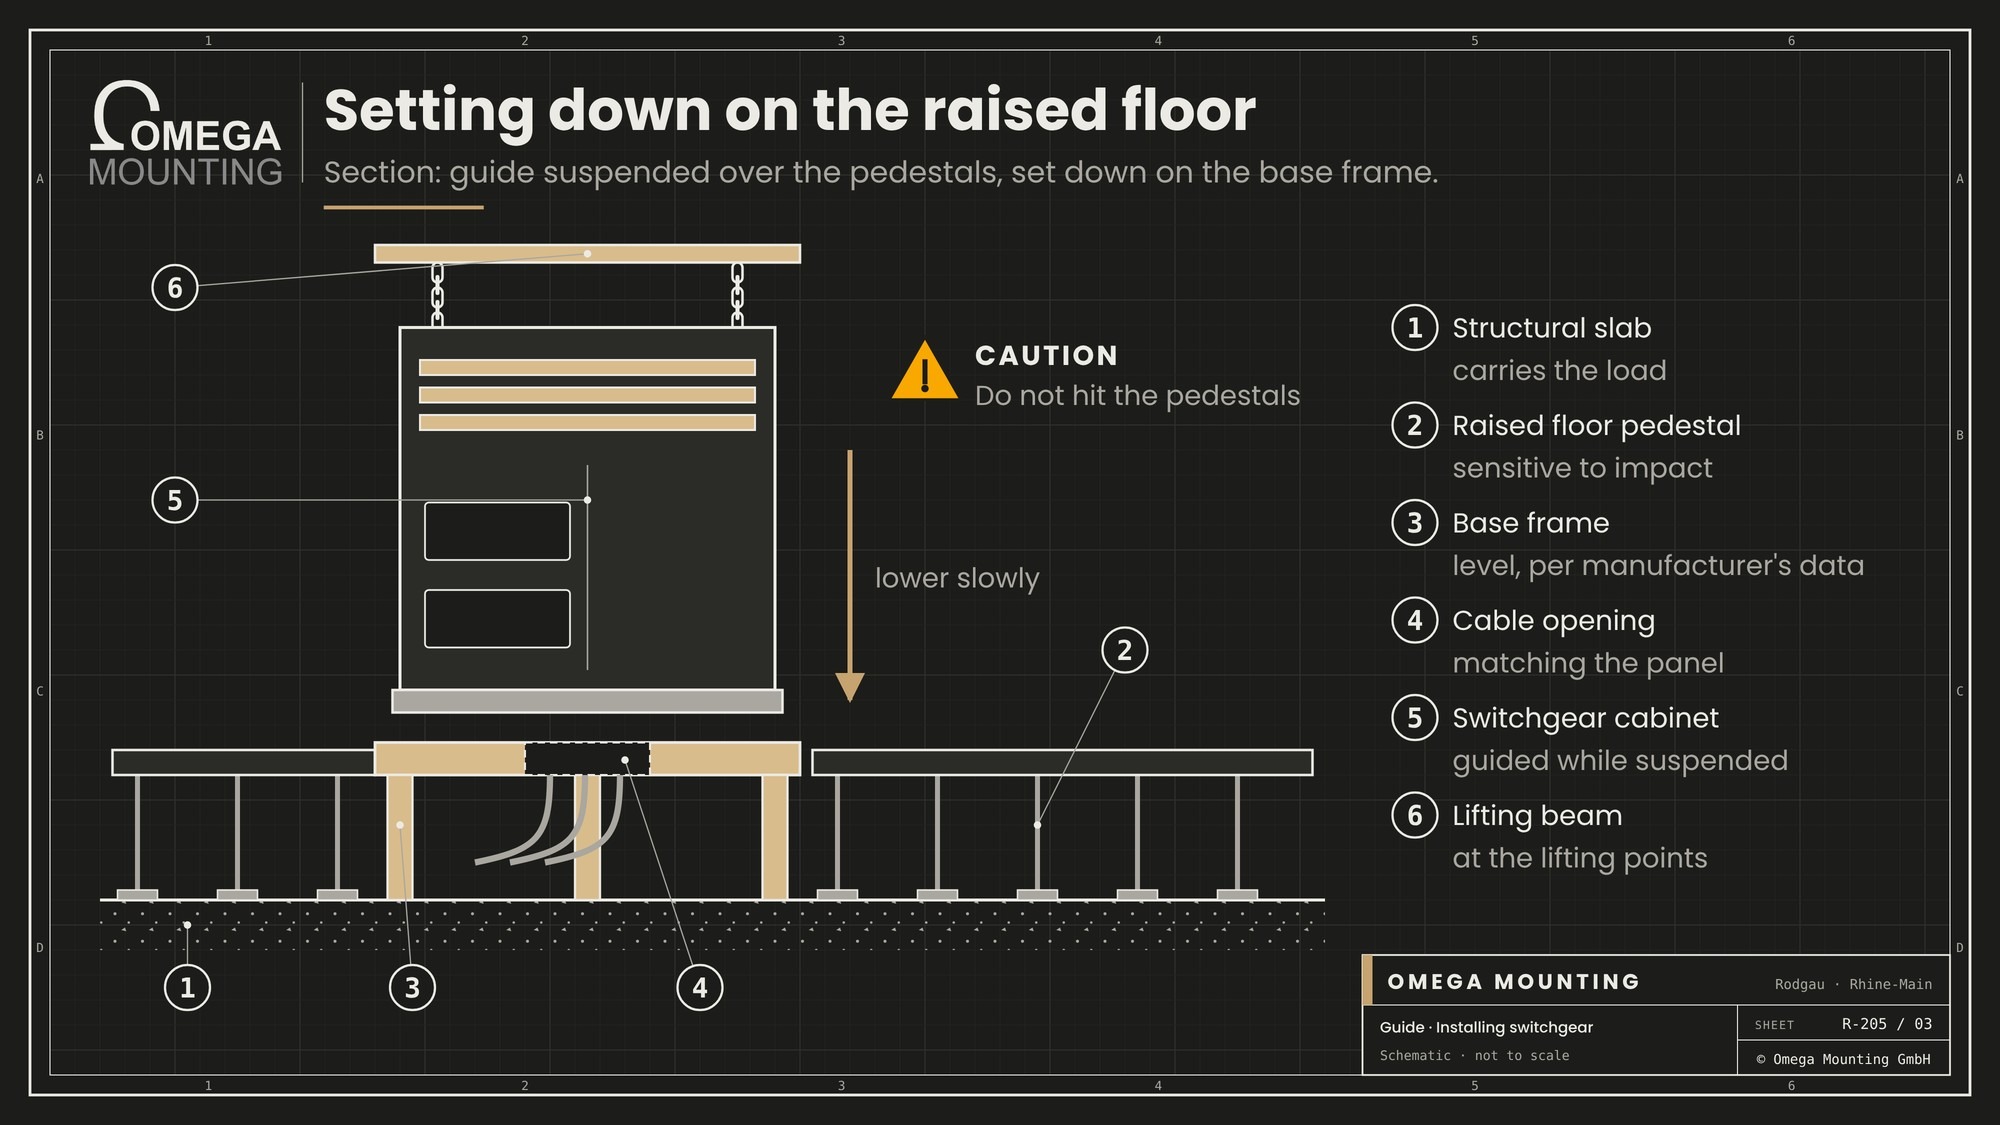
The pedestals cannot take impacts. A wheel that knocks a pedestal can shift it. A load pressing on one point of a floor panel can break it. That is why the cabinet is guided over the raised floor while suspended and only set down at its position.
Travel routes on the raised floor
If loads have to travel over the raised floor, load-spreading plates are laid. Whether the floor can carry this is stated in its data or clarified with the planner. If in doubt, the load is lifted rather than driven.
Openings under the panels
Under the panels there are openings for the cables. They must match the panel. Before setting down, it is checked whether cut-outs, frame and panel base line up.
Base frame, levelness and row
Switchgear is only as straight as what it stands on. The panels are set up on a base frame or on foundation rails.
Levelness as specified by the manufacturer
The manufacturer specifies how level the base must be. Base frames are aligned and checked beforehand. Anyone who skips this will not be able to connect the panels cleanly later.
Aligning the row
The panels are set up in line, plumb and tight against each other. For long rows a laser survey helps. Small errors at the first panel grow by the last.
Connecting the panels
The panels are bolted together according to the manufacturer's instructions. That is the mechanical connection. Busbars, earthing and connections follow afterwards – by the manufacturer or the electrician, as agreed.
Fixing
Depending on the specification, the switchgear is bolted to the base frame or anchored in the floor. Here too: fixings and tightening as specified by the manufacturer.
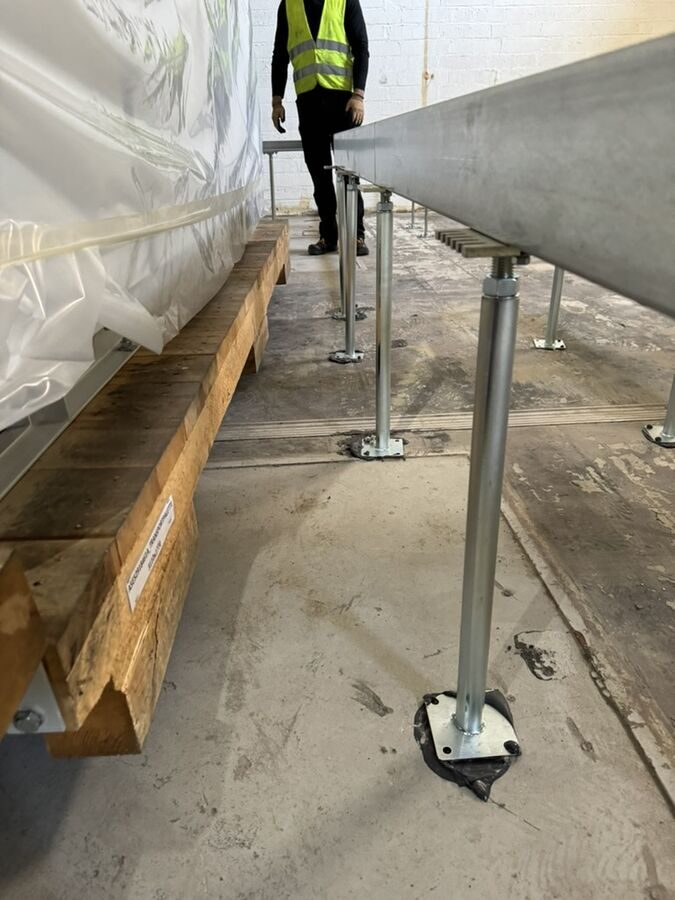
Setting down without impact: interim storage and one panel at a time
Not every panel is set straight into place. Often it is stored temporarily until the previous panel stands.
Interim storage
Interim storage is on timber beams. They protect packaging and base frame and leave room for the lifting accessory. The storage spot is chosen so that it does not block the route and keeps a distance from the pedestals of the raised floor.
Setting down slowly
Every lift is slow and controlled. At the installation point the panel is stopped just above the floor, aligned and then lowered. Only when it stands securely is the lifting accessory released.
Unpacking in place
Unpacking happens only at the installation point. Film, timber and straps are removed and disposed of immediately. A room full of packaging is a trip hazard and a fire risk.
Room, climate and cleanliness
Switchgear does not tolerate construction dust or moisture. The room must be ready before the first panel arrives.
Dry and clean
Walls, ceiling and floor are finished. Screed and plaster are dry. Drilling and grinding are complete. Otherwise dust settles in the switchgear, and moisture can lead to condensation.
Protection after set-up
Once the switchgear stands, it is covered as long as work continues in the room. Doors and openings stay closed. Access is controlled.
Fire protection and penetrations
Cable penetrations in walls and ceilings are sealed after connection – in line with fire protection requirements. How penetrations are made is described in the guide Core drilling in industry.
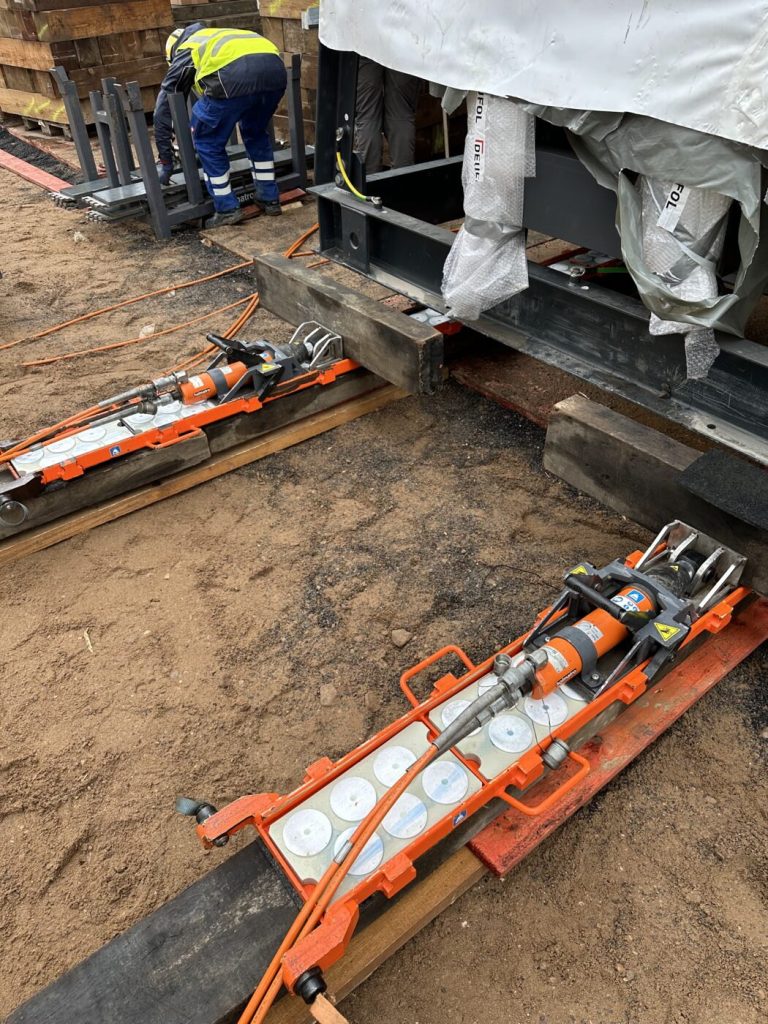
When no door is big enough: skidding, gantry and other routes
Sometimes the switchgear does not fit through the existing door. Then another route is needed.
Skidding
Very heavy units, such as complete substations, are pushed into the building at ground level on a skidding track. How this works is explained in the article on the skidding system.
Gantry and chain hoist
Where no forklift can reach, a gantry with chain hoist helps. It is set up at the installation point and lifts the panel off the dolly. Afterwards it is dismantled again.
Creating an opening
If none of these solutions is enough, an installation opening in a wall, façade or ceiling is discussed. The planner clarifies this with the structural engineer and the client. For the next switchgear, this opening should be planned in from the start.
Extending and replacing: individual panels during operation
Switchgear grows with the site. A data center gets new data halls, a factory new lines. Then a panel is added or an old one replaced – often next to panels that are live.
Working next to live switchgear
When equipment is moved in next to live switchgear, the operator decides which areas are isolated and which stay in operation. The work area is fenced off. Lifting and moving take place only where the release applies.
Space at the end of the row
A new panel usually goes at the end of the row. If there is no room to lift there, the panel is brought in from the side and pushed into position on rollers. This is checked during the survey.
Removing an old panel
When replacing, the route runs in reverse: disconnection by the electrician, separating the busbars as specified by the manufacturer, releasing the panel, lifting, moving it out. The new panel then follows the same route.
Keeping the route clear for later
Anyone setting up switchgear should document the installation route and keep it clear. A corridor that is built over later makes every replacement expensive.
Interfaces: installer, manufacturer and electrical team
When installing switchgear, several trades work hand in hand. Who does what is set out in advance.
What is clarified beforehand
Who checks the delivery? Who connects the busbars? Who connects the earthing? Who connects the cables? Who commissions the switchgear? These questions belong in the installation plan, not on the site.
Handover after set-up
When all panels stand, are aligned and mechanically connected, the switchgear is handed over to the manufacturer and the electrical team. This includes a short record with photos: position, alignment, condition, open points.
The operator has to play along too
Access, time slots, isolation in adjacent areas and contacts come from the operator. In live plants especially, that is the rhythm everyone follows.
Safety rules during installation
Some rules apply to every switchgear installation.
- Nobody stands under the suspended load.
- Lifting only at the manufacturer's lifting points.
- Every lift has a responsible person who releases or stops it.
- Loads at risk of tipping are guided on both sides while moving.
- Routes are fenced off and kept clear.
- Lifting accessories are checked before use.
- In areas with live equipment, work only after release by the operator.
Typical mistakes when installing switchgear
Centre of gravity estimated: the cabinet tips at the first step.
Attached to the housing: doors or panels bend, the load slips.
Ceiling height forgotten: the panel fits through the door but cannot be lifted in place.
Raised floor underestimated: a pedestal is knocked, a floor panel breaks.
Unpacked too early: dust and scratches along the way.
Room not finished: construction dust and moisture in the new switchgear.
Wrong sequence: the last panel blocks the route for the first.
Interfaces left open: nobody feels responsible for busbars or earthing.
The mistake behind the mistakes
Almost all mistakes happen because the site survey was too short. Half a day with tape measure, plan and manufacturer saves days on site.
Who does what when installing switchgear?
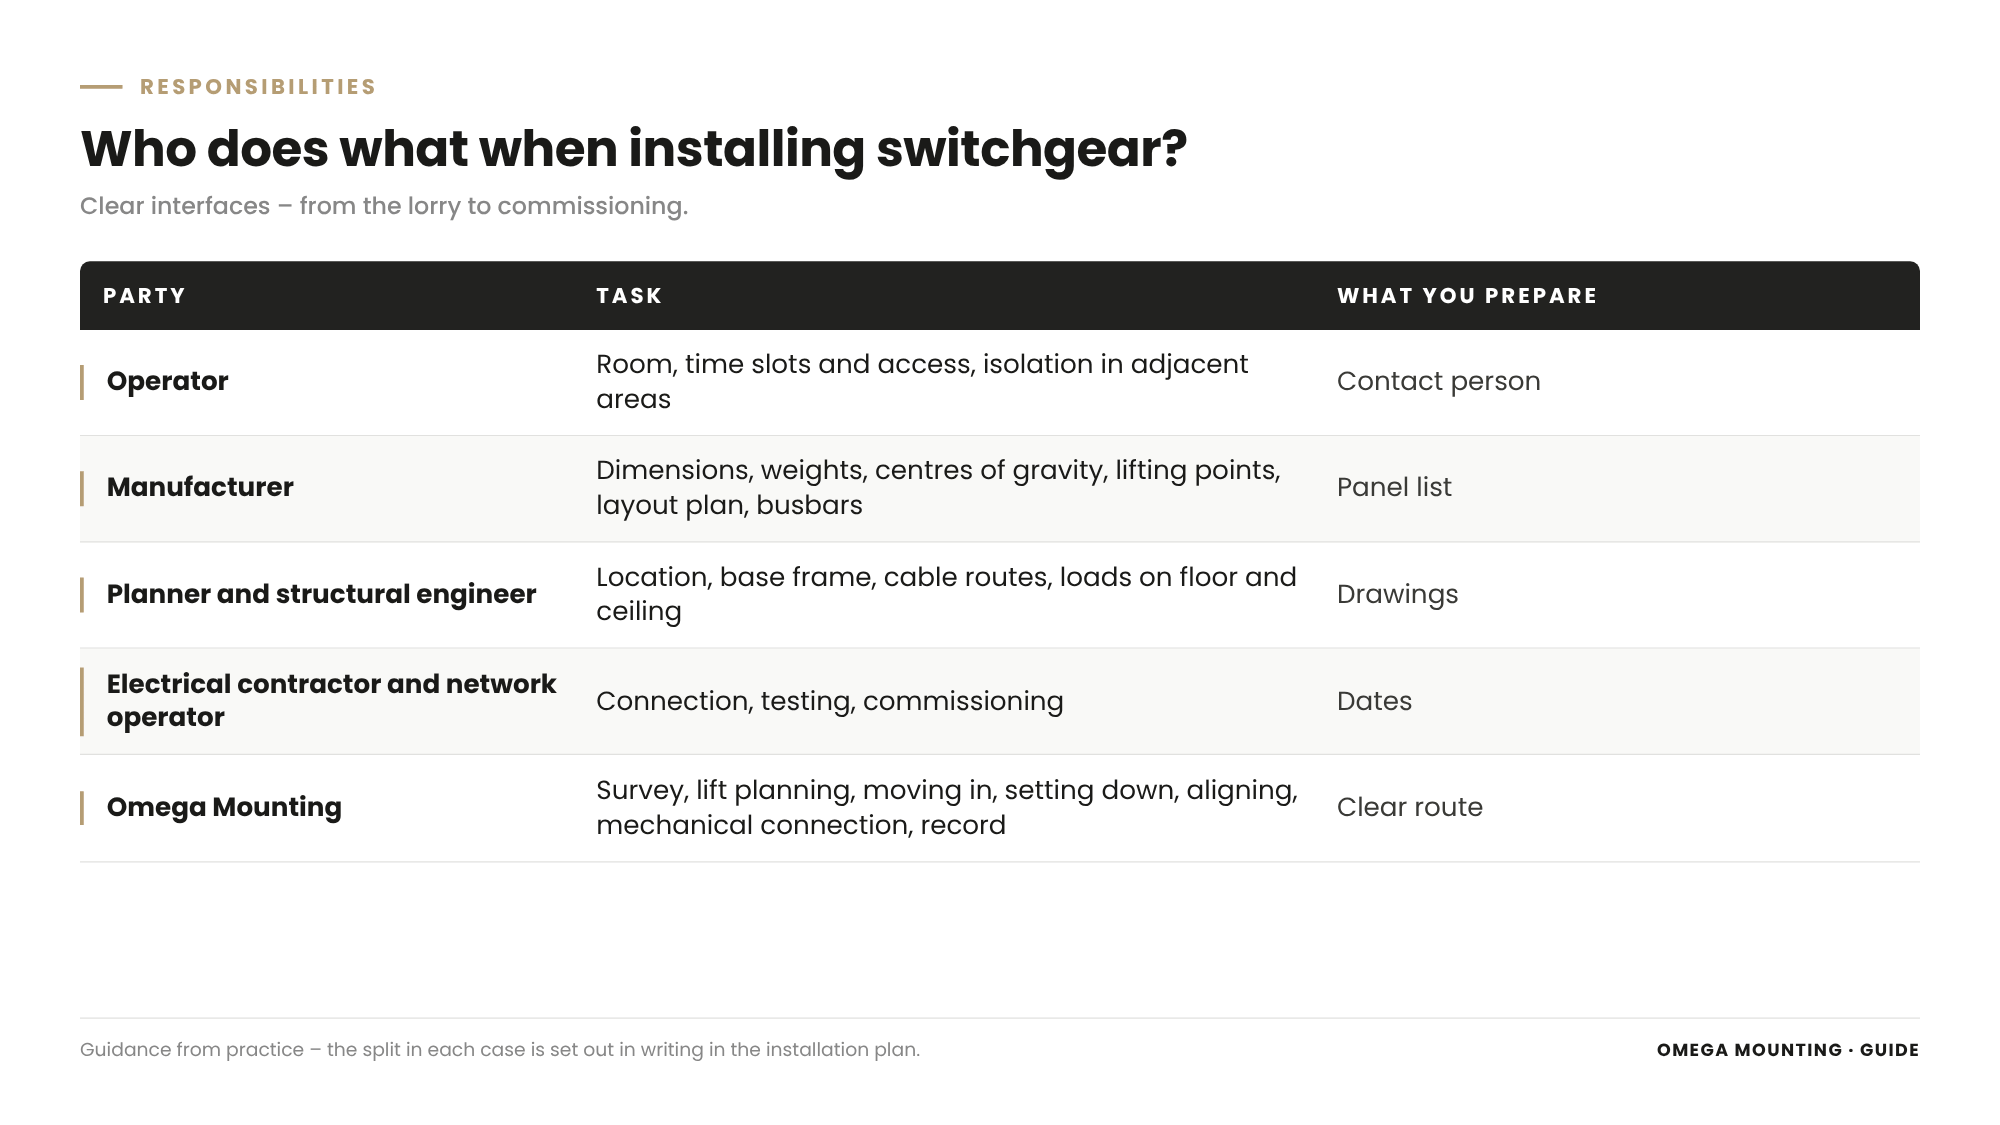
When installing switchgear, everyone involved has their task. Clear roles prevent anything being left undone.
Operator
They release room, time slots and access, name contacts and arrange isolation in adjacent areas.
Manufacturer
They supply dimensions, weights, centres of gravity, lifting points, layout plan and installation instructions. On many switchgear assemblies they connect the busbars and support commissioning.
Planner and structural engineer
They define installation point, base frame and cable routes and assess whether floor and ceiling carry the loads.
Electrical contractor and network operator
They connect, test and commission the switchgear – for medium voltage and grid connection according to their rules.
Omega Mounting
We survey the route, plan the lifts, move each panel in, set it down, align the row, connect the panels mechanically and hand over with a record.
Installing switchgear: what it means for your planning
Four questions help to set up the installation well.
Do you know dimensions and weight in transport condition?
Request the details for each panel from the manufacturer – with centre of gravity and lifting points.
Is the route clear and measured?
Have door, corridors, lift and ceiling height surveyed before the delivery date is fixed.
Is the room ready?
Plan the installation only when the room is dry, clean and finished.
Are the interfaces assigned?
Set out in writing who moves in, who connects, who wires and who commissions.
What belongs in the order when installing switchgear
A good quotation names each of these points explicitly.
Service
Site survey, installation plan, unloading, moving in, lifting and setting down, aligning, mechanical connection, disposal of packaging.
The frame
Lifting and transport equipment, protection of route and floor, time slots, fencing off, contacts.
Record
Lifting plan, record with photos, handover to manufacturer and electrical team.
Legal framework
Lifting and moving loads are subject to, among other things, the German Ordinance on Industrial Safety and Health, the accident insurers' rules for lifting accessories and load-handling attachments and the operator's risk assessment. Set-up, connection and commissioning follow the manufacturer's installation instructions and the electrical engineering standards. This guide is not legal advice – clarify which obligations apply in your case with your occupational safety specialist and your planner.
Installing switchgear in the Rhine-Main region and throughout Germany: how we do it
From Rodgau we quickly reach Frankfurt, Offenbach, Hanau, Darmstadt, Aschaffenburg and the data center and industrial areas of the region – and we work throughout Germany with our own teams. Anyone who wants switchgear installed in Rhine-Main gets survey, planning, moving in and set-up from a single source.
We move switchgear, distribution boards, transformers and other heavy equipment into existing buildings. How we do this in general is shown on the page on Lift and Shift.
For you, that means one contact for the whole route from the lorry to the aligned panel.
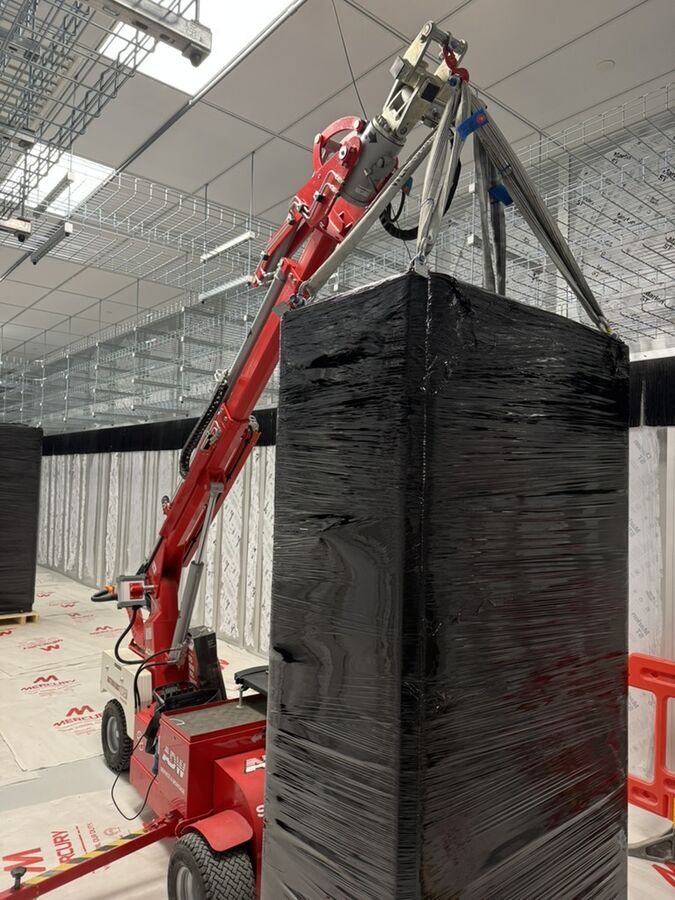
Project examples
Three jobs show how we move in and set up heavy electrical equipment.
High-voltage switchgear in a power station
During the modernisation of a power station, we moved in and installed a purpose-built high-voltage switchgear. Every panel had to go through a small industrial door into a concrete building. The floor had a basement below, the raised floor was already in place, and only a few centimetres of headroom remained above the cabinets. We built our own lifting solution for almost every panel: a forklift with adjustable lifting chains and low-profile lifting beams. The panels stayed packed until in place, were stored temporarily on timber beams, guided suspended over the substructure, set down, aligned and connected.
Transformers on the skidding track
In a data center in the Frankfurt area, we pushed two transformers into their cells on a hydraulic skidding track. A crane lift from above was not possible because the building was already closed. The job is described in the report Moving transformers into a data center in Frankfurt.
Distribution cabinets in the data center
In a data center in the Rhine-Main region, we distributed a large number of distribution cabinets across several data halls, unpacked them, lifted them, set them down after a laser survey and aligned them in line. Then the electrical trade took over. The process is shown in the report Moving in and setting up PDCs in a data center.
Shall we install your switchgear?
Send us the layout plan, a panel list with dimensions and weights and a few photos of the route – we will tell you what the installation could look like. Get in touch now.
What this means for your role
Buyers: Ask whether site survey, lifting plan, protection of route and raised floor, disposal and a record are included in the quotation.
Planners: Plan the installation route, ceiling height and base frame from the start and obtain the manufacturer's transport data early.
Project and site managers: Fix the delivery date only when room and route are ready, and assign the interfaces in writing.
Maintenance managers: When setting up, think about replacing individual panels later and keep the route clear for it.
Operator: Clarify access, time slots and isolation in adjacent areas in good time.
Occupational safety specialists: Check the lifting plan, fencing off and tipping protection and the rules for working near live equipment.
Switchgear installation plan: template on request
For your project, we have put together the switchgear installation plan. For each panel it asks about dimensions and weight, centre of gravity and lifting points, route and bottlenecks, floor and raised floor, lifting gear, installation point and interfaces. Request the template via our contact form – keyword “Switchgear installation plan”.
Why Omega Mounting?
With over twenty years of experience in installation and lift and shift, we know: when installing switchgear, preparation decides. That is why we survey every route ourselves, plan every lift and, where necessary, build a separate lifting solution for each panel. We work slowly, guided and with clear release. We move in, set up and align – and say clearly beforehand where the manufacturer and the electrical team take over. For you, that means switchgear that stands undamaged and straight when the electricians arrive. Talk to us about your project – we will get back to you promptly.
Conclusion
Installing switchgear means knowing the route precisely, lifting every panel without tipping, protecting the raised floor, setting up the row straight and clarifying the interfaces in advance. The weight can be handled. Centre of gravity, ceiling height and floor decide.
With a thorough survey, one solution per panel and a clean handover, the switchgear stands as the manufacturer intended. If you want switchgear installed, get in touch with us.
Planning a move-in, installation or maintenance in the Rhine-Main region?
Tell us briefly what you need – we'll come back with an honest assessment.
Free, no-obligation callback
You may also be interested in these guides
About the author
Tobias Schott
Managing director of Omega Mounting GmbH, Rodgau · more than 20 years of hands-on experience in installation and maintenance
A trained mechatronics technician, working in maintenance, servicing and industrial installation since 2004 – first alongside his father, and with Omega Mounting since 2012: from overhead conveyors in Frankfurt to the crane system in a new-build hall. He plans and leads lifting operations as an appointed person (AP) in data centers and on industrial sites in the Rhine-Main region, trains and examines operators of cranes, mobile elevating work platforms and telehandlers, and is a qualified occupational safety specialist. On jobs abroad he is known as the “German Troubleshooter” – the person you call when a site gets stuck. He learned what quality means from his father, not from a manual: Made in Germany as a standard for his own work, not a label. That is why quality comes first at Omega Mounting – ahead of speed and price. He writes these guides from that practice: what works on our sites is in them – what exists only on paper is not.
Frequently asked questions
The route is surveyed, each panel in transport condition is brought through door and corridor with suitable lifting and transport equipment, set down slowly at the installation point, aligned and mechanically connected. Then the manufacturer and the electrical team take over.
The panels contain switching devices and copper busbars. That makes them heavy. Because the cabinets are tall and narrow and the heavy parts are often high up, they tip more easily than other loads.
Yes, if the raised floor and its substructure are designed for the load. The panels are guided suspended over the pedestals and only set down at their position. Travel routes are protected with load-spreading plates.
Then low-profile lifting gear is used, such as lifting beams on the forklift with adjustable lifting chains. Often each panel needs its own solution.
On many switchgear assemblies, the manufacturer connects the busbars. Connection, testing and commissioning are carried out by the electrical contractor and, for medium voltage, the network operator. This is set out in the installation plan beforehand.
When the room is dry, clean and finished. Construction dust and moisture damage the equipment.
Lifting is subject to the German Ordinance on Industrial Safety and Health and the rules for lifting accessories; set-up and connection follow the manufacturer's data and the electrical engineering standards.
Yes. From Rodgau we are quickly on site in the region and work throughout Germany with our own teams – including in power stations, data centers and industrial plants.
Send us the layout plan, a panel list with dimensions and weights and photos of the route. We will assess the effort and come back to you with a proposal. Go to the contact page.
 English
 German