
- Guide – Industrial installation
Installing cable tray: routes, hangers and loads – installed mechanically, cabled by the electrician
By Tobias Schott · Reading time approx. 22 minutes · As of: November 2026

Installing cable tray means: setting the right type according to the routing plan, anchoring every hanger in a load-bearing substrate, keeping support spans and loads within the manufacturer's and designer's specifications, and forming bends, branches and height offsets so that the cables later lie without strain. The tray is mechanical work. Pulling cables, equipotential bonding and connection are for the electrician; fire protection and function retention are for approved specialist firms.
Cable tray looks simple: a sheet-metal channel on the ceiling, a few threaded rods, done. In practice, it decides whether a data center, a production hall or a logistics centre can later be cabled cleanly. If the tray hangs too low, it clashes with the ventilation. If the support span is too long, it sags under the cable load. If the anchor sits in the wrong ceiling, the installation becomes a job for the structural engineer.
Cable tray installation usually comes with a new build, an extension or a refit in a running facility. The questions are almost always the same: which type fits? How is it fixed to ceiling, wall or steel? What load may the tray carry? Who takes care of fire protection and earthing? And how do you install over live equipment without dust and disruption?
This guide answers these questions from the installation contractor's point of view. It is written for project and site managers, building services designers, operators and technical managers, facility managers, electrical contractors, buyers and occupational safety specialists. What is generally different for subcontractors in a data center is described in the guide installation in data centers.
Key points at a glance
- Installing cable tray means: putting type, fixing, loads and routing into practice according to the plan.
- The plan first. Routing plan, cable load and reserve are set by the designer, not by the installers.
- Support span per the manufacturer. The spacing of the hangers and the permissible load are in the manufacturer's data.
- Check the substrate. For existing ceilings, the structural engineer signs off before anything is drilled.
- Height made safe. A MEWP, barriers and tethered tools belong to every tray installation.
- Fire protection only with a specialist firm. Fire stopping and function retention are built by approved specialist firms.
- Electrical work with the electrician. Equipotential bonding, cable pulling and connection are done by the qualified electrician.
- Clean in operation. In a data center, access, dust protection and floor protection count.
What is cable tray – and what belongs to the installation?
Cable tray is a support system that carries cables and wires through a building in an orderly way. It consists of the carriers themselves, that is channels, wire mesh trays or ladders, of connectors, fittings such as bends and branches, and of the fixings to ceiling, wall, steel or floor. Which types exist and how they are built is explained in the knowledge article The cable route: cable tray, wire mesh tray, cable ladder.
What the tray is for
The tray carries the weight of the cables, protects them from mechanical damage and keeps order. It separates power and data cables, makes later additions possible and makes sure that cables do not run loose over ceilings, equipment or pipes.
Mechanical and electrical
Cable tray is a mechanical component. It is set, anchored, aligned and joined like any other steel structure. Only then does the electrician come: he pulls in the cables, bonds the tray into the equipotential bonding and connects. This sequence shapes the whole process.
Where the installation stops
We install the tray mechanically: fixings, carriers, fittings, connectors, covers. On equipment that we build ourselves, our own electricians connect on the equipment side up to the main isolator. Building electrics, incoming supply and medium voltage stay with the electrical contractor or the grid operator. Fire stopping and function retention are built by approved specialist firms.
Cable channel, wire mesh tray, cable ladder: which type for what?
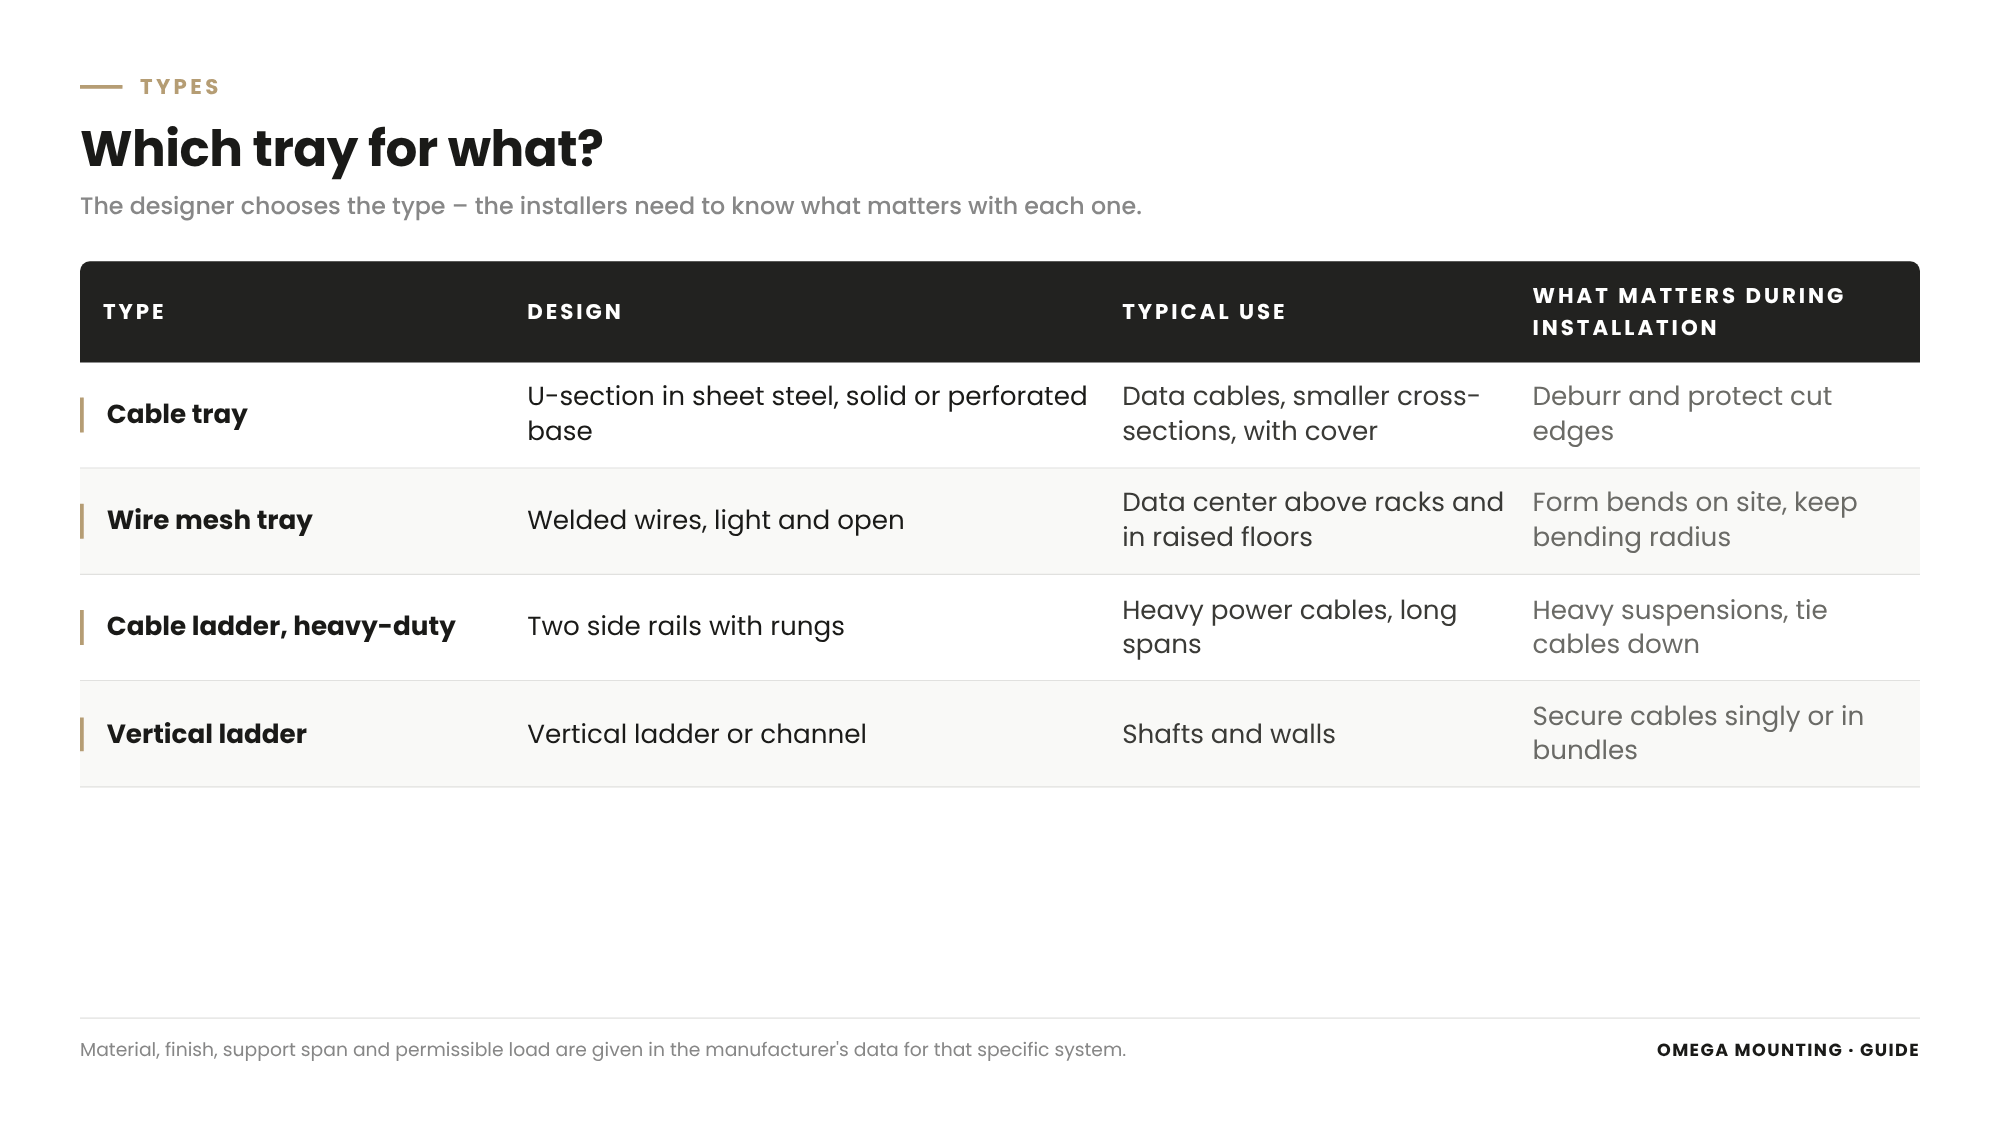
The designer decides the type. For the installation it is still important to know why which tray was chosen, because fixing, cutting and fittings depend on it.
Cable tray
The cable channel is a U-shaped sheet-metal profile with a closed or perforated base. It protects the cables well, can be closed with a lid and is often used for data cables and smaller cross-sections. When installing a cable channel, make sure cut edges are deburred so that no cable sheath is damaged.
Wire mesh tray
The wire mesh tray is made of welded wires. It is light, well ventilated and can be cut to size and formed into bends quickly on site. In data centers it is common above racks and in raised floors, because cable outlets are possible almost anywhere.
Cable ladder and heavy-duty cable ladder
The cable ladder consists of two side rails with rungs. In practice the heavy version is often called a heavy-duty cable ladder. It carries thick power cables over long support spans and is typical for main cables between transformer, distribution and equipment. The cables are tied to the rungs.
Riser tray
Riser trays are used for vertical routes in shafts or on walls. Here the cables are fixed individually or in bundles so that their own weight does not pull on the connections.
Material and finish
Galvanised steel is the standard for dry indoor areas. For damp, aggressive or food-related areas there are hot-dip galvanised or stainless steel versions. Which finish is needed is set by the designer; during installation, cut edges are treated with suitable corrosion protection.
Planning: routing plan, loads and support spans come from the designer and manufacturer
Cable tray is not invented on site. Before we install cable tray, we check that the specifications are complete and match the reality on site.
Routing plan
The routing plan shows route, height, width, type and fittings. It sets out where branches to distribution boards and equipment lie and where the tray crosses walls or ceilings. If a detail is missing, we ask rather than guess.
Cable load with reserve
How much the tray has to carry results from the cable occupancy and a reserve for later additions. The designer calculates this load. The installation puts it into practice and reports if more cables are visibly planned on site than the tray can take.
Support span of the cable tray
The distance between two fixings is called the support span. The larger the support span, the less the tray may carry per metre. The permissible values are in the manufacturer's load charts for exactly this system. There is no support span by feel for any cable tray.
Clearances to other trades
Ventilation ducts, sprinkler pipes, refrigeration pipes, lighting and crane runways compete for the same space under the ceiling. The designer coordinates the heights. On the site visit we check whether the planned height is actually clear and whether there is enough room above the tray to lay in the cables.
Separating power and data
Power and data cables are routed separately, either in separate trays or with a divider. Which separation is needed is set by the electrical design. We set dividers and trays so that this separation is also kept at branches.
Site visit before installation
Plans of existing buildings are often inaccurate. On the site visit we measure heights, check ceilings and steel beams, look for obstacles and clarify access, storage area and working hours. Deviations go back to the designer before installation. How we turn these points into a reliable sequence is described in the guide Creating an installation plan.
Fixing to ceiling, wall and steel: how cable tray is installed safely
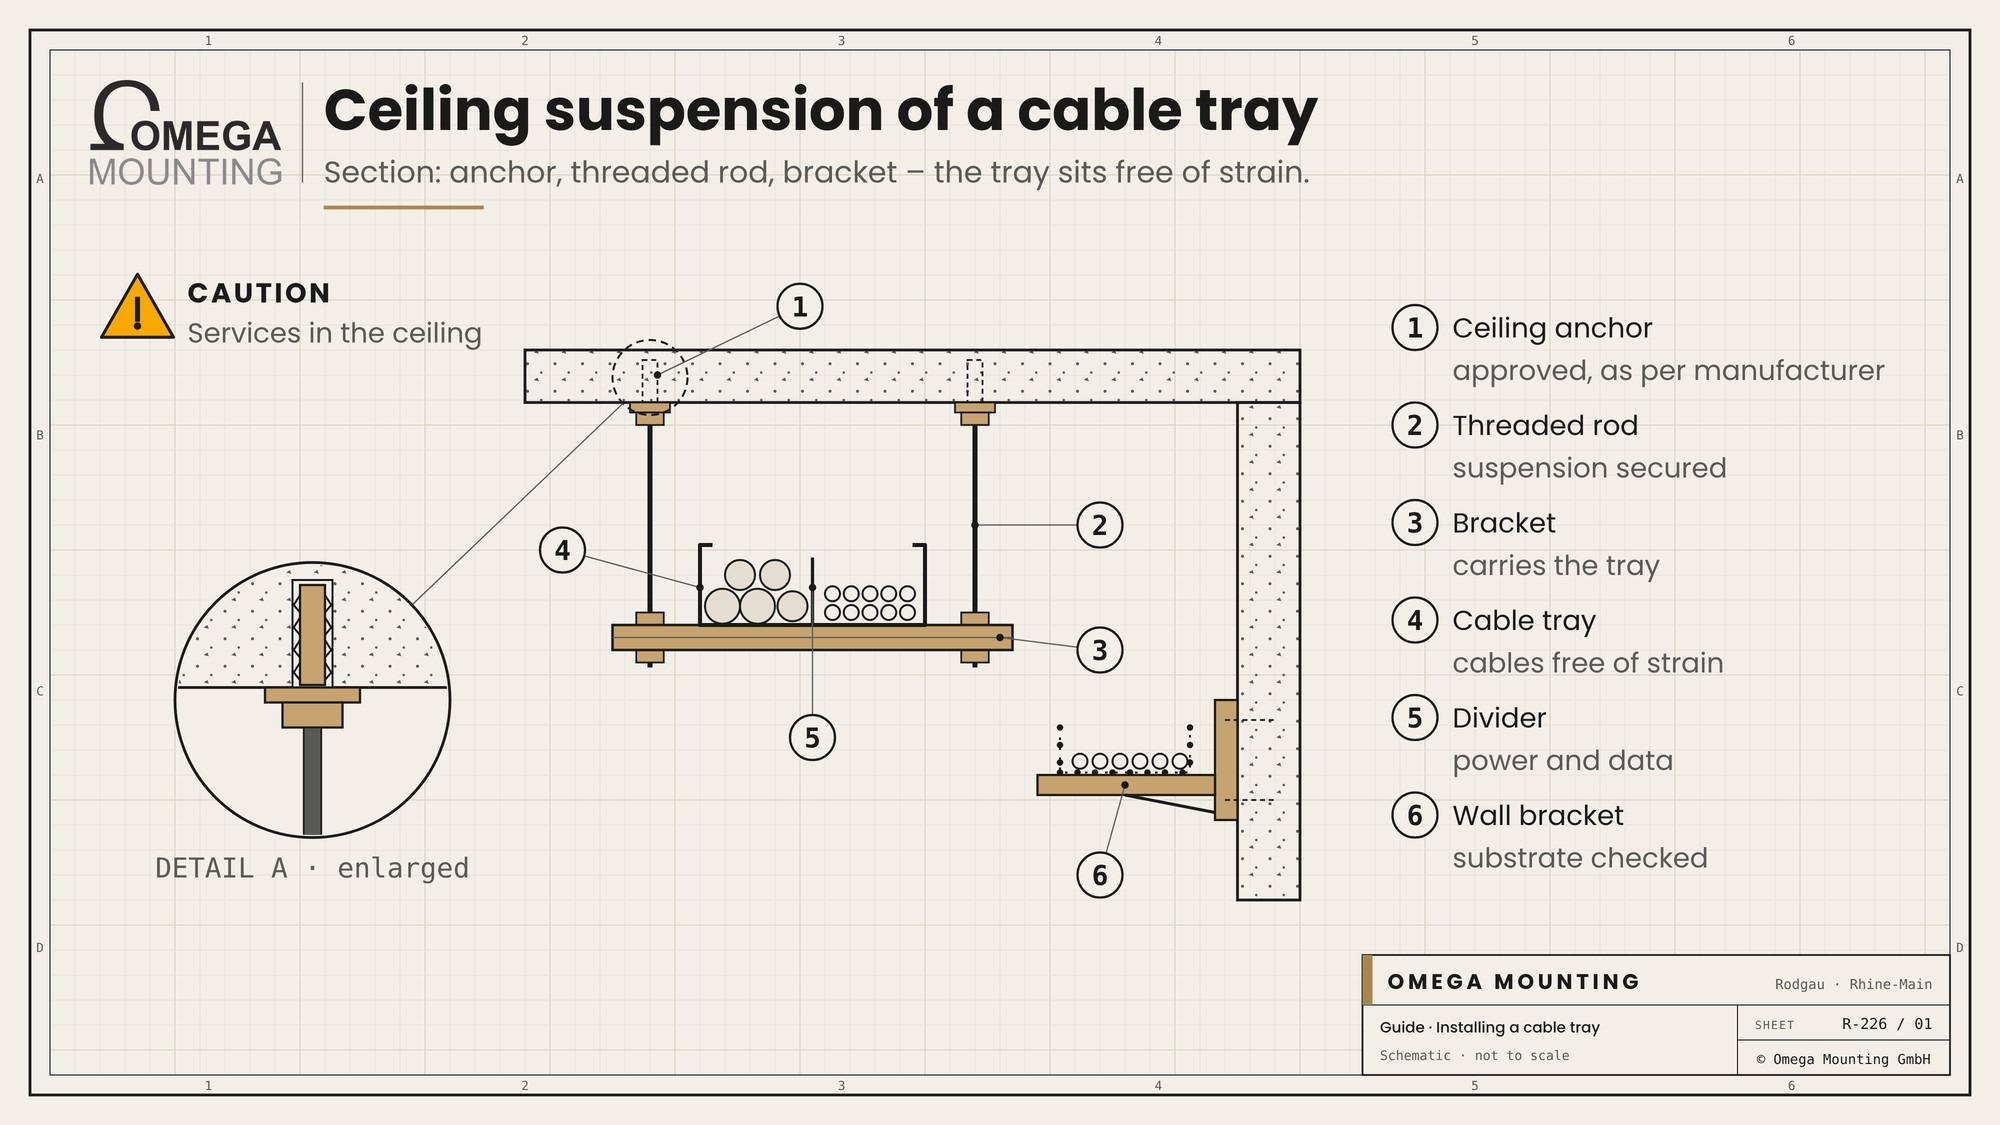
The tray is only as good as its fixing. Most damage to cable tray does not occur in the channel but at the anchor, the hanger or the bracket.
Ceiling fixing of cable tray with anchors
On concrete ceilings, fixing is done with anchors approved for the substrate and the load. In the tension zone of a ceiling, the concrete may be cracked, so anchors suitable for that are needed. Drill hole, cleaning, setting depth and tightening torque follow the manufacturer's data. What really holds in concrete is explained in the knowledge article Heavy-duty anchors and bonded anchors.
Tray hangers with threaded rod or profile
The classic tray hanger consists of a ceiling fixing, a threaded rod or hanger stem, and a bracket on which the tray rests. For heavy trays or long hangers, profile rails are used instead of threaded rods. According to the manufacturer, long hangers need bracing so that the tray does not swing when the cables are pulled in.
Wall brackets
Along walls, the tray is carried on wall brackets. The substrate counts especially here: masonry, aerated concrete or drywall need different fixings than concrete. For lightweight walls, we clarify beforehand whether the wall may take the load at all.
Fixing to steel
In halls, fixing is often to steel beams. Beam clamps need no drilling or welding and spare the corrosion protection. Whether an existing beam may carry the additional load is decided by the structural engineer. Welding to existing steel is done only with permission and a hot work permit.
Floor supports
Where there is nothing to hang from, for example in a raised floor or over roof areas, the tray stands on floor supports. In a data center, the support must match the load capacity of the raised floor; what the raised floor carries is described in the knowledge article The raised floor in the data center.
Secured and documented
Every nut is secured against loosening, every connection tightened according to the manufacturer's data. For safety-relevant anchors, we document type, position and setting procedure so that it can later be traced what is in the ceiling.
Existing ceilings: structural check before the first drill hole
In existing buildings, the ceiling is rarely as well known as the plan claims. That is why the question of what may be drilled comes before the first drill hole.
Load-bearing capacity
A tray with heavy power cables puts a permanent load into the ceiling. Whether the existing ceiling can take this load is assessed by the structural engineer. For large loads, the load is spread over additional hangers or cross members.
Prestressed concrete and hollow-core slabs
Prestressed concrete ceilings contain tendons that must not be hit when drilling. Hollow-core slabs have only certain areas where anchoring is permitted. Here nobody drills without sign-off. A hit tendon is not minor damage.
Locating reinforcement and cables
Before drilling, reinforcement and cables in the ceiling are located. If the drill hits reinforcement, drilling does not continue but moves to an offset position – in agreement with the site management. How core drilling is handled is described in the guide Core drilling in industry.
Documenting the sign-off
We record the structural sign-off, the planned anchor positions and deviations on site in writing. This protects everyone involved when additions or alterations are made later.
The process: installing cable tray in six steps
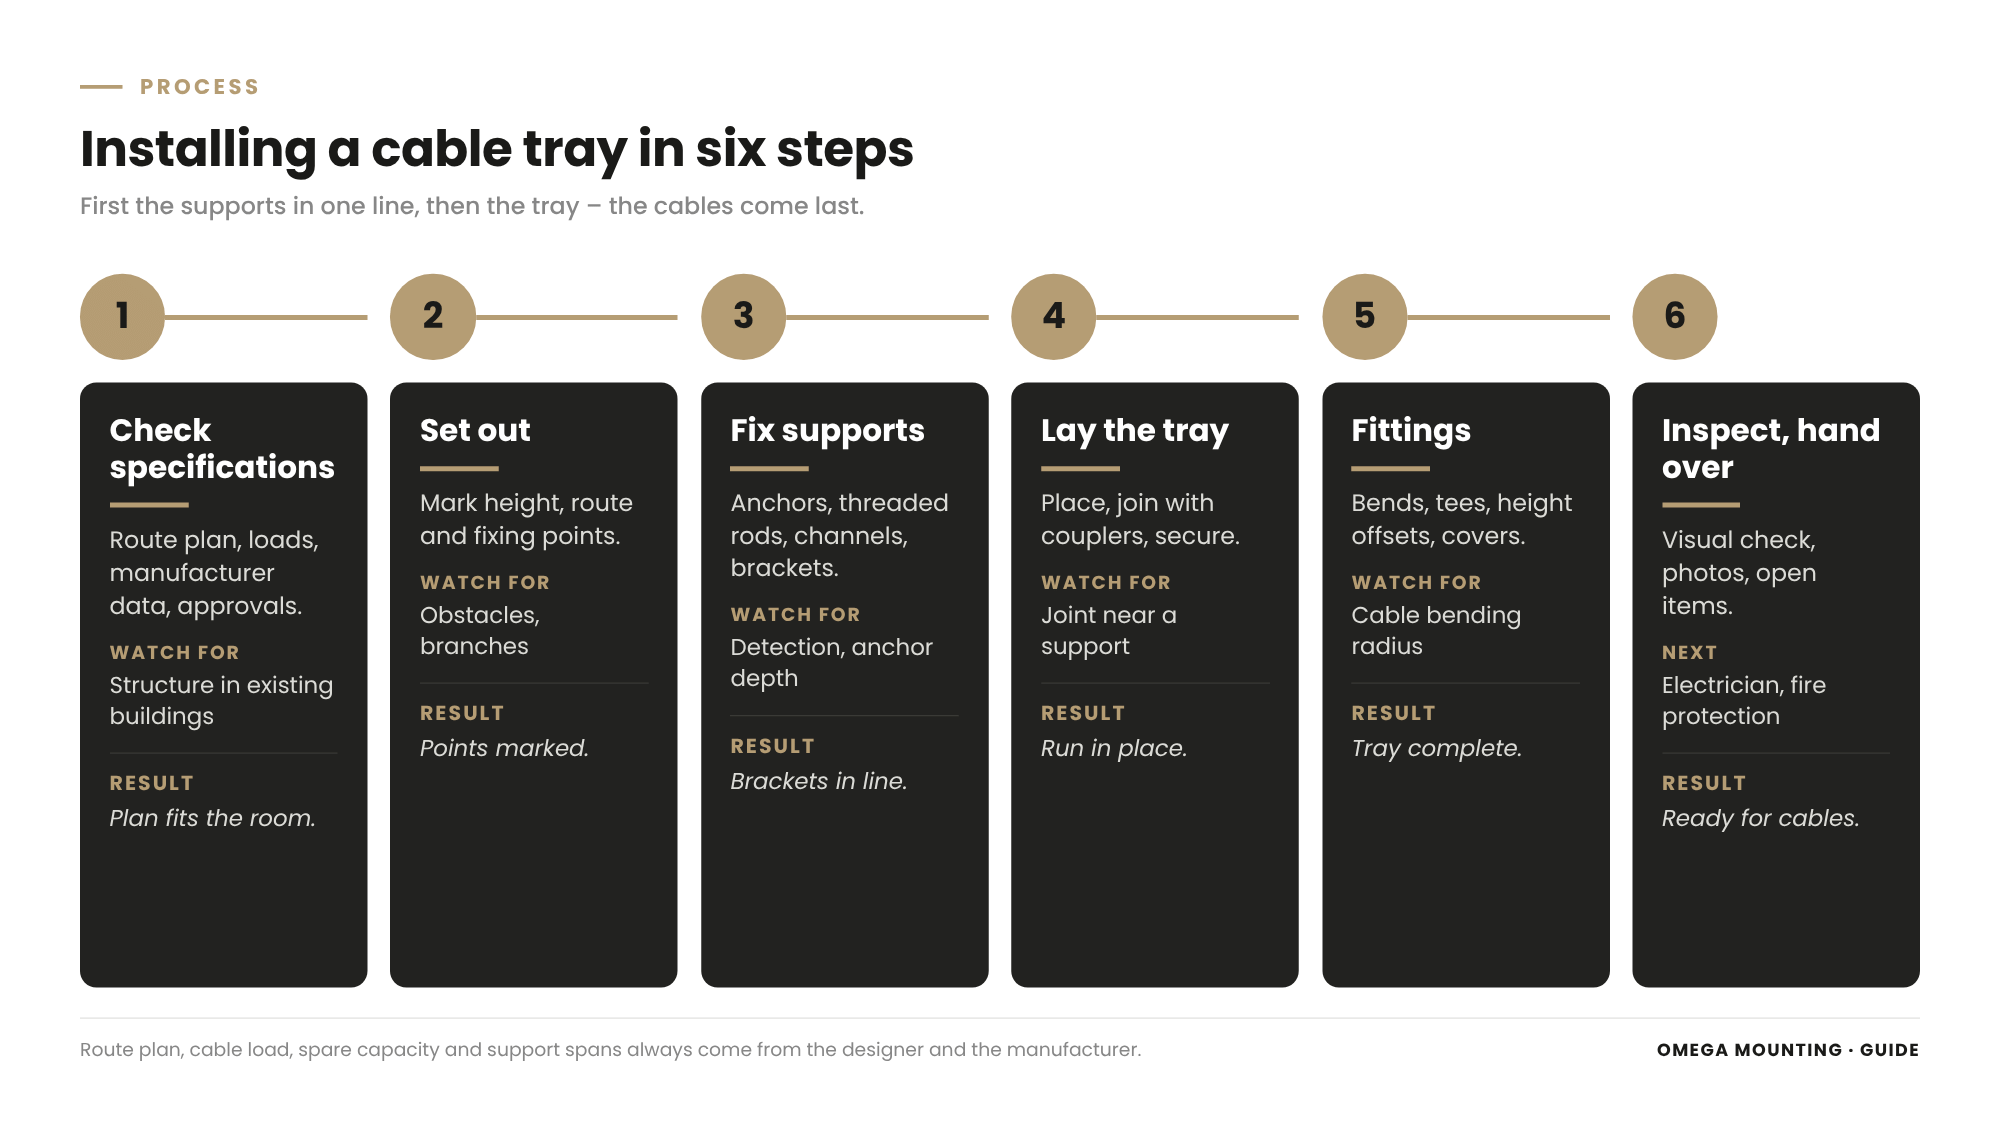
Every tray is different. The process in which we install cable tray is nevertheless always similar.
Check the specifications
Routing plan, type, loads, manufacturer's data and sign-offs are checked. Open questions go to the designer and the site management.
Survey
Height, route and fixing points are marked on site, ideally with a laser. Obstacles and branches are marked before drilling.
Set the fixings
Anchors, threaded rods, profiles and brackets are set and brought to height. Only when all brackets lie in one line does the tray go in.
Lay in and join the tray
The carriers are laid on, butt-jointed with connectors and secured on the brackets. According to the manufacturer, joints lie close to a fixing, not in the middle of the support span.
Fittings and covers
Bends, branches, height offsets and dividers are fitted. Where provided, lids and end caps are added.
Testing and handover
Visual inspection, photos, open points and handover to the electrician. Only then are cables pulled.
Installing at height: MEWP, barriers, tools
Cable trays hang under the ceiling. Almost every tray installation is therefore work at height.
The right work platform
For trays under the ceiling we mostly work with scissor or articulated platforms. Type, working height and floor loading are clarified beforehand. Ladders are generally not a suitable workplace for installing trays. What matters in choosing and operating a platform is described in the guide MEWPs in installation work.
Fall protection
Whoever works on the platform stays in the basket and is clipped on as the manufacturer specifies. Leaning out to reach the next bracket is the classic mistake. Better to reposition once more.
Barriers on the ground
A danger zone arises under the platform. Tools, bolts or a piece of tray can fall. The area is cordoned off, walkways are diverted, and nobody works directly under another trade.
Securing tools
Cordless drills, spanners and small parts are secured against falling. Over live equipment or racks this is mandatory, because a dropped part can do more damage there than on the hall floor.
Handling long tray sections
Tray sections are long and bulky. They are passed up by two people or carried with the platform and secured on the bracket immediately. We do not work alone anyway: we never send just one fitter, and every team has at least one trained first aider.
Bends, branches and height offsets
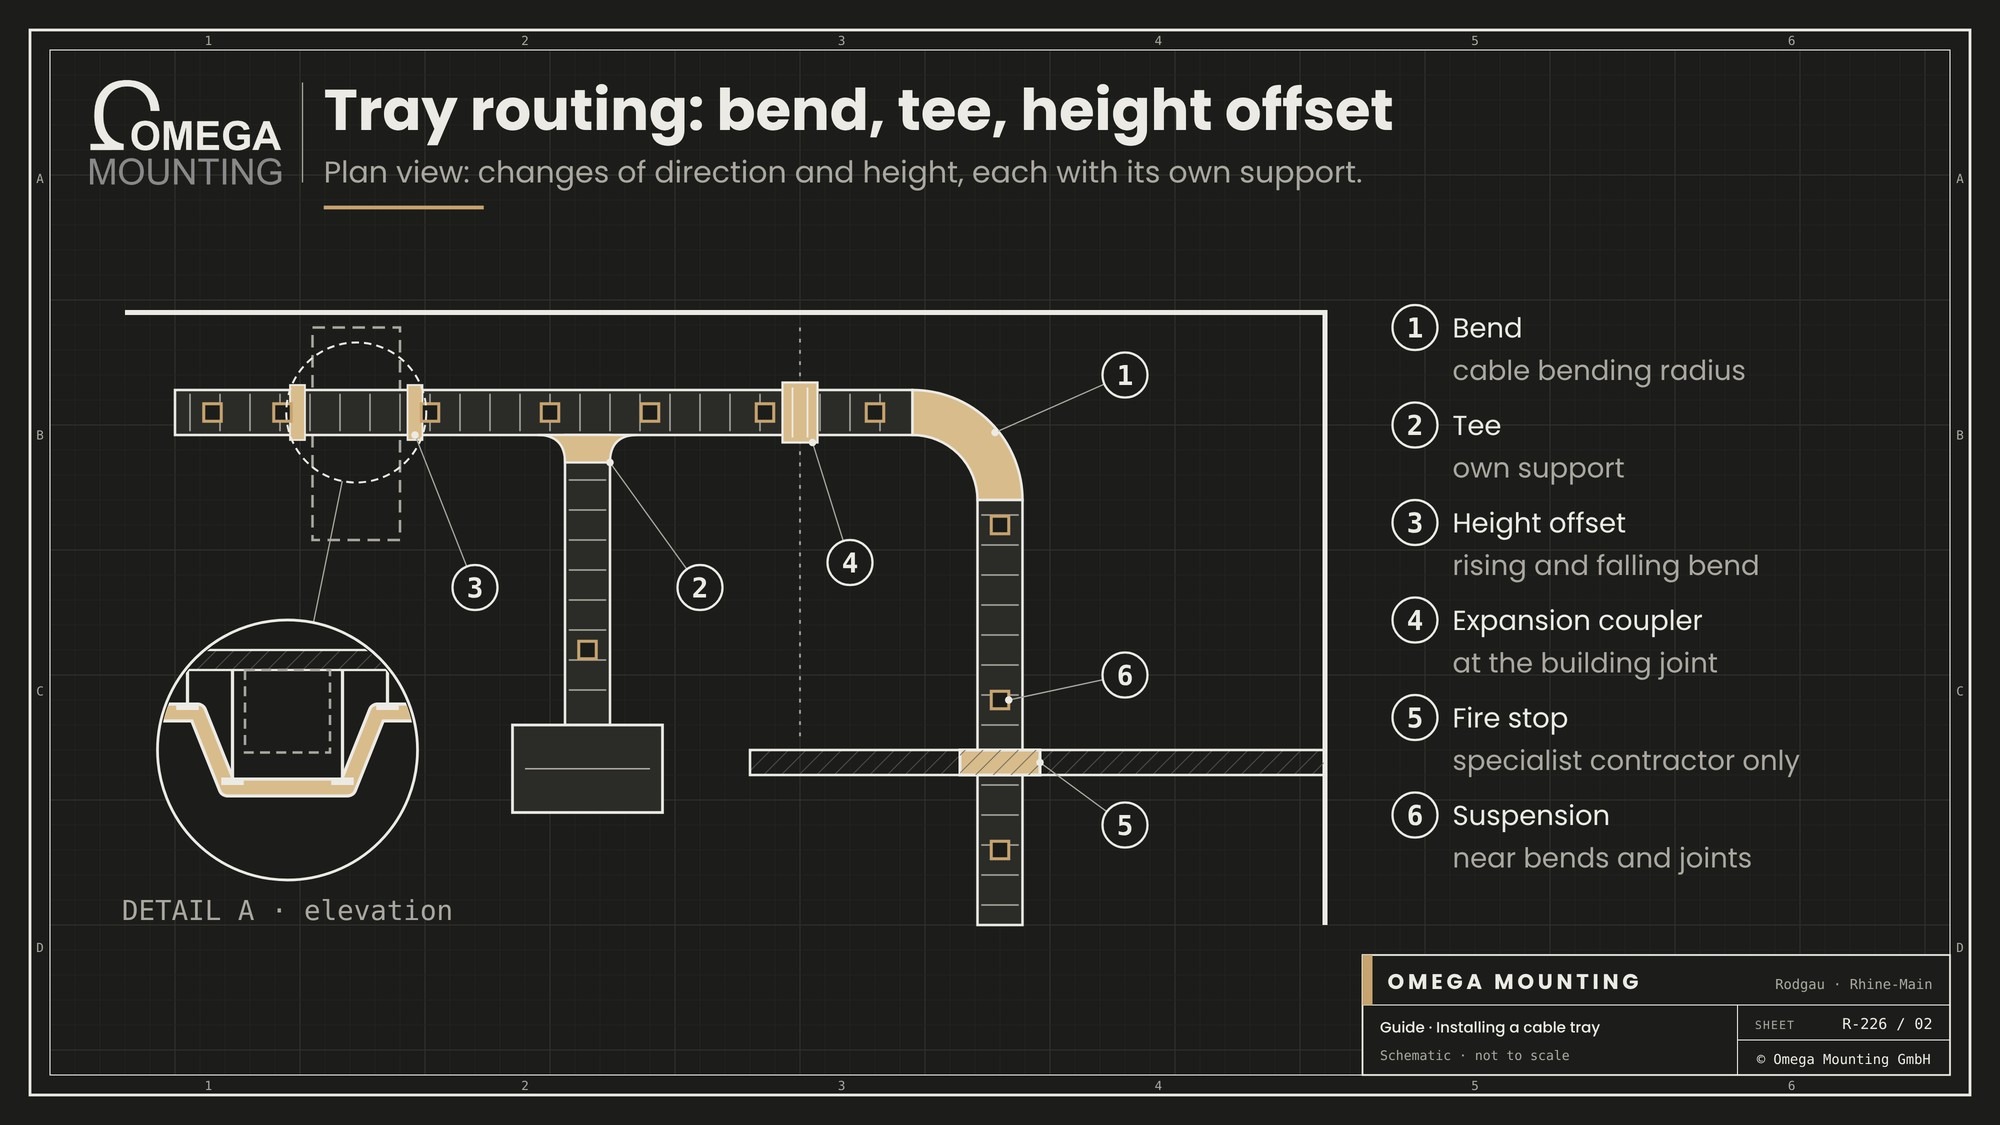
The straight run is the easy part. A tray becomes demanding where it changes direction or height.
Bends and bending radius
Every cable has a minimum permissible bending radius. The bends of the tray must be large enough for even the thickest planned cable to follow without kinking. With wire mesh trays, bends are often formed on site; the same rule applies then.
Branches
Branches lead cables to distribution boards, cabinets or equipment. They are made with fittings or specified cuts and supported so that the branch does not hang from the main tray.
Height offsets
If the tray has to pass under a ventilation duct or over a pipe, a height offset of a rising and a falling bend results. Both bends need their own fixing nearby. A height offset without a hanger is a point of failure.
Expansion joints
Where the tray crosses an expansion joint in the building, an expansion connector is used. It allows movement without the tray distorting or cables being put under tension.
Transitions to equipment
At the end of a tray there are switchgear cabinets, distribution boards or machines. The tray ends so that the cables can be led cleanly into the cabinet. In a data center every distribution cabinet stands exactly under its cable outlet; how these distribution units are built is explained in the knowledge article PDC and E-House.
Fire protection on cable tray: fire stopping and function retention only by specialist firms
In fire protection, the boundary between installation and specialist firm is particularly clear. This is about approved systems that work only as they were tested.
Fire compartments
If a tray crosses a fire wall or a ceiling between fire compartments, the opening needs fire stopping. Position and type are set by the fire protection concept. How openings in walls and ceilings are planned is described in the guide Planning an installation opening.
Fire stopping by a specialist firm
Fire stopping is installed, marked and documented by approved specialist firms according to the system's proof of usability. We install the tray up to the opening as the stopping system requires and leave the space free. We do not build the fire stopping itself.
Function retention
Some cables must keep working for a certain time in a fire, for example for emergency lighting, fire alarm or smoke extraction systems. For this there are tested cable systems: cable, tray, fixing and anchor together form one system. These systems are installed only by suitably qualified specialist firms and only with the tested components.
Change nothing
Fire stopping that has been completed is not opened to push in one more cable. A tray with function retention is not supplemented with parts from elsewhere. Whoever does that turns a tested system into an untested one.
Fire loads
Fire protection is also an issue outside penetrations, for example in escape routes. Whether cables may be run openly there is set by the fire protection concept. We keep to the tray routing that is approved there.
Earthing, equipotential bonding and cabling: the electrician's job
The tray is made of metal. That puts it into the building's electrical safety concept – and that is the job of the qualified electrician.
Equipotential bonding
Whether and how the tray is bonded into the equipotential bonding is set by the electrical design. Connections and measurements are carried out by the qualified electrician. We install the connectors as the manufacturer provides for a continuous connection and leave connection points accessible.
Pulling cables
Pulling in the cables is done by the electrician. He needs a finished, secured tray without sharp edges, with suitable bends and enough room to lay the cables in. We make sure of that.
Connection up to the main isolator
On equipment that we install ourselves, our own electricians connect on the equipment side up to the main isolator. The supply cable from the building, building electrics, incoming supply and medium voltage stay with the electrical contractor or the grid operator. The handover point is fixed beforehand.
Coordinating the sequence
The tray must be finished when the electrician wants to start. That is why we plan the installation in sections: a finished section is handed over while the next is still being installed. That way nobody waits.
Installing cable tray in a running data center
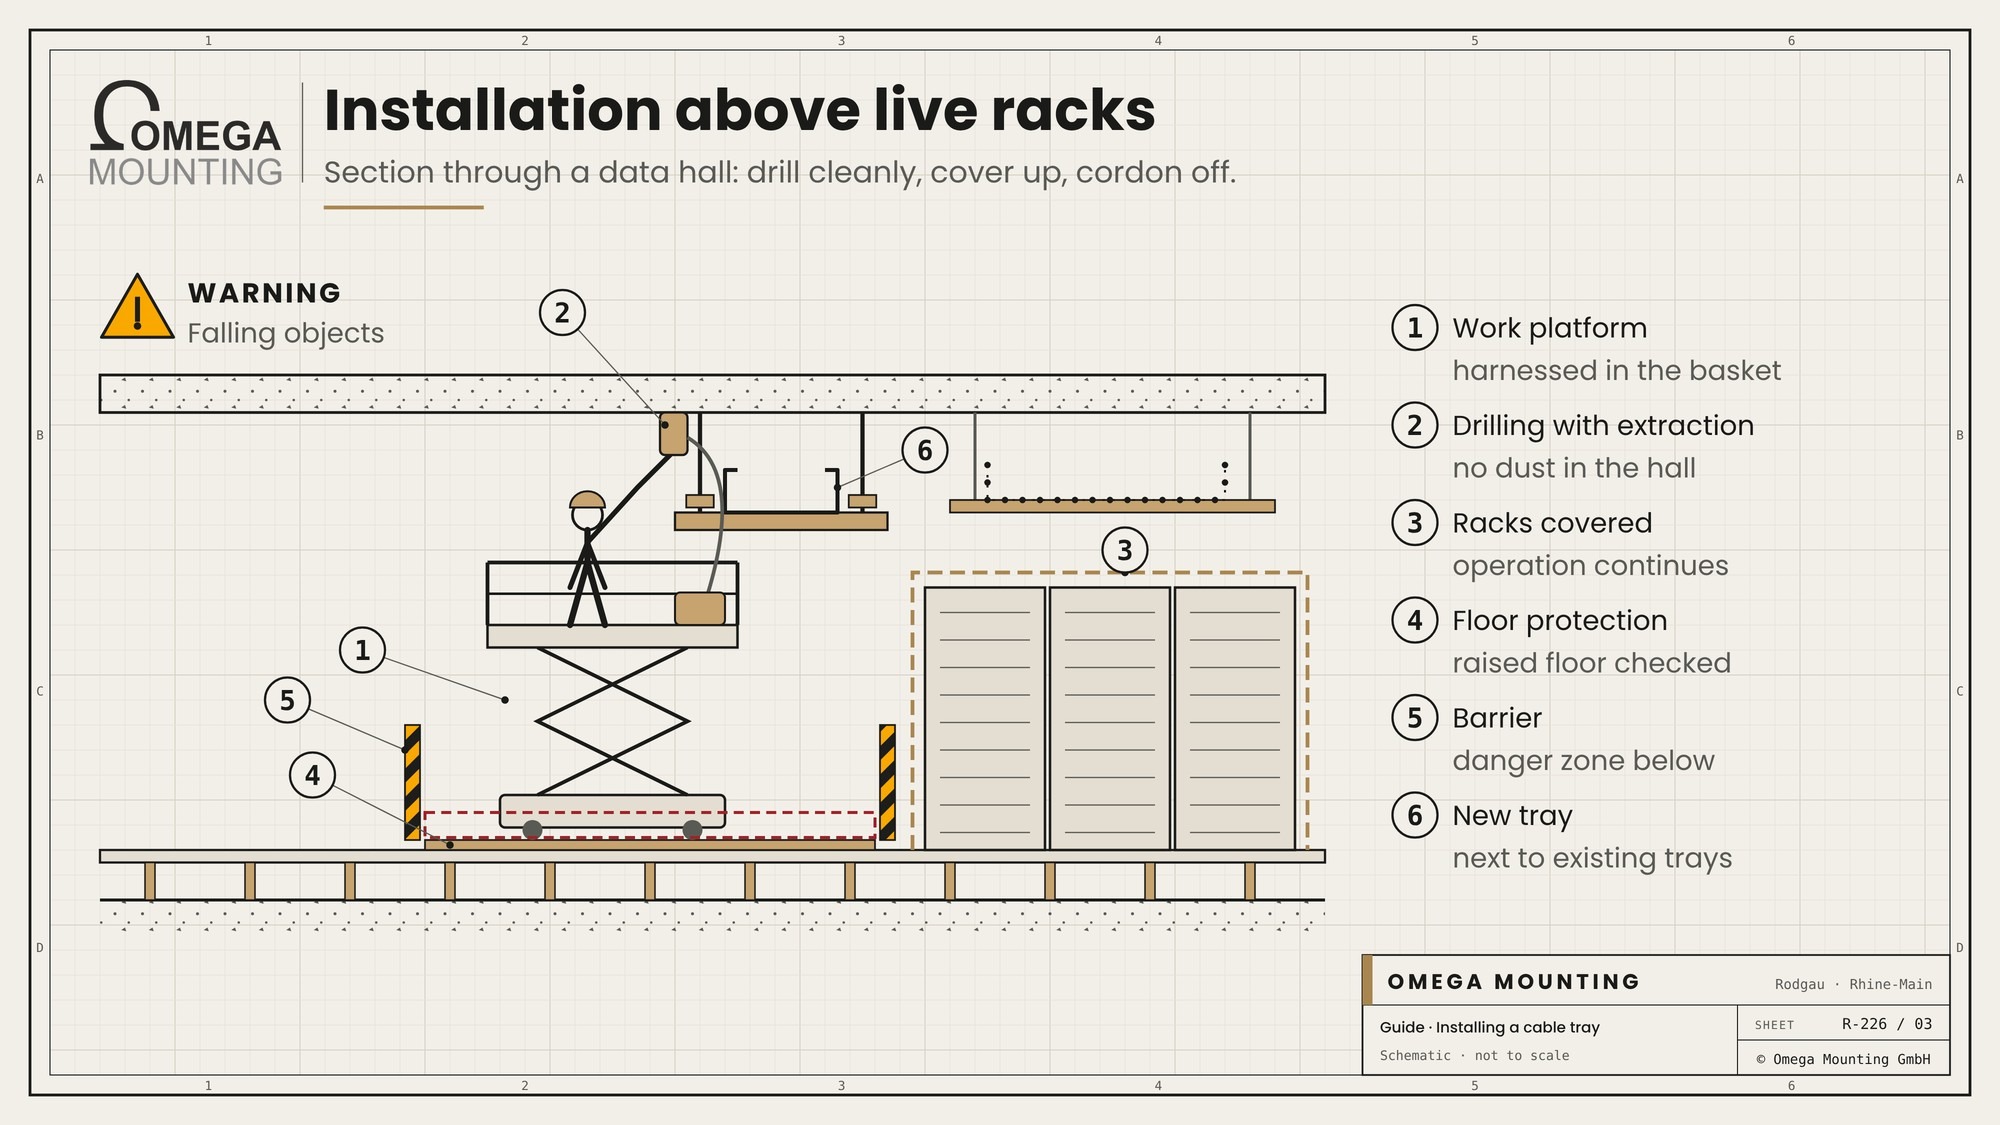
In a data center, installation is often carried out above live racks and next to sensitive equipment. Whoever installs cable tray in a data center therefore has one main task: disturb nothing.
Access and permissions
Access is only with registration, ID and induction, often through security gates and locked doors. Every work step is notified to the operator in advance, with risk assessment, personnel list and evidence for the work equipment.
Avoiding dust
Drilling dust has no place in a data hall. Drilling is done with extraction directly at the drill, tray parts are cut and deburred outside, and packaging stays outside. Racks below the work area are covered by agreement.
Smoke detectors
Dust can trigger sensitive smoke detectors. Whether detectors are covered or switched over during the work is decided by the operator alone. We work only in areas released for it.
Protecting the floor
MEWPs drive on finished floors, in some cases on raised floors. Walkways and travel routes are laid with protective fleece or boards, and the floor loading is checked beforehand.
Time window
Work over live systems is placed in agreed time windows. How installations in data halls succeed to a tight schedule is described in the guide series installation in data centers.
Acceptance: what is checked before handover
Before the electrician takes over, the tray is checked. What shows up here is quickly put right. What later disappears under cables is not.
Visual check
Height and route as planned, all fixings set and secured, joints in the right place, bends without kinks, no sharp edges, corrosion protection on cut edges.
Fixings
Anchors, nuts and clamps are checked on a sample basis or completely as specified. Missing locking devices are added.
Documentation
Photos of every section, anchor records, deviations from the plan and open points belong in the handover. How inspection points are fixed in advance is described in the guide Inspection and test plan for installation.
Snags
Whatever is still missing goes on a list with a responsible person and a date. How “almost finished” becomes a clean acceptance is explained in the knowledge article The punch list.
Handover to electrical work and fire protection
The sections are handed over to the electrician and, where necessary, to the fire protection specialist firm. Whoever has taken over confirms this in writing.
Safety rules for tray installation
- No installation without a risk assessment and briefing.
- Drilling starts only after the substrate is signed off and located.
- On the MEWP, everybody stays in the basket and clipped on.
- The area under the platform is cordoned off.
- Tools and small parts are secured against falling.
- Only approved specialist firms work on fire stopping and function retention.
- Nobody works alone; every team has a first aider.
Typical mistakes when installing cable tray
Support span estimated: the tray sags as soon as the cables are in.
Wrong anchor: an anchor for uncracked concrete sits in the tension zone of the ceiling.
Drilled without structural sign-off: in an existing building, the drill hits a tendon or the reinforcement.
Joint in the middle of the span: the connector sits exactly where the tray is most heavily loaded.
Bend too tight: the thick power cable does not fit through without kinking.
No room to lay in: the tray hangs so close under the ceiling that nobody can pull in cables.
Fire stopping damaged: a cable was pushed through a finished stopping afterwards.
Dust in the data center: drilled without extraction, detector triggered.
The mistake behind the mistakes
Almost all mistakes arise because the tray is treated as a side issue. Anyone who treats it as a load-bearing structure, with a plan, structural check and inspection, installs it right the first time.
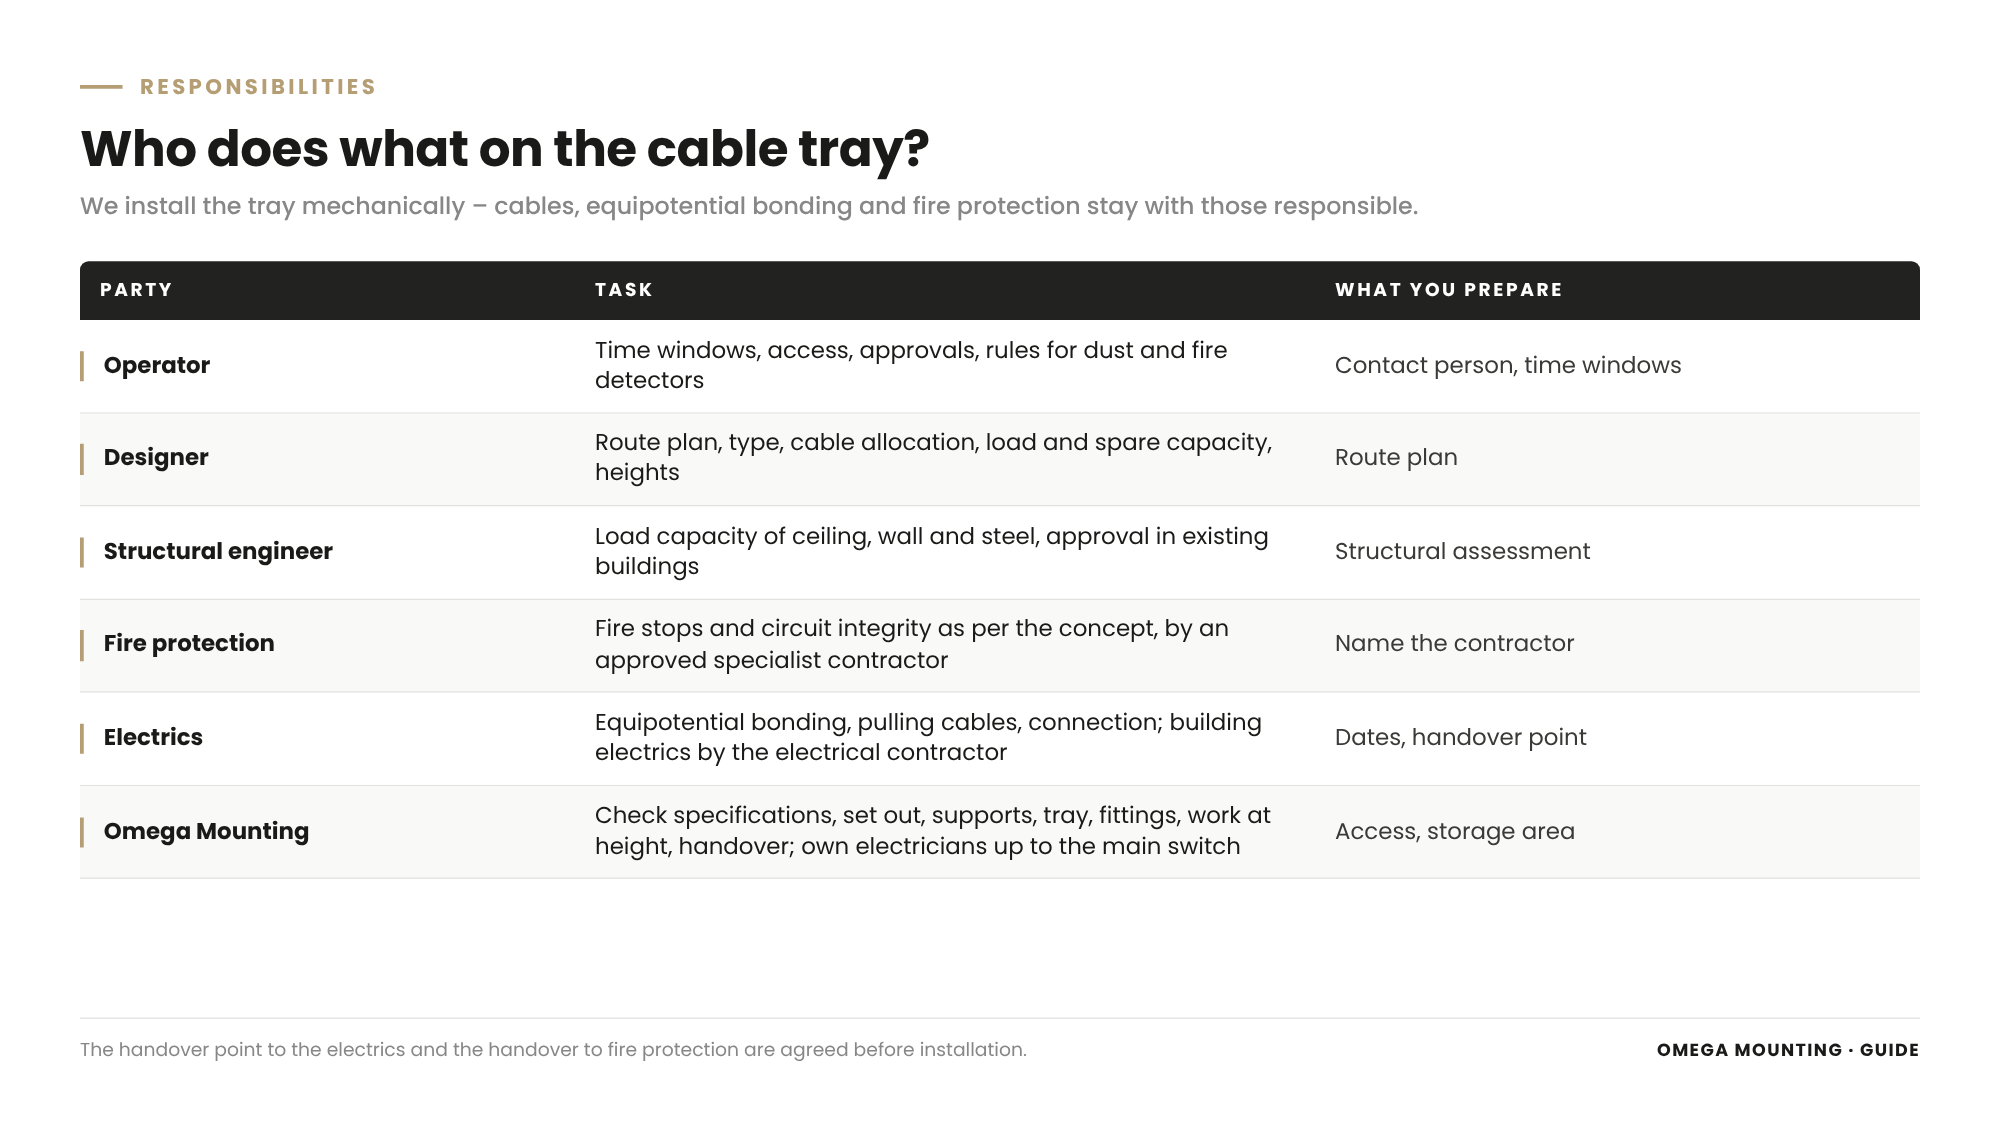
Who does what when cable tray is installed?
Operator
The operator sets time windows, access and safety rules, releases areas and decides on smoke detectors and work next to live equipment.
Designer
The designer sets the routing plan, type, cable occupancy, load and reserve and coordinates the heights with the other trades.
Structural engineer
The structural engineer assesses the load capacity of ceilings, walls and steel beams and signs off fixings in existing buildings.
Fire protection
The fire protection concept sets fire stopping and function retention. Approved specialist firms install and document them.
Electrics
The qualified electrician bonds the tray into the equipotential bonding, pulls the cables and connects. Building electrics and incoming supply are done by the electrical contractor.
Omega Mounting
We check the specifications on site, survey, set the fixings, install tray, fittings and covers, secure the work at height and hand over with documentation. On equipment that we install ourselves, our electricians connect on the equipment side up to the main isolator.
Installing cable tray: what it means for your planning
Are all specifications available?
Routing plan, type, cable load with reserve and the manufacturer's data on support span and load should be fixed before installation.
Is the substrate clarified?
For existing ceilings and existing steel, a structural sign-off is needed.
Who does fire protection and electrical work?
Name the fire protection specialist firm and the qualified electrician early so that handovers can be planned.
How does the work run in operation?
Clarify time windows, access, dust protection and smoke detectors with everyone involved beforehand.
What belongs in the order for tray installation
Service
Checking the specifications, survey, fixings, tray, fittings, covers, securing work at height, documentation and handover.
The frame
Time windows, access, MEWPs, storage area, dust protection, coordination with electrical work and fire protection.
Record
Photos, anchor records, list of deviations, snags and handover record.
Legal framework
Cable tray installation is governed, among other things, by the German Occupational Safety Act with the risk assessment, the Industrial Safety Ordinance for MEWPs and other work equipment, state building regulations with the rules for cable installations and fire protection, and the approvals and proofs of usability for anchors, fire stopping and function retention. Equipotential bonding and connection are governed by the electrical engineering rules. This guide is not legal advice – which requirements apply in your building, you clarify with the designer, the fire protection planner and your occupational safety specialist.
Installing cable tray in the Rhine-Main region: how we work
From Rodgau we are quickly in Frankfurt, Offenbach, Hanau, Darmstadt, Aschaffenburg and at the data center, logistics and industrial sites of the region – and with our own teams we work nationwide. If you want cable tray installed, in the Rhine-Main region or beyond, you get installation, work at height and coordination with electrical work and fire protection from one contractor.
We work in data centers, production halls and logistics centres, often in live operation. How we proceed in industrial installation is shown on the page on Industrial installation.
In practice: a tray that carries, and an electrician who can start pulling cables straight away.
Project examples
We come across cable tray on almost every building services site. Three related jobs show what matters – none of them was a pure tray installation, but all had to do directly with cable routes, height or live operation.
Under the cable trays of a data hall
In a data center in the Rhine-Main region, we moved in and installed numerous distribution cabinets in several data halls. The cable trays on the ceiling were prepared, and every cabinet had to stand exactly under its cable outlet. The halls were laser-surveyed for this and all routes laid with protection boards and fleece. The electrical trade carried out the electrical connection. The job is described in the report Moving in and installing PDCs in a data center.
At height in a live data center
In a live data center in Frankfurt, we replaced an air conditioning unit. Access was only through security gates and locked doors, the work was done with the scissor lift up to the ceiling, with full fall protection. Walkways and travel routes were laid with protective fleece and taped down, and every lift was prepared with a lift plan. The job is described in the report Replacing a CRAH unit in a live data center in Frankfurt.
Cable routes at many loading bays
In a logistics centre near Leipzig, we installed vehicle restraint systems at many loading bays. The order included laying all the cable routes needed; we carried out the electrical work on the systems with our own people, and the commissioning together with the system manufacturer. The job is described in the report Installing vehicle restraint systems in a logistics centre in Leipzig.
Do you have a tray installation coming up?
Send us the routing plan, the type and your time window – we will check the documents and tell you how the installation can run. Get in touch now.
What this means for your role
Project and site managers: Insist on complete specifications for load, support span and fixing before the installation starts.
Planners: Coordinate the heights with all trades and leave room to lay in the cables.
Operators and technical managers: Fix time windows, access and rules for dust and smoke detectors early.
Facility managers: Keep routing plans, anchor records and photos – they help with every later addition.
Electrical contractors: Agree the handover points and the sequence of the sections with the installation contractor.
Buyers: Ask whether MEWPs, dust protection and documentation are included in the quotation.
Occupational safety specialists: Check the risk assessment, work at height and barriers.
Cable tray checklist: on request
For your projects we have put together a checklist for tray installation. It covers routing plan, type, loads, support spans, fixing substrate, fittings, clearances, fire protection, equipotential bonding, work in operation and acceptance. Request the checklist via our contact form – quoting “cable tray checklist”.
Why Omega Mounting?
From over twenty years of practice in installation and move-in, we know that cable tray is a load-bearing structure, not an accessory. That is why we check specifications and substrate before we drill, work at height with a platform, barriers and secured tools, and keep to the boundaries with electrical work and fire protection. On equipment that we install ourselves, mechanics and equipment-side electrics up to the main isolator come from one contractor, and we never send just one fitter. In practice: a tray that holds, and clear handovers. Talk to us about your project – we will get back to you promptly.
Conclusion
Installing cable tray means putting type, fixing, loads and routing into practice according to the specifications of the designer, manufacturer and structural engineer. What counts is load-bearing anchors, correct support spans, clean bends and height offsets, and safe work at height.
The tray is mechanical work. Equipotential bonding, cable pulling and connection are done by the electrician, fire stopping and function retention by the approved specialist firm. Anyone who plans these boundaries cleanly gets a tray that carries for years. If you want to have cable tray installed, get in touch with us.
Planning a move-in, installation or maintenance in the Rhine-Main region?
Tell us briefly what you need – we'll come back with an honest assessment.
Free, no-obligation callback
You may also be interested in these guides

About the author
Tobias Schott
Managing director of Omega Mounting GmbH, Rodgau · more than 20 years of hands-on experience in installation and maintenance
A trained mechatronics technician, working in maintenance, servicing and industrial installation since 2004 – first alongside his father, and with Omega Mounting since 2012: from overhead conveyors in Frankfurt to the crane system in a new-build hall. He plans and leads lifting operations as an appointed person (AP) in data centers and on industrial sites in the Rhine-Main region, trains and examines operators of cranes, mobile elevating work platforms and telehandlers, and is a qualified occupational safety specialist. On jobs abroad he is known as the “German Troubleshooter” – the person you call when a site gets stuck. He learned what quality means from his father, not from a manual: Made in Germany as a standard for his own work, not a label. That is why quality comes first at Omega Mounting – ahead of speed and price. He writes these guides from that practice: what works on our sites is in them – what exists only on paper is not.
Frequently asked questions
With approved anchors in a load-bearing substrate, threaded rods or profiles as hangers and brackets on which the tray rests. Support span and load follow the manufacturer's data and, in existing buildings, the structural sign-off.
The cable channel is a sheet-metal profile with a base, the wire mesh tray is a wire grid, and the heavy-duty cable ladder is a heavy cable ladder with side rails and rungs for thick power cables over long support spans.
The manufacturer sets this for its system in load charts. The larger the support span, the lower the permissible load per metre.
The designer, from the planned cable occupancy and a reserve for later additions. The installation puts this specification into practice.
No. For prestressed concrete and hollow-core slab ceilings a structural sign-off is needed, and reinforcement and cables are located before drilling.
Fire stopping and function retention are installed by approved specialist firms according to the fire protection concept and the system's proof of usability. We install the tray so that space remains for this.
The qualified electrician. He bonds the tray into the equipotential bonding, pulls the cables and connects – on equipment that we install, our own electricians on the equipment side up to the main isolator.
Yes. From Rodgau we are quickly on site in the region, and we work throughout Germany with our own teams.
Send us the routing plan, the type and your time window. We will check the documents, clarify the substrate and access and come back with a proposal. Go to the contact page.
 English
 German